Monday, June 27, 2022

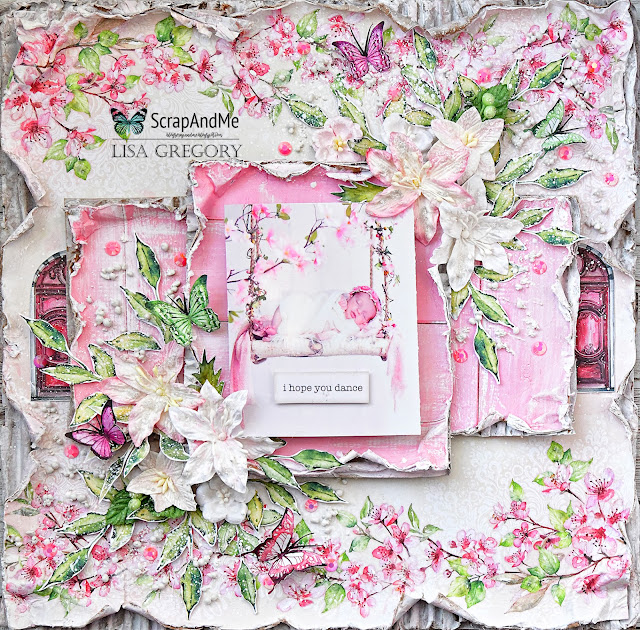
Scrap And Me "Pink Blossom 2 paper collection"

I have been honored to Guest Design for Scrap and Me. I couldn't wait to work with this beautiful collection. Pink Blossoms 2. I have so many pictures of my granddaughter when she was born, and wearing pink! This photo goes perfectly with the Pink Blossom 2 Collection. 

I started by adhering the 12x12 paper on a piece of 12x12 corrugated cardboard using Mod Podge. After it dried, I wet the edges of the paper and cardboard and tore away  the paper along with the top layer of cardboard exposing the corrugated part of the cardboard. I distressed the ends of the top layers and tore and curled it in a  few places. Once I was satisfied with the distressing, I let it dry, then brushed the exposed cardboard with white gesso.


For the base of the photo mats, I used the Paper Blossoms 07/08, mounted it on 3 pieces of corrugated cardboard and did the same distressing treatment as I did with the background. I stacked them onto the background. I cut a door from the Windows and Doors 2, cut it in half, and tucked each piece on either side of the mat. I placed a piece of cardboard under the photo, and placed it in the middle. 


I fussy cut the leaves from the Leaves 4 sheet, and butterflies from the Butterflies sheet. I placed my flowers on opposite corners of the mat, then tucked the leaves in and around all of around the 49 and Market Stargazer flowers. I scattered some butterflies on the layout as well. I only adhered the butterflies by the bodies only, then fluffed up the wings. 


You can see the layers of dimension. I finished off the layout using Art Stones, rhinestones, and then spattered white paint over the floral and leaves clusters. I printed out the words "I Hope You Dance", and adhered it to the bottom of the photo. 


Scrap and Me Products Used:

Pink Blossom 2  (07/08)

Pink Blossoms 2 (01/02) 

Leaves 4

Doors and Windows 2

Butterflies

47 and Market Products Used:

Stargazers Petal Pink

Stargazers Simply White

Friday, June 24, 2022

Heartfelt Creations Alumni June 2022 Blog Hop


Welcome to the June 2022 Heartfelt Creations Alumni Blog Hop. You can have a chance to win 1 of 2 $25 Gift Certificates to the Heartfelt Creations store.  The hop begins at 8AM EDT on Friday, June 24th,2022 and runs until 11:55PM EDT on Monday, June 27th, 2022The winners will be announced on the Heartfelt Creations blog and Facebook page on Wednesday, June 29thThe winner has 72 hours to claim the prize by emailing socialmedia@heartfeltcreations.com. Please write “Winner of the June 2022 Alumni Hop” in the subject line. Just leave some love on each of the designers blog, and you could be picked a winner!! 


I wanted to create a modified slimline card. It is not as tall as the traditional slimline  card. This card measures 3.5 x 7.5. I think it is the perfect size. I started by creating the base with heavy white cardstock. I chose 2 colors from the Clematis Paper pad. Green and a purple. These colors compliment each other so well. I placed the purple on the base of the card, then stacked the smaller green paper over the purple. I cut the green 1/2 inch shorter so it left a 1/4 inch border all around. 

For the flowers, I inked the stamps using black Archival Ink onto white card stock. I then colored the flower middle with Archival Ink in Fern Green, then the petals with archival Ink in Majestic Purple. I did blend the purple a little into the green. I used the Small Wild Rose 3D shaping mold , then I added the Ribbit Prills to the middles of the flowers. I finished them by dusting them with the Crystal Clear. 

I placed the leafy accents on the card first. I die cut them with one of the green papers in the Clematis Paper Pack. I stamped them using Archival Ink in Fern Green, then die cut them. I used the Leafy Accents  3D Shaping mold to shape them. I added the flowers cascading down the card. To finish the card, I created a small sentiment, mounted it on chipboard and placed it on my card. Simple but sweet. 

Thanks for hopping on over! 


Heartfelt Creations products used. 

Climbing Clematis Paper Collection

Small Wild Rose Die

Small Wild Rose Cling Stamp Set

Leafy Accents Die

 Leafy Accents Cling Stamp Set

3D Leafy Accents Shaping Mold

3D Small Wild Rose Shaping Mold

Rajni Chawlas Crystal Clear

Ribbit Prills

Ranger Archival Ink Pad_Fern Green

Ranger Archival Ink Pad-Majestic Violet


BLOG HOP ORDER:

Kathy Clement- Kathy by Design

Amarilys Doria- Amarilys’s Creations

Alissa Wells- Will Run for Stamps

Gloria Stengel- Scraps of Life

Lynn Stanborough- What the Heart Wants

Bozena Bodynek- BBartCards

Candy Slabaugh- Candy’s Creations

Monica Edwards- Simply Monica

 YOU ARE HERE: Lisa Gregory- What a Beautiful Mess

NEXT: Oksana Clegg- Everyday Crafting

Vicki Dutcher- All I Do Is Stamp

Heartfelt Creations- Heartfelt Creations Blog

Wednesday, June 22, 2022

Vintage Artistry Collectors Volume 2 / Pair of Trifold Folios

I created this project for 49 and Market. I love creating folios. This time I created 2 of them. Similar in size and structure, but using different patterned paper from the Vintage Artistry Collectors Edition Volume 2. The range of colors in the collection is beautiful. The collection is packed with papers, laser cuts and washi tape.  The design of the folio is pretty simple. It is a great way to use up some of your smaller piece scraps to create pockets and tags. Of course what cover would not be complete with out the gorgeous flowers and ephemera!. I hope you are inspired to create your own folio. I have the step by step instructions on how to create one of your own. Plenty of room for photos and journaling. 


Pair of 8"x4" sized Trifold Folios. 

Step by Step instructions:

Using 1 12x12 sheet of patterned paper, Cut it down to 8 inches, bearing in mind, where you want to see the design on the outside of the Folio. Put aside the 4 inch cutaway piece. 

Using a scoreboard, place the 8 inch paper on the board with long side left to right, and score at 3 3/4, 4, 8, and 8 1/4.

Fold at the score lines and burnish the creases. Fold over the right side, then the left. The left side should be placed over the right. You should have two 1/4 inch spines, left and right. This is the trifold Folio. There should be a 1/4 inch gap when folded over. This will allow for some bulk on the inside of the folio. 

Take the 4 inch piece that you cut away, and cut it down to 8 inches. Then cut the 8 inch piece in half long ways, to create 2 8x2 inch pieces. These pieces will be adhered to the inside of the Folio on both ends to create 2 pockets. Make sure to only place glue on 3 sides and leave one side open for a pocket. 


This shows how the 2 pieces are adhered to both sides of the folio. Leave inside ends open to form a pocket. 

Using white cardstock, cut 8 pieces, 3 3/4 x 4 1/4. 

Using a score board, score at 1/2 inch on the short side for all 8 pieces. Then fold over and burnish flat. I will refer to these pieces as "flaps". 

Using patterned paper, cut 8 pieces 3 1/2 x 3 1/2. Adhere these pieces over the 8 "flaps." On the outside of the folded over flap, place a piece of  1/2  inch Score Tape or adhesive  of your choice. These will be used to create the waterfall in the middle of the folio. 

To create the waterfall, place the first flap in the middle section of the folio, about 1/4 inch of the way down from the top. To place the next flap, flip open the one you just adhered, and line the top of your flap to the edge of the flap you just adhered. Burnish. Do this for the rest of the flaps. You now have 8 flaps that flip up, then back down again. If you want, you could also create another 8 pieces for the backside of the flaps. The backs can be used for photos or journaling. You could place photos on the front pf your faps, then journal about that photo on the back. 


Create tags that will fit into the inside left and right pocket folders. Or you could use those tuck spots for more photos. 


You can decorate the cover as you wish. On both covers used laser cuts, and flowers were used. On this one, a ribbon tie closure was used. The ribbon was secured on both spines using a hot glue gun. 

Laser cuts, Bubbles and Baubles,  and flowers on this one. 


Here is the inside of the trifold folio. There is plenty of room for photos and journaling, and you can get more creative by adding more to fill your tuck spots. Tags, photos, a hidden letter, and even smaller booklets for added journaling. 


I used my favorite Labelzz and Tagzz tag die from Crealies  to create the tags. For the second tag, I put 2 tags together, and on the left edge, joined them together using washi tape as a hinge. 


Close up of the cover. I simply adore the flowers and butterflies from 49 and Market. 


49 and Market Products Used:

Vintage Artistry Collectors Edition Volume 2

Royal Posies Orchid

Royal Spray Orchid

Royal Posies Sunshine

Daisy Stems Lavender

Wishing Bubbles and Baubles Lilac


Thursday, June 16, 2022

49 and Market ARToptions Viken DREAMER 12x12 layout

Hello Lovelies. This week I am showcasing a 12x12 layout created with the very gorgeous ARToptions Viken. I can not tell you just how much I am in love with this collection as it has my favorite colors. I can never go wrong with purples and greens, and those blues in-between are just beautiful! This collection has it all. Ephemera, tags, rub-ons, washi tape, chip board, and laser-cuts!! I didn't even know where to begin! I just created a base, and the rest came naturally. 

 
The title Dreamer is a laser cut, and the words on the bottom is a sentiment strip from the ephemera bits collection that I cut apart. I matted the words  using the waste part (back of laser cuts)  as it is a beautiful purple color. I placed a small piece of chipboard underneath and adhered it to the layout. The flower/leaf cluster is one of the laser-cuts that I cut in half, and tucked one of the halves on the top, and one on the bottom. I added a piece of corrugated cardboard under each piece. 


I  wanted the look of a real window. So I cut a piece of acetate ( I use clear cake collar, you know for baking!!)  and placed it behind the window ephemera using double sided tape. I then placed thin strips of thick chipboard along the back of the window to pop it up off of the photo. Before I attached the photo to the back of the window, I placed some tiny laser cut butterflies on the photo. Then I attached the photo to the back of the frame. I had lifted the wings on the butterflies a bit for a 3d effect. I topped it with a laser cut ribbon and bow. 


I love the tags! So many shapes, sizes, and colors. And I love that the eyelets and strings are already attached. I added a piece of corrugated cardboard under them to pop them  off of the page. The butterfly on the tag is actually a rub-on that I rubbed onto a white piece of cardstock. I cut it out, and attached it to the tag by the body only, and I fluffed up the wings. Just another way to use the rub-ons. I simply went through my stash of 49 and Market flowers and chose a few different packs in the colors that matched  perfectly. You don't always have to use an entire pack on your projects, just pick some out from a few different packs to create your floral arrangements. I find that they go a long way, and look beautiful!


To finish the layout, I added some spatters using distress ink in colors that perfectly matched the colors in the papers. I used some art stones, and rhinestones around the layout as well. 

49 and Market Products Used:

ARToptions Viken -12x12 Collection Paper Pack

ARToptions Viken - Splendid

ARToptions Viken - Ephemera Bits

ARToptions Viken - Laser Cut Elements

ARToptions Viken - Tag Set

Enchanted Petals - Twilight

Enchanted Petals - Sea Glass

Enchanted Petals - Mint

Garden Petals - Sea Glass

Sugar Stems - Huckleberry


Wednesday, June 1, 2022

Spectrum card kit/ Envelope Mini Album

 Hello Lovelies. I am so excited to share with you what I have done with the Spectrum Sherbet Card Kit. I created a mini album. The Spectrum line is so full of gorgeous accessories that you will want it all! The card kit isn't  just for creating cards! This mini came together so easily as it is held together with book rings. Easier than creating a spine. 

If you would like to make one of your own, the step by step  instructions will be on my personal blog. 

I love the fresh bright sunny colors in the Spectrum/ Sherbet collection. It reminds me of summer. I took inspiration from the wonderful artist Amber Mitchell AKA bambidearr. She makes the most fantastic tiny mini albums! I am obsessed with her minis. 

Following this post, I have created a photo step by step tutorial on how I created this mini from the card kit. Click HERE for the tutorial. 

Creating this mini album, I added a few fun element's that I created with the chipboard. The charms hanging from the book rings were created using the chipboard for the charms. I glued 2 circles wrong sides together, and adhered a heart opposite side of the sentiment. I punched a hole on top and added a jump ring. Then just used some of my jewelry supplies to create the dangles. 

Here is a closeup of the book rings with the dangles. But you could hand just about anything you want. I thought of died seam binding as well. 

The covers were created using chipboard for the base, and covered with patterned paper.  The envelopes were put together using glue to secure the flaps. I love that the card kit is so simple to use and everything is cut out for you. All you have to do is fold and glue! Here is the back cover.  I used book rings to put it together, and I added large eyelets for a finished look. 

I used the entire kit using all 8 cards and envelopes. It made for a fun chunky album. I did have a few of the rub-ons from the kit left over as there are many in the kit. The cards are a generous size and I have plans to adhere photos to the inside of the cards with room for journaling. I did have to create an extension on the envelopes to punch holes in. Other wise it you punched holes in the envelope,  you wouldn't be able to slip the card in. I think it added a bit of whimsy to the envelope pages. 


Thank you so much for visiting the 49 and Market blog. I hope you are as inspired as I was to create your own envelope mini. This one was a lot of fun. Visit my blog What A Beautiful Mess for the step by step instructions. xo


49 and Market Products Used:


Spectrum Sherbet Envelope Mini Album Tutorial

The new 49 and Market Spectrum/Sherbet Card Kit isn't just for making cards!! I'll show you step by step, how I created this Mini album using the kit and its contents. With just a few extra items, you can create this awesome keepsake, that can be used for photos, journaling or just for fun. 


Here is your step by step tutorial on how I created this mini album. To complete it as I did, you will need the following. 

3 one inch book rings

2 pieces of 5 x 6 3/4 heavy chip board

6 wide eye eyelets (I used We R Memory Keepers)

Flowers and Embellishments of your choice. There are so many collections in the Spectrum/Sherbet collection. I used chipboard pieces, tags, washi tape and Frames from the collection. 

A few sheets of  12x12 Spectrum/Sherbet paper

A border punch (I used Fiskars border punch Apron Lace)

Score Tape (or any brand 2 sided tape)


*********************************************************************************

To prepare for the album, I put all 8 envelopes in the Card Kit together. You could also fold the cards, and set the cards aside.


Cut 8 pieces of paper 2 1/2  x 4 1/2 inches. These are going to be used as hinges on the envelopes, so decide if you want a coordinating color, plain paper, or matching to your envelopes. 


Place them on a score board short side up, and score longways down at 1 1/4 inch. 

 
This is optional, but you can use a decorative border punch to punch the edges on both of the long sides.


 This is what they will look like when they are all done. I will refer to them as hinges. 


Adhere 1/4 inch of the end of the hinge, to the short edge of the envelope making sure there is close to 1 inch of overhang from the fold line. May be a little less if you used a decorative punch. Then put a little adhesive on the inside of the fold and  fold over adhering the opposite of the hinge to the front of the envelope. This hinge will allow you to punch holes for the book rings, without obstructing the inside of the envelope.  It looks pretty too!! Make sure you adhere the hinges to the same side of the envelopes if you want them all going in the same direction. It is up to you. 

 
Now prepare your front and back covers. place double sided tape to the insides of the 2 pieces of chipboard as shown. 

 
We are going to wrap the chipboard with card stock. Cut 2 pieces of 7 x 8 3/4  inch paper you want for the front and the back covers. Place your chipboard adhesive side down onto your paper leaving 1 inch paper all around. Miter the corners by cutting off paper at a 45 degree angle leaving a small space on the corners. Do not cut up against the corners. Place double sided tape on the flaps of the paper. 


Starting on the short ends wrap your paper around the chipboard, then do the long ends. Now your chip board is neatly wrapped. 


Here is what your cover and back should look like. Make note of the direction of your designs. This pattern, it didn't matter to much. Either way would look fine. 


Now we will finish the insides of the front and back covers. Choose the papers you want for the insides. Cut 2 pieces  to 6 3/4 x 4 3/4 inch. This will leave a 1/8 inch gap all around the insides of your front and back covers. Adhere the papers to your chipboard. Figure out where you want your 3 holes to be, and punch the holes. This would be a good time to set your eyelets if you want to use them. I find it gives the front and back a clean look, and the colors are fun as they match the papers. It may be easy to create a little template for your holes. This way they are all in the same place. 


This is what the front and back cover looks like. The book rings fit through the wide eyelets. Standard eyelets may be to small. If you have a Cropadile, it is so handy for punching holes through chipboard as well as setting the eyelets. 


Now punch holes through the flaps on the envelope so that they match the front and back cover. Be careful not to punch on the envelope itself. You wont be able to slip the card inside. 


Now you are ready to put the album together. Open your book rings and place the back cover on, then the envelopes, and end with your cover. Close your book rings. Your envelopes should open easily without any obstruction on the inside of the envelope. The hinges are essential to this. 


Now it is time to decorate your card covers. Or the inside if you want to. 


I chose to use the rub-ons included  in the card kit. They are absolutely beautiful!!


Tuck the cards into the envelopes, Decorate the cover as you want, and call your envelope mini album finished!! 

You can visit my post for the finished mini and more details HERE.