Friday, February 25, 2022

Heartfelt Creations Alumni February 2022 Blog Hop


The hop begins at 8AM EST on Friday, February 25,2022 and runs until 11:55PM EST on Monday, February 28th 2022.
At that time a randomly chosen comment from a mystery blog will be chosen to win a $25 Heartfelt Creations Gift Card. Heartfelt Creations is also giving away a second $25 gift card for a randomly chosen comment from their blog. So there will be 2 winners!!
The winners will be announced on the Heartfelt Creations blog and Facebook page on Wednesday, March 2nd, 2022
The winner has 72 hours to claim the prize by emailing socialmedia@heartfeltcreations.com. Please write “Winner of the February 2022 Alumni Hop” in the subject line.                                                                                              *****************************************
I created a sunny sunflower card using the Rustic Sunflowers. To prepare my card, I created the card with heavy white cardstock. I then cut a piece of watercolor paper the same size as the front of the card. I lightly spritzed the watercolor paper, and pressed some distress ink in Dried Marigold on a glass mat, then sprayed a little water on the mat as well. I placed the watercolor paper onto the mat and moved it around until it was full of color. I dried the paper and did some machine sewing around the paper. I then used double sided tape on the back of the inked paper, and adhered it to the card front. I did some stamping using the Rustic Sunflower die and Leaf Green ink. 

I die cut 2 circles from the Decorative Circle frames die, and stamped the sentiment onto the smaller circle. I layered the circles using corrugated cardboard in between each layer. I set it aside. I created a small bow using cream colored Sari fabric and hand died it with Dried Marigold Distress Ink. 

I created the sunflowers Stamping the flowers with Ranger Archival Ink in Tea Rose, using 2 layers for each flower. I layered the colors with distress ink in Mustard Seed on the entire flower, then used Dried Marigold in the middle. I also added some Ranger Archival ink in Tea Rose to the middles. I shaped them using  a ball stylus from the Deluxe Flower Shaping Kit, and after layering them, I added the Redland Elements to the middles. The smaller purple flowers are the Arianna Cling Stamp Set. I used Distress Ink in Seedless Preserves and Distress ink in Mustard Seed, and  Ranger Leaf Green in the middle. All of the leaves are stamped with Ranger Leaf Green. I then watered down some glue, lightly painted the flowers and leaves and sprinkled them in Rajni Chawla's Crystal Clear. 


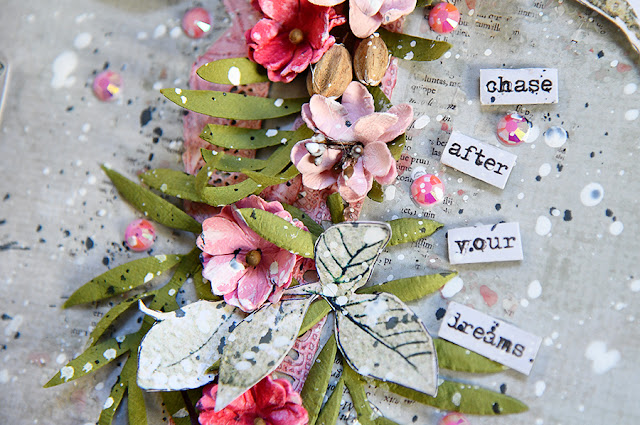
Here is a close up of the flowers and leaves. When the card was done, I placed a piece of paper over the sentiment and circles, and did a little spattering of  paint with white watered down acrylic paint. To create a fine spray of paint, I used Tim Holtz Splatter Brush dipped into the thinned out paint. 


I hope you are inspired to create Rustic Sunflowers of your own! They can be used for cards, layouts, and those off the page projects. The possibilities are endless. 

Get Ready To Hop!!!

Kathy Clement:  Kathy by Design

Carole Wright:  The Pretty Paper Patisserie

Vicki Dutcher:  All I Do Is Stamp

Amarilys Doria:  Amarilys's Scrappy Corner

Candy Slabaugh:  Candy's Creations

YOU ARE HERE! Lisa Gregory:  What a Beautiful Mess

Monica Edwards: Simply Monica

Alissa Wells:  Will Run for Stamps

Oksana Clegg:  Everyday Crafting

Heartfelt Creations: Heartfelt Creations Blog

Heartfelt Creations Products Used:

Wednesday, February 16, 2022

49 and market ARToptions Avesta

Hello Lovelies. Today I am bringing you a  layout created with one of the newest collections from 49 and Market. It is the Artoptions Avesta Collection. There are so many embellishment collections to the paper series, which makes it the perfect collection for all paper crafting artists. The combination of pinks and greens is simply stunning. I didn't do any mixed media with this layout other than a few paint splatters at the end, because didn't want to take away any of the beauty in this paper. I mounted the 12x12 paper onto a piece of corrugated cardboard. I used the Roughly Sewn Rub-Ons in Black around the edges of the layout. My "canvas" was now ready for embellishments! 


To frame the photo, I built a Frame set using 2 of the frames from the Laser Pack set and one of the small floral framed from the Ephemera Bits collection. To add depth, I backed them with thick chipboard in 2 and 3 layers to pop them off of the page. Once they were adhered to the background paper, I started layering the flowers and leaves. I also tucked in a few laser cut butterflies,  and topped the frame with a laser cut bow. 


For the bottom half of the layout design, I added a pink lace laser cut vertically down the middle, and layered the leaves and flowers over it. To the bottom left, I layered a frame with a tag (topped the tag with the single ply jute) and embellished it with leaves, flowers and butterflies. Using flowers from several packs of pink and white flowers, I was able to create many floral clusters without using an entire collection of flowers. I love how they all mix and match. This is a great way to stretch your flower collection!  I also used some of the Avesta 6x8 Rub-Ons around the bottom floral cluster. I cut apart a few pieces to fit the spaces. It really didn't take much. The Rub-On pack is stuffed with the most gorgeous Rub-Ons. 


For the title of the layout, I chose one of the word strips in the Laser Cut Elements set. I just cut it apart to stack them on the layout. I popped them off of the page by adding a small piece of thick chipboard underneath each word. Once the layout was done. I scattered some pink iridescent rhinestones all around the page, then spattered the layout with white gesso, and bit of black colored spray. 

Tuesday, February 1, 2022

49 and Market Curators Botanical. 12x12 layout "It's All About This"

Hell Lovelies. Today I am sharing a layout created with the brand new Curators Botanical Collection. I am also focusing on the Rub Ons which come in 2 sizes for this collection. 12x12 and 6x8. They are amazing! I started by choosing a Solid 12x12 paper and machine sewed all around the edges using a straight and zig zag stitch. I then mounted the paper onto a piece of 12x12 corrugated cardboard using Mod Podge. I chose one of the Rub On designs from the 12x12 transfer sheet and cut it down the middle. I used one piece on the upper right side, and the other peice on the lower left hand side. The images of postage stamps is beautiful! I also pained on a thin layer of clear gesso over the whole piece. 
I then created the diagonal photo mat set using the Vintage Artistry Square File Frame set. I chose 3 files, 1 large and 2 small, plus the matching backs to layer underneath. I positioned the frames the way I wanted them, and using a tiny stapler, attached them together. I layered them onto the solid pieces and then added some corrugated cardboard underneath to lift it off of the background for dimension and adhered the piece to the background. As always, the fun began layering flowers and leaves. 


This is a closeup of the main photo in the large file folder frame. I love the combo of the purple and the yellow flowers. I pulled out a few different floral collections and mixed and matched them, tucking in the leaves here and there. The larger purple flowers are Enchanted Petals in Twilight. The smaller yellow flowers are Royal Spray in Sunshine. The rest of the smaller flowers and leaves are Royal Posies in Sunshine and Sugar Stems in Blue Raspberry.


I fell in love with this next laser cut. A beautiful little Farmhouse style tall dresser. I am currently refinishing some furniture for one of my spare rooms in this style with the cup style handles. Love this!! I made a few tiny slits where the drawer would open, and tucked in a few of floral sprays to look as if peeking out of the drawer. I added a tab on the side and added my granddaughters name on it. Finished it with a few more laser cuts and a Rub On. 


This last closeup shows a little of the dimension I created with layers. What can I say, I love a chunky layout! I finished it off with some white spatters, purple rhinestones and a bit of dotted glitter glue for sparkle. I also tucked in some raffia for added texture. It doesn't take much  of mixed media to put the icing on the cake! A little can go a long way. When everything was done, I added some watered down distress ink around the matted photo frames and chest of drawers. Added color to compliment the purples in the layout. 


Thank you for joining me this week. I hope that you are inspired to use Rub ns in your next project. The ones from 49 and Market glide on like butter, and become integrated into the paper. You can't even tell it is a rub on. Try it! This ain't your mamas old Rub Ons!! These are improved to perfection! 
49 and Market Products Used: