Friday, December 1, 2023

Hello Lovelies. Today I bring you  a layout created with Vintage Artistry Moonlit Garden. Oh how I love this collection!! Everything about it speaks to my heart. There is so much color you could possibly incorporate into the beige and whites along with the  black. I chose to use muted blues, greens, and yellows to compliment the colors. Its just a beautiful collection all together. I started with Colored Foundations paper #1 for the background. I added strips of Washi Tape from the Washi Assortment Set around the perimeters of the 12 by 12 paper. I used the Assortment Curators Washi Tape Stitch Set for opposite corners of the layout. Awesome for those who don't do machine sewing! Easier to just rub on the stitches!. 


 I built the layers for my photo using the Cluster Kit. It is so easy to follow the design, or you can add or take away and substitute anything from the design to make it your own. I tend to find additional things to tuck in and layer. There are extra pieces in the kit that you can use as well. The cluster kit is perfect for cards, layouts, canvas and even journals. Using a single cluster design for the cover of a journal or book is perfect! 

Another cluster on the opposite side was created using the Cluster Kit as well. You could also add pieces from the Laser Cut sets as well as  the chipboard. Mixing and matching makes endless possibilities when designing your projects. There is just so much to choose from. And adding form other collections stretch your products even further. You would be surprised how other collections match each other. It amazes me all of the time. 

To finish the layout, I used spattered acrylic paint in blue and green. I also used a 49 and Market Script stamp, although retired, I thought was perfect on this layout. I added a couple of the butterfly Rub Ons from the 6x8 set. They are so sweet and perfect. 

Thank you for joining me today. I hope that you are inspired to use Moonlit Garden for your next project. The collection is truly beautiful. xo


Thursday, November 16, 2023

49 and Market Vintage Artistry Sunburst

  Hello Lovelies. Today, I am sharing a layout I have created with the beautiful, sunny, Vintage Artistry Sunburst. This collection is perfect for those summer photos. Think sunshine, seashells and seahorses!!! Oh my... The bright sunny colors and nautical theme is perfect. Sprinkle in some butterflies and plumeria flowers and you can almost smell a tropical paradise! There is so much to appreciate with this collection.  Even if you just purchased the Ultimate Page kit, I promise you will be wanting more. 


The layout is 12x12, starting with The Ray Of Sunshine paper from the Colored Foundations paper pack for my base. Of course, the fun part is layering all of the beautiful elements to create your projects. Whether it is minimal and simple, or elaborate and full of product, you can't go wrong with any of the 49 and Market collections,, and Sunburst is no exception. The colors alone will make you smile.  


I used the rusty porthole door laser cut for the frame. I backed it with a black and white photo of my granddaughter at the beach. I used the Wildflowers in 2 different colors along with laser cuts to surround the frame. I dry brushed some white acrylic paint over the flowers and leaves. I tucked in a laser cut seahorse and butterflies as well. 


I love the chipboard sentiment strips from the Cluster Kit. I backed it with some plain chipboard and adhered it to the background so they pop off the page a bit. Each sentiment is a memory of that day at the beach. 


If you haven't tried the 49 and Market Rub Ons, then you are truly missing out. They rub on like butter. And you can use them on a variety of surfaces. Even Fabric!!  I used the 12x12 Sunburst rub-ons on the background on the paper.  They make the perfect fill in for a title!! I finished off the layout with the blue half beads from the Cluster kit. The possibilities in designing your projects are endless, when you mx and match from the collection. There is so much beauty in it all. 


Thank you for joining me this week on the blog today. Be sure to check back everyday, as the team brings you beautiful inspiration. 


Wednesday, November 1, 2023

ARToptions Spice and Color Swatch Grove

 Hello Lovelies. I am so excited about 49 and Markets new collection. ARToptions Spice!!! Autumn has made her colorful entrance in some parts of the world, and the colors are glorious!! Same with Spice. All of the gorgeous colors of Autumn in one beautiful collection. And if you collect the Color Swatch Collections, they coordinate with so many of the collections you probably already have. I incorporated the brand new, Color Swatch Grove. The beautiful greens really pop on the fiery colors of Spice. I know I will be using Grove for a long time to come. Mt layout featured photos of my granddaughter. Every year I decorate the gazebo in my yard for Autumn photos. I can't wait to do it this year for more photo ops of my grandkids. Funny how some of us dress our kids according to paper collections. I know I do!! 

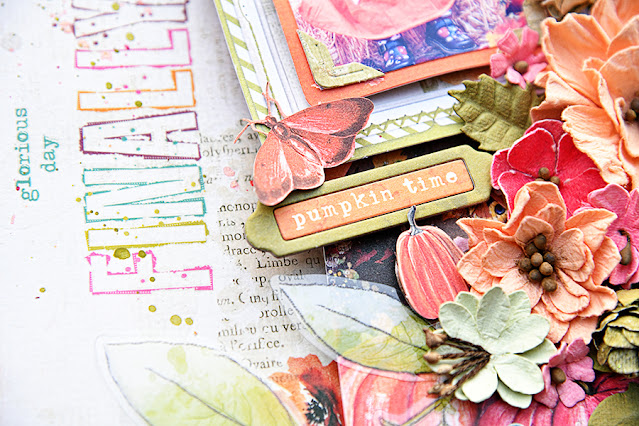
Here is a close up of the 12x12 layout. To finish it off, I chose 3 different paints and sprays that matched the paper, and spattered in 2 corners, for more texture. Then I scattered some Spice Bubbles and Baubles around the spatters. 


If you haven't tried the rub-ons transfers, then you must!! They glide on your paper like butter!! But you are not limited to paper only, try hard surfaces like plastic and glass, they even rub beautifully on fabric. The book plate is from the Spice Chipboard set. You can interchange the colors for contrast. The sentiment pops out. 


I love floral clusters. These flowers are from 3 different collections. Royal Posies, Royal Spray, and Natures Bounty. I love mixing and matching the different flowers, just like in a real arrangement! I tucked in some laser cut pumpkins, and popped them off of the page with pop dots. The acetate leaves are my favorite. I make sure to have each and every color that comes out. I used Grove on this layout. 


once again, the Rub-ons are used, and they are beautiful! I used both the 12x12 and the 6x8 Rub-On collections. I also used the Washi Tape Stickers. Check out the sweet little paper clip! Yes, that is the Spice Washi Tape Sticker on the photo frame. 

For the photo frames, I used the Color Wash Grove Frame set. For the orange mats, I used a  piece of paper from the 6x8 set, and die cut the photo mats, then layered them over the Grove Frames. This is a closeup of both of the frames on this layout. The sweet moth on the frame is a laser cut element. And the Rose bud on the other frame is from the chipboard set. Love the Binder clip Washi Tape sticks. 

Thank you for joining me today on this creative journey! I hope you are inspired to pull out your favorite Fall photos and use them in your ARToptions spice projects. I know I will use it for many projects. A Banner would be awesome!! I challenge you to create one! 


Products Used:

49 and Market Products Used:
ARToptions Spice 6x8 Collection Pack
ARToptions Spice 12x12 Charisma Paper
ARToptions Spice 6x8 Rub-on Transfer Set
ARToptions Spice 12x12 Sentiments Rub-on Transfer Set
ARToptions Spice Laser Cut Elements
ARToptions Spice Chipboard Set
ARToptions Spice Wishing Bubbles and Baubles
ARToptions Spice Washi Tape Stickers
Color Swatch Grove Acetate Leaves
Color Swatch Grove Frame Set


Monday, October 16, 2023

49 and Market Vintage Artistry Nature Study

Hello Lovelies!! I am here today to bring you a layout created with Vintage Artistry Nature Study, and the awesome Ledger papers. Add any of the beautiful  Bookplates as a base to your Film Strip framed layout, and you have an instant  winner! I love the beautiful subtle colors of blues and greens mixed in with the neutrals in this wonderful collection. Once all of the layers were placed, I used the Nature Study Foliage rub-ons to enhance the light background paper and all around the Bookplate and matted photo. I cut apart some of the pieces in the bookplate pack, and layered them onto the page. In-between each layer is a piece of corrugated cardboard. This gives the layout so much dimension. 


Here is a closeup of the bookplate. There are different sizes and patterns in the package that you can layer. I chose to use 1 Bookplate as it looks like it is already layered with pages. I cut down a sentiment strip and layered it onto a tab, then slipped it onto the side of the Bookplate. I used a Filmstrip to frame the photo of my sweet granddaughter. I did not take it apart as I like the double matted frame look. I wrapped a piece of the 5 stranded jute around the photo, and tied a bow. 


I chose 5 different  flower collections for the flower clusters. The beauty of the flower collections is that so many of them coordinate with each other, so you only have to use a few from each package. I scattered or tucked in  some laser cut mushrooms and butterflies. And I placed the Searching sentiment from the Nature Study Ephemera Bits, over the floral cluster. 


 I used pieces of the lacey trim in cream, tucked in the flower arrangement as well as the frame, and the outside of the background paper. I machine stitched around the edge of the paper sewing a double row. I snipped the thread and paper in some parts and distressed the edge. Once the layout was complete, I spattered some ink, and watered down some of it, to paint on the page. 


I so enjoyed creating this layout with Nature Study. It truly is a beautiful collection. I hope you visit the blog for more inspiration from the Design Team members. they truly inspire me!! 


49 and Market Products Used:


Sunday, October 1, 2023

49 and Market Christmas Spectacular 2023/Book Box of cards

 Hello Lovelies! It is never to early to get started on those Holiday Projects. In this era of digital technology, there are still those who mail out cards through snail mail. I created this project as a gift for someone I know, who LOVES to personalize and mail cards. I married 2 of the Christmas Spectacular kits to create my Cards in a Box. The Cluster Kit and the Card kit. I love how it came out. I have had an unfinished kraft book box in my stash for a few years. This was the perfect time to use it. 

To prep the book box, I painted the edges and borders, that were going to be exposed after the papers were adhered, in a green acrylic paint that matched the papers. I covered the outside, using 1 sheet of the 12x12 paper, and covered the inside with another 12x12 sheet of paper. I chose this outside paper because I knew I wanted to go crazy with all of the beautiful Rub-Ons. For the cover of the book box, I adorned it with product from the Christmas Spectacular 2023 Cluster kit. I started using one of the  designs, and added to the cluster, using Christmas Spectacular chipboard. Besides the beautiful laser cut flowers in the Cluster Kit, I used Royal Posies flowers in Tomato. 


 Some of the sentiments and designs around the 3 sides of the box are rub-ons that are included in the card kit, and some are from the Classic Rub On Transfer Set. They are truly beautiful, and you can create your own designs using the variety of rub-ons available. I created dimension with the cluster pieces using corrugated cardboard underneath each layer, and was even able to sneak in a chipboard sentiment on the side of the door. Little hidden treasures. 


On the inside of the cover, I created a little pocket using a piece of paper from the 6x8 paper collection, and I used the trim away piece from the 12x12 paper for the border of the pocket. I love the trim away pieces, as the designs are so awesome! I made some tags using the 6x8 paper, punched some holes, die cut some tag rings from scraps of the same paper I used to line the inside of the box, and tied some single ply jute through the holes. I tucked the tags into the pocket. 

Once again, I used the trim away piece from the 12x12 paper I used, and cut it down to cover the raised parts of the spine. I used some of the Washi Stamps in between. Once the whole box was finished, I used some gilding wax in gold to finish the box. This gave the whole project an old world look, that matched the theme of the gorgeous designs of the collection. How can you go wrong with a bit of gold!! 

I was going to create a mini album using the cards from the card kit, then decided to just wrap up the stack of cards, with cards already tucked into the envelopes. I used the elastic cord from the cluster kit to tie them together. They fit perfectly in the box. I am still temped to make that mini though!! We'll see!! Since this will be a gift, I am also going to include the rest of the cards kit contents into this box. This way, the recipient can individualize each card to their liking before mailing them out.  I plan on wrapping the card package in red tissue paper, and place one of the seals from the card kit to close it up. 

I hope you enjoyed my project, and it gave you some ideas on ways to mix and match the kits from the collections. There are so many possibilities when creating! As I am writing this blog post, more ideas are popping into my head with what else I could have done with this project. Perhaps I will give it a go!!


49 and Market Products Used:
Christmas Spectacular 2023 Cluster Kit 
Christmas Spectacular 2023 Card Kit
Christmas Spectacular 2023 12x12 The Spirit Paper 
Christmas Spectacular 2023 12x12 Christmas Exemplified Paper
Christmas Spectacular 2023 6 x 8 Paper Collection Pack
Christmas Spectacular 2023 Santas Postage Stamp Washi Tape