Thursday, February 20, 2020

49 and Market Vintage Artistry Sage Collection. "Captured"

Hello lovies!! Its my turn on the blog today with some new inspiration. The newest Vintage Artistry Collections are simply divine, and with 4 color schemes to choose from, You may have a problem choosing your favorite. I have used the Sage papers for this layout, and the Stitched frames are from the natural collection. But the butterflies are from the coral collection. Did I say you would have a problem choosing a favorite?? The beauty of all 4 color collections, is that they all blend and coordinate with each other beautifully. This makes your crafting so versatile! So go ahead and purchase all 4 collections. The possibilities will be be endless! Coral, Sage , Natural and Sky. Oh my!!


The 49 and Market Wild Flowers are one of my favorite flower style. I used them in Tangerine. I created the floral cluster,  and it was built on a photo wheel I die cut and mounted on corrugated cardboard to give it height. . The laser cut butterflies from the Coral collection blend in perfectly with the Sage color. I also used the laser cut leaves and vines from other 49 and Market collections to fill in the cluster.


I built my matted photo upon 2 stitched frames. The larger one on the bottom was matted over a cream piece of paper that I stamped and used watercolor on. Both stitch frames were edged with some distress ink and then I stamped the word "captured" onto a laser cut tab and tucked it between the 2 stitched frames. I added a  bit of lace over some cheesecloth to the bottom of the matted photo for added texture. The lace adds a soft feminine touch to the airy spring feel of the layout. 


The tags were die cut from the scraps left over after I die cut the photo wheel. You can't tell that they aren't full sized tags, because I only needed a small portion of them peeking out from behind the photo mat.


Here is another closeup where you can see another tag tucked under the photo mat on the side. I love the little butterflies that seem to be enjoying the beautiful flowers. Hard to see in the photos, but the lighter butterflies have layered wings which lends a beautiful dimension to them.


Thank you for taking the time  today to visit my blog. I hope to keep you inspired. xo


49 and Markets Products Used:
Vintage Artistry Sage 12x12 Collection Pack
Vintage Artistry Sage 6x6 Collection Pack
Vintage Artistry Natural Stitched Frame
Wild Flowers in Tangerine
Wishing Bubbles Minty Breeze
Lacey Trim Cream
Snapshots of Yesterday Stamps
Bold and Beautiful laser cut sheet
Seaside Mini 12x12 Collection Pack

Wednesday, February 5, 2020

49 and Market Vintage Artistry in Natural...12x12 Layout *Natural Beauty*

 Hello Lovelies. Today I am here in hopes of inspiring you with the brand new Vintage Artistry in natural. There are 4 new color collections in Vintage Artistry. The beauty of the Natural Collection is if you want to add color, you can add any color your creative heart desires! I chose green and peach. I added a touch of brown distress inking to keep with the vintage look. Last year, a beautiful dragonfly let my granddaughter get up close and personal with him. She touched it, stroked his wings, and even held it in her hand. I captured the photos beautifully, and thought this was the perfect time to use them.


I absolutely adore the new Vintage Artistry Stitched Frames. If you don't own a sewing machine, but love the look of real stitching, then these frames are for you! I love to sew, so to tie the frames into the layout, I tore strips from a piece of paper from the 6x6 Natural collection, adhered them together to form a frame the size of the layout, then stitched all around to match the smaller frames. I inked the edges then adhered it to the 12x12 background. I also stitched around the laser cut frame and layered it onto the Stitched  Frame. I left the tail of threads for added texture.


Here is another Stitched Frame. I adorned it with the beautiful Country Bloom florals and the leaves are from the Captured Adventures laser cut sheet. I inked the edges and wrinkled the leaves for a natural look. Then I tucked the leaves under the clusters of flowers. I tucked some of the green leafy stems found in the Cottage blooms pack, under the dragonflies wings.


The tiny rolled roses were created using the smaller scraps of paper left after die cutting the big dragonfly, and tearing the strips for the framed border. I added some of the smaller Wishing Bubbles to the dragonfly body. I used 2 different stamps sets on the background around the design of the layout. It added beauty and texture around the photos and design elements. 


Here is another closeup of one of the clusters of flowers and leaves. The dragonflies from the Serendipitous laser cut sheet are so sweet. I love when you layer them and flip their wings up, they look as if they are ready to fly off of the page!


Thank you for joining me this week for your 49 and Market Inspiration. Keep checking back on the 49 and Market Blog, as the team continues to inspire us all. Yes, even my teamies inspire me every single day. I am so proud to be on this team!


49 and Market Products Used:

Vintage Artistry 12x12 Natural Collection Pack
Vintage Artistry Sage Stitched Frames
Vintage Artistry Natural 6x6 Collection Pack
Seaside 12x12 Mini Collection Pack
Wishing Bubbles in Cream Soda
  Vintage Artistry Best Ever Stamp
Artsy Stamp set
Country Blooms in Tangerine
Cottage Blooms in Cantaloupe
Serendipitous Laser Cuts
Captured Adventures 12x12 Laser Cut Sheet


Monday, January 20, 2020

49 and Market ...Seaside and Shipwreck...Adventure Layout

 Living near coastal waters my entire life, I have so many beach photos in my collection. Seaside  and Shipwreck are two of 49 and Markets beautiful collections. But you don't have to live near the coast to create a fabulous Sea themed project. If you love sealife and mermaids, then these 2 collections are for you! I started by using an awesome Dusty Attic Fishnet #2 stencil on the background. I used a patterned paper from the 6x8 collection and mounted it on a piece of corrugated cardboard and adhered it to the background, then tucked some cheesecloth under and around the piece. I mounted the photo on corrugated cardboard as well, and adhered it to the 6x8 design.


From there, I built my design using elements from the Underwater Layered Embellishment Set. This collection of beautiful layered  pieces adds beautiful dimension to your projects. I mixed in flowers that had sea and beachy colors. I love how the little fish seem to be weaving in and out of the underwater sea life. I adore the glitter Epoxy bubbles. They give the layout a little sparkle.


Another piece from the Embellishment set, are the shells hanging on a string wrapped around a piece of wood. At first glance it looks so real. The detail is incredible. This piece made the perfect frame around the photo.


 The title Adventure is a Dusty Attic piece from the WP 35 set. I primed it with white gesso, added some crackle paste over it, and after it dried, painted it with acrylic paint.


Here is a close up of the hanging shells from the Underwater layered embellishment Set.


Thank you for joining me today for more inspiration from 49 and Market. And look forward to seeing some gorgeous new collections that will reveal at Creativation this week!


49 and Market Products Used:
12x12 Paper: Shipwreck Atlantis
Seaside Shipwreck 6x8 Collection Pack
Flowers: Cottage Blooms in Linen
Enchanted Petals in Mint
Blossom Blends in Linen
Pixie Petals in Mint
Underwater Layered Embellishment Set

Sunday, January 5, 2020

Photo Folio with Belly Band Closure / Lisa Gregory

 When I received the Old School Collection from 49 and Market, I knew exactly what I wanted to do with it. Create a Photo Folio for my grandaughters school pictures. There is also lots of space to document the milestones she  reached in Preschool. There is an awesome book from 2013 by Kathy King AKA The Paper Phenomenon. The book is Mini Interactive Scrapbooks and I use the instructions for the Flipped Out Mini Album. I changed a few things and made it my own style, and that includes the closure. I created a Belly Band to close the mini.  I chose to use a black base to bring out all of the beautiful detail in the patterned papers. The page with the laser cutouts is absolutely awesome for a project like this. You can use so many of the images on the flaps inside of the folio.


The Folio is a trifold and there are lots of pockets to tuck tags and trifold envelopes I created. The middle has a waterfall feature and under each flap is a frame that was fussy cut from one of the Captured Adventures paper. I used the images in the laser cut sheet to adorn each flap on the waterfall, as well as the pocket on the right.


This is the outside of the Folio. I absolutely love this paper. It really didn't need any adornment except for the closure.


Under each flap of the waterfall, you will find a cut out from the Captured Adventures collection. It is in the Backer sheet, which is an  Extra Bonus Page (Located on Backside of Cover Sheet) Awesome bonus, as it has 6 polaroid style frames I cut out and used under each flap. Just cut out a small photo and adhere it to each frame.

Underneath the last waterfall flap is a fold out that can be used for more photos and journaling. The next 2 photos show it closed, then untied and opened.


In each of the 4 pockets created on the Folio, I have made tags and an envelope with closure  that opens up for more journaling or photos.


The envelope opens up like another trifold and the tags were die cut using a thick heavy card stock  and the patterned paper was adhered to the tops. I strung some hemp cord through the holes.

I wanted a pretty simple closure, and felt that a belly band would be perfect. It just slips on and off of the Folio. The flowers and Wishing Bubbles completed the front of the Folio, and I left the back and sides of the belly band plain because I didn't want to cover the beauty of the pattern on the paper.


Thank you for joining me this week. I hope that you are inspired to create an off the page project such as this Photo Folio. As much as I love to create layouts, mini albums and folios are also one of my favorites to create.

Products Used:

Thursday, December 19, 2019

Lemon Craft Guest Designer for December 2019


It has been such a wonderful pleasure to Guest Design for Lemon Craft these past couple of months. For December I am using the gorgeous Joy To The World 12x12 collection. I decided to do a layout and a Trifold Folio that will hold my Holiday memories from this season. There are 2 color versions in this collection. The blues I used for the folio, and for the layout, I chose the more traditional Christmas colors, except I added a vintage touch by using Distress ink in Vintage Photo. I hope you enjoy this post as much as I enjoyed creating for Lemon Craft. The layout features my twin grandchildrens trip to see Santa last week. The background paper is 06, and I mounted it on some distressed corrugated cardboard. I distressed the edges and machine sewed around the perimeter with red thread.


I used 2 different Sizzix dies to create the frames. I also used 2 different patterned papers for the layers. The papers I used are 03 and 04. I absolutely adore the wood pattern! I love all of the cutouts on the 02 and 05 paper. I had a few sheets of the papers and decided to fussy cut all of the poinsettia flowers and create some layered dimensional flowers for the layout. I fussy cut everything out of the paper. I used the cookies and stars and pine branches. Once they were all cut out, I chose a few to tuck around the photos and flowers. I rubbed them all with some Mod Podge then sprinkled them with Rajni Chawla's Crystal Clear. I wish you could see the gorgeous sparkle. They look like real tiny  sugar cookies!!


Here is a closeup of the flower cluster  and leaves. The larger leaves are from 49 and Market, then i layered them with the pine branches I fussy cut from the 02  paper.


For the middles of the flowers I used Prills, in beautiful Autumn colors that matched the flowers perfectly. Once the flowers were layered and assembled, I ducted them with the Crystal Clear to make them sparkle. I really love the way they came out.


I fussy cut out the mug and also used some Crystal Clear on it. It gave it a beautiful frosted look.
I placed the frosted stars all around the layout. It simply gave it a finishing touch. Twinkling stars all around. Simply magical. Just like the season.


This is the Trifold Folio I created using the blues in the collection. I added a lot of Vintage Photo inking to give the Folio an old world vintage feeling. I think the images on the papers are vintage looking and I wanted to portray that nostalgic feeling. The Folio is closed by a belly band.


This is the backside. I fussy cut the rocking horse and adhered it to the back panel.


  This is the inside opened up. there are tuck spots  and a waterfall feature in the middle.


I had fun created the belly band for the closure. Once again, I layered the fussy cut flowers, created the middle of the flowers with Prills,  and added sparkle with Rajni Chawla's Crystal Clear. I tucked in some 49 and Market laser cut leaves. In between I tucked in stars and die cut snowflakes, then added golden rhinestones for sparkle. It just slips over the Folio beautifully.


Each card is removed from the pockets of the Folio. Each card can hold more photos of journaling.


  Each card was covered with the tags in the 04 paper. I created  small title spots under each tag. 


In back of each waterfall layer I created Sizzix die cut frames to add photos. 


 I fussy cut a lot of the images from sheet 05 and adorned each layer of the waterfall feature.


I want to thank you for joining me today. And thank you so much to LemonCraft for having me as a Guest Designer for November and December. I have enjoyed creating my projects with their gorgeous papers. I want to wish everyone a beautiful happy Holiday season. I cant wait to see what the Lemoncraft Designers will create in 2020.

Friday, December 13, 2019

49 and Market Travelers Journal.

Hello Lovelies! Today, I am sharing a project other than a layout. Last year, I took a course in Bookmaking with Nik the Booksmith. The lovely part is, I get to use ALL of my scrapbooking supplies and then some. I couldn't wait to use some 49 and Market product to create books and journals. This is a hardcover Travelers Journal. It is thick,  full and each page is simply luscious. Each signature is created with 49 and Market paper with pockets, and inside of each signature cover are tea and coffee dyed papers, vintage dictionary pages and ledger pages. There are 5 signatures created with the 12x12 papers, 78 pages, and lots of pockets and inserts. Vintage Remnants and Vintage Artistry was a perfect choice for this Travelers Journal.

    This is the front cover. Paper, Lace and flowers. I adore the pieces of laser cut shapes from the                               frame set. There are so many elements to layer or use for tuck spots. 


        This is the back cover. The pattern on the paper needed no additional embellishments other than the beautiful lace ribbon along the side. I did ink the edges with distress ink. 


                                                     Here is a closeup of the front cover.


       This is another closeup of the front cover. The word Vintage Artistry came from the strip at the                           bottom of the 12x12 papers. I fussy cut the words and inked the edges.


                    This is a closeup of the beautiful vintage layers of all of the pages in the journal.


      This is a view of the book when it is open. My mother in law gifted me with her very large 4 volume vintage dictionary. I have been tea dying them and using them for book pages as well as collage sheets. 


This is the top of the spine. There is some 49 and Market burlap layered with some cheesecloth peeking out of the top. 


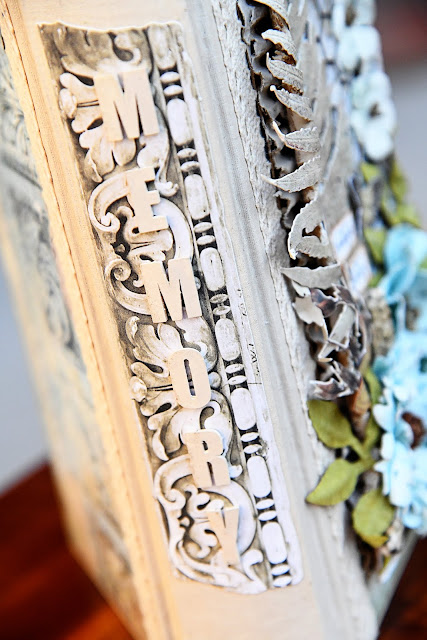
For the spine, I layered  a piece from the Laser Cut Shapes Frame set 03 and the word Memory is from the Archival Board Memory Captured set. 


These are some closeups of some of the small paper pads I created and ATC cards with envelopes that i tucked in some of the pockets in the journal. 
 These are more closeups of some of the inserts I created. And never throw out those smaller pieces of paper. I created little tabs at the top of the journal. I stitched some burlap onto the paper before I placed them on the page. 

There are so many cards and tags. I machine stitched some, stamped some and inked them all.

And here is yet another photo of some of the pockets I created for the inserts. There is plenty of realestate to tuck away all of the memories you may have of your travels. And there are plenty of blank pages where you can stick those photos onto, or journal your thoughts and dreams!! 


49 and Market Products Used
Paper: 
Vintage Remnants Paper No 09, 04 and 05.
Vintage Artistry 12x12 paper
Vintage Artistry 6x6 paper pad,
Vintage Artistry Flora and Fauna

Burlap Ribbon Roll Cream

Flowers:
Seaside Blooms Aloe

Laser Cut Shapes Frame Set N 03

Archival Board Memory Captured