Thursday, December 31, 2015

Off The Page Project for The Flying Unicorn as Guest Designer

I am honored and excited that I was invited to be the 1st Guest Designer for The Flying Unicorn for 2106!! When I opened my box, I was tickled pink!!! really tickled!! I have had a creative blast working with the January 2016  Your Passion, Your Art Main Kit and all of the coordinating add-on kits,  Mixed Art, Mixed Passion, and the Small Art Big Passion kits. They are all so versatile. If you like layouts, cards, mixed media and altered projects, then these kits are for you. There is a little bit of everything for everyone.
I will be revealing my projects done with the kits throughout the month of January. There is so much to create with. For my first project, I used the Off The Page product that is included in the Main kit. It is a wooden coaster set. If you know me , then you know I love mini albums. I can turn anything into a mini!! So this is what I did with the coaster set. I just couldn't resist. For this, I used the The Small Art Big Passion kit.


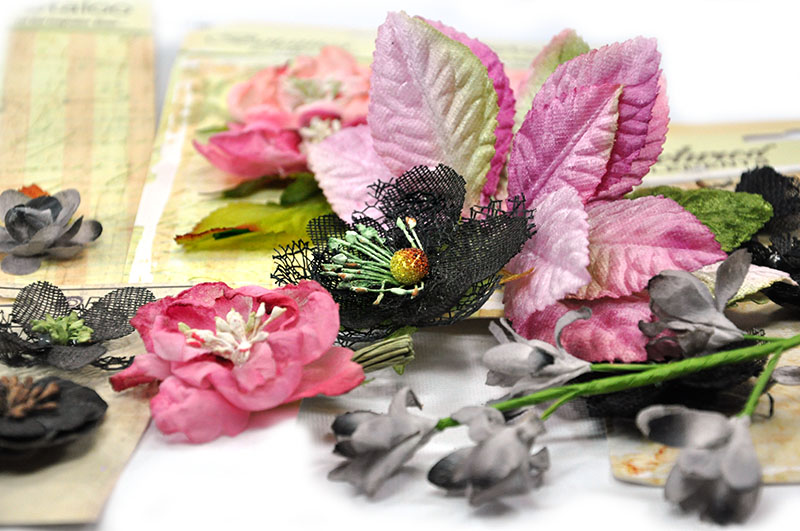
For the coaster holder, I inked all of the edges using the  Prima Vintage Pink Chalk ink. Then I covered the entire outside using the 13 Arts Secret Letters 6x6 paper pad. The scale of the print is perfect for small scale projects. The front was adorned with Petaloo flowers ad the Prima Shabby Chic resins. I adhered pieces of the trim to the sides.


 Here is view of the back.


For the mini album itself, I had my husband drill 3 holes though the tops of the coasters once each one was covered with the paper. The cover was adorned with butterflies  from the paper I fussy cut, the flowers, a resin, and the Prima metal embellishments, I slid the darling paper clip onto the paper. I used 3 gold book rings from my own stash to hold the mini together. Then I added seam binding ribbon from my stash to the tops of the book rings.


I fussy cut the Prima Lace Stickers for the title and adhered them to a piece of patterned paper and inked the edges before applying them to the back of the mini. Then I used fussy cut butterflies, and added the flower and the Prima leaves came from the Mixed Passion kit.


Here is a side view of my chunky little mini. 


I hope you were inspired to do something with the Coaster Set. There is plenty of room on the inside to display your favorite photos. Please join us at The Flying Unicorn in the month of January to see what the rest of the design team had created  using the kits. Make 2016 the year of creative genius!! See my previous blog post below to see the kits and some of the work that Flying Unicorn Artists have created for your inspiration. You will not be disappointed!! And stay tuned as I reveal more of my work for The Flying Unicorn throughout the month. I frequently shop at The Flying Unicorn Store as there is always a wonderful selection of the newest product!!

The January kit from the Flying Unicorn and I am Guest Designer!!

http://www.flyingunicornstore.com

The January kit from the Flying Unicorn has a fresh pop of color to usher in the new year. Start your year on a fun and festive note. Without further adieu, we offer you our January "Your Passion. Your Art" kit of the month.


http://www.flyingunicornstore.com/category_s/1522.htm
January is a month to start a'fresh. This month, we have the perfect "Off the Page" piece to help keep everything around you fresh as well. Included in every main kit is this handy coaster set.


http://www.flyingunicornstore.com


From the beginner to the avid mixed media artist our Mixed Art add on kit will surely please you. Our Mixed Art kit will always come with a canvas and mixed media art supplies to advance your skills as an artist.


http://www.flyingunicornstore.com/category_s/1522.htm
Flowers, vines,and embellishments oh my! Our Mixed Passion is a collection of everything pretty to add to the Main kit or the add on kits. The colors and embellishments will enhance your Kit of the Month creations or it can stand alone and you can create something magical on its own! So turn up the music, make some tea and lock your self away while you create some art!


http://www.flyingunicornstore.com

Our Small Art Big Passion is all about the love of making cards, tags atc's and anything in between. From Stamps, flowers, paper, embellishments and pretty things in between! These yummy goodies will enhance any of the kits or stand alone .


http://www.flyingunicornstore.com
We are thrilled to present great free tutorials, techniques, videos and Build a Page using our Kit of the Month to help you grow in the passion of your art. So stay tuned there is so much more to come in the next week!


Plan a day trip! Crops -Classes-Fun

926 North Monroe St
Tallahassee, Florida
Tel: 850.270.6366 Toll Free 800.231.7119 FREE

Thursday, December 10, 2015

Old World Style using Moon Shadow Mists

 Hello Lindy's Lovers!! Lisa here... I am coming to you with a extra project from me this month. I just cant get enough of Lindy's Stamp Gang Products. Today I will show you a couple of color techniques using Moon Shadow Mists, and how to achieve an antique feeling to your colors.
To prepare my Prima paper, I adhered it to a 12x12 piece of corrugated cardboard using Mod Podge. . I dry brushed it lightly using white gesso. I used a mask and some modeling paste to create some texture to my background. I prepared my die cut frames and painted them with gesso as well. I added white flowers to the design and  adhered them to my background paper. Once everything was dry, I brushed the entire surface with Gloss Gel, but you can also use clear gesso. This will give your paper a "bite" for the mists to  adhere to, without bleeding through the paper. It also allows you to blend your mists better with out them appearing muddy. Let the misting begin. I sprayed the entire page with Clam Bake Beige Starburst Spray.


 All of the leaves were die cut from white card stock then sprayed first with Greased Lightening Green Flat Fabio Spray, then while still wet, just lightly sprayed them with Land Lubber Green Moon Shadow Mist. This gave them a more realistic color. The brown undertone is so lovely.


I sprayed the flowers with Wild Honeysuckle Coral Starburst Spray, but did not saturate them. While the mist was still wet , I very gently gave a light spray of Moonlit Mulberry Moon Shadow Mist to the flowers in random spots. This gave them an antique tea stained look. Once the flowers were all sprayed, I added my leafy vines and leaves. I just tucked them here and there.


I used a few tiny words to make up my title. Sometimes a few tiny words is all you need to make a big impact.


I love the way the color clings to the masked areas of the paper, giving them definition, and making them pop off the page.


I used a small brush and randomly brushed the Moonlit Mulberry Moonshadow Mist around the edges of the floral clusters and the frames, dabbing the colors a few times and layering more color. The color has a rosy undertone to it with the brown base. LOVE the Moonshadow Mists for that reason. And by dabbing a little, it gives the project the look of wax when rubbed off on furniture after it has been painted. The dark areas just cling to the crevices creating that antique look.


I wanted my floral clusters to appear as if they were hanging vines. You can see the closeups of the dabbed on Moon Shadow Mist, under and around the floral clusters. 


I have used this die cut frame a few times, but I simply love it!! It is actually 2 different die cuts that layer perfectly.  These frames were just primed with gesso and layered, then sprayed with Clambake Beige Starburst spray. I dabbed them in a few spots with Moonlit Mulberry Moon Shadow Mist. My sweet sweet grand daughter Charlotte completes this layout. Before I adhered the photo, I gave the entire layout one more light spray of the Clam Bake Beige Starburst Spray.


Thank you for joining me today. I hope that you give the Moon Shadow Mists a try. You will simply love the way the colors and the brown undertones blend to give you a gorgeous antiqued look. The color just sparkles right through giving it a beautiful sheen.

  xoxo
Lisa