
This interview with TPC (The Paper Crafting) Magazine was fun to do. And the magazine is so awesome!! You really have to check it out. Paper crafting from around the globe!!

Here is a link to my interview with TPC Magazine.

Hello Lovelies. I am excited to share with you, 2 of 49 and Markets new collections. Vintage Artistry Everywhere and the perfect match, Color Swatch Toast. The beauty with Toast is, it will go with EVERYTHING!!!! I used one of the papers as my base, and everything else just naturally followed. My granddaughter LOVES to explore. Even if it is in my own back yard. I have the perfect photos for the Everywhere collection. This explore and travel themed collection is extraordinary...
I started by machine sewing around the edges of the Toast Paper A. I used 2 colors that matched the colors in the layout. Then I mounted the paper into a 12x12 piece of corrugated cardboard using Mod Podge. I inked the edges with distress ink. Once I had the placement of my photomat and Filmstrips, I marked it with pencil, and used the Everywhere Rub On Transfer Set around the pencil lines, then worked my design inside of the rub ons.

I designed the photo mat, by using the Ticket Essentials in Toast, and pasted them behind the photo reel from the Everyday Cluster kit. I used the frame from the same kit, adhered it to a small piece of corrugated cardboard and placed my photo in the middle, then placed the framed photo in the middle of the reel. I love the envelope pockets from the Everywhere Essential File Set. I put one together to tuck the reel into. I inked the edges with distress ink. I placed the adorable banner under the photo. The staples look so real!!!


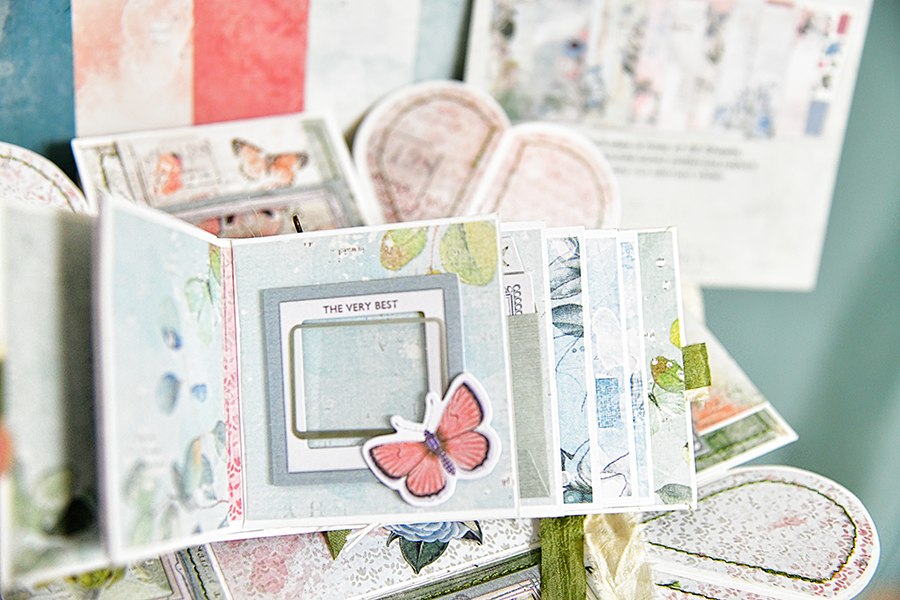
Hello Lovelies. Today I hope to inspire you to create something different. I created an explosion box that has a mini album inside. I love creating these boxes. I used the brand new Vintage Artistry Tranquility Collection along with the perfectly color coordinated Eucalyptus collection. I just gathered all of the product from both collections, spread them out on my table and grabbed from different embellishments as I was building my box. For the base, I used my We R Memory Makers explosion box score board, and I did the Xtra large box. I used a heavy duty white cardstock in white to form the base for the box and lid. I then used Tranquility papers to cover the box inside and out. Before I adhered the pieces on the box, I did some machine sewing on each piece. I also added 4 wooden beads for the feet of the box. I thought about painting them, but love the look of the raw wood, so I left them unpainted. Once the all of the papers were adhered to the box and top, the fun began. Embellishing!


When you lift the top of the explosion box, it reveals a tiny mini album that measures 3 1/4 x 3 1/4 and has 6 pages. This was so much fun to create. There is so much room in this explosion box for photos. There are tucks, tags, frames and pockets to save keepsakes, or photos. All from the Tranquility and Eucalyptus collections. The embellies are the best. There are so many to choose from. If you purchase all of the collection, you could be created for days! Endless possibilities.

Here are different angles of the mini album. The front is adorned with 3 different flower collections, Lasercut elements, Rub ons, and Essential Film Strips. I created a 2 1/2 inch spine I made a hole on the top in the middle, placed an eyelet, and tied on some silk and sari ribbon. I created charms from some of the Chipboard pieces. I also created a small cabochon charm. I added beads to the chipboard word strips and sandwiched an eye pin in between the chipboard and backed with a scrap of Tranquility paper. Then I placed jump rings to the eye pins, and used a bulb pin to pin the dangles to the ribbon. I love dangles on mini albums. Its like jewelry. I used the same silk and sari ribbon for the closure and tied it in a bow. You can see the mini when it is open. I created 6 pages besides the front inside and back inside covers.


I hope that you are inspired to create an explosion box of your own. I think they are so much fun to make. Think of what you want to fill yours with. The mii album is so cute, and I enjoyed creating it.

49 and Market products: