Monday, November 30, 2015

Accordian Mini Album in a Can...The Dusty Attic

Hello my Dusty Attic Divas!! I'm here to share with you an upcycled project. What do you do with empty baby formula cans??? You make a beautiful container that holds a little surprise! A little accordion mini album!!! I had to used 2 of the gorgeous colors of the November Inspiration Board once again this month.  I was inspired by the word reflect for this project because as the years go by, and you flip through the mini, you will reflect on the memories the photos capture. I hope you find some inspiration in the November Inspiration Board.


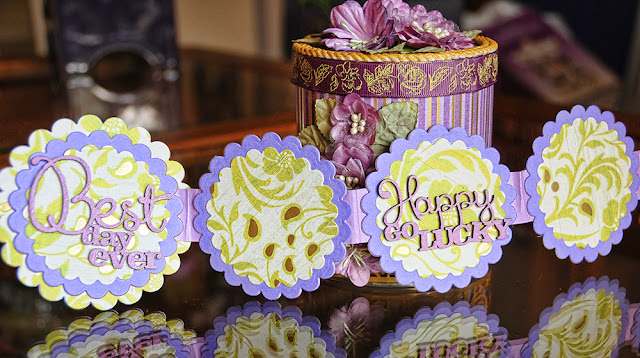
This is a full view of the can closed. The lid is plastic and I just covered it with ribbon, rope and Dusty Attic Flowers. It snaps right on.


 Here is the lid off of the can and a closeup of the lid. I lightly painted the rope with gold acrylic paint.


This is a view of the mini album in the can. I die cut chipboard and patterned paper for each page, then used a paper hinge system to attach them together.


Here is the front cover of the mini. The Vine Frame was painted with Dusty In Colour Crushed Olive with a bit of Dusty In Colour 


Here is a closeup of the album folded out. Every other page has a diecut mini caption on it. The backside pages were left blank to mount photos.


Smal photos can be mounted on the pages that are left blank.


Here are some of the pages showing the cover and a few inside pages using the chipboard.

Here is a closeup of the Lace Border chipboard. I used gold acrylic to paint it. It gives the can an elegant look.


Thank you for joining me this week for the Dusty Attic  Inspiration Board Challenge. Thank you to all that entered the Challenge. The entries are so beautiful!!  There is a chance of winning some Dusty Attic gorgeousness!!

Dusty Attic products 


Saturday, November 28, 2015

Dusty Attic November 2015 Mood Board

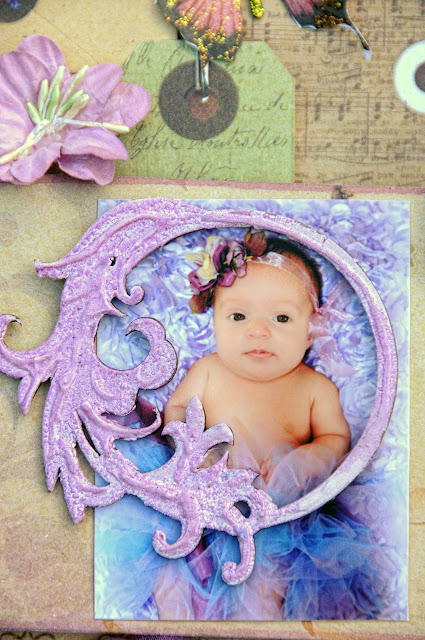
 Hello Dusty Attic Lovers!! Today I bring you my interpretation of the Mood Board this month.The lavender and the gold colors in the palette just screamed my creative name. I had a ton of fun using my favorite color. Purple!!I took a series of photos of my dear grand daughter Charlotte in a fairy Tutu I handmade, and dreamed of creating a woodsy fairy like layout. This is the result.


If you know me, you know I love butterflies, so I am always looking for new and beautiful ones. While cruising my favorite digital site,  Studio Girls Scrapbook Graphics,   I found these gorgeous purple butterflies in a kit by Rosy Posey. The Featherweight Collection. There are a lot of elements I will be using in future projects.


One of the simplest things you can do to dress up your chip board is to heat emboss it. I primed it with white gesso then used Lindys Stamp Gang embossing powder in Spring Leaf Chartreuse. I added a few dots of Distress Stickles just for a little sparkle.


To get the texture on this Elegant Frame, I used a technique shown by my teamie Gabrielle Pollacco, but I added a twist. I used dimensional paint on the frame,  once the dimensional paint was dry, I painted it using Crackle paint in white, sprayed it with Lindy's Stamp Gang Starburst in  Teapot Purple then very lightly heat embossed it with Aurora Amethyst.


I just heat embossed the words from the Cherish Yesterday set with Lindy's Stamp Gang embossing powder in Aurora Amethyst. It naturally has a 2 toned effect. Love that about Lindys Embossing Powders!!


The Branches and Berries chipboard was painted in white gesso, then painted with Lindy's Stamp Gang Magicals.  I  adore the delicate leaves on this branch. The flowers are Dusty in Bloom flowers in Vintage Rose. They have a gorgeous sheen to some of them. I love the mixed textures of fabric and paper flowers in some of the packages.


I'll tell ya....Working with corrugated cardboard is pretty addicting to me. Peeling back the layers just makes it that more beautiful. And oh so dimensional. If you want that rustic woodsy feel, give it a try. 


 Thank you for joining me today!! Please check out this gorgeous Mood Board and see what it inspires you to come up with . Join us for a chance to win a fabulous prize!!

 November Mood Board

Products used: 


Lisa
xoxo


Thursday, November 19, 2015

The Frank Garcia Design Team and .....ME!!!!!!!

I met Frank Garcia almost 5 years ago when he first started scrapping and showing up on forums and galleries. I remember how I felt when I first noticed his posts online in galleries....I was mesmerized by the raw talent I saw. I just knew he was destined to be big..Over the years, we have formed a wonderful friendship, spoke of our Hispanic heritages, talked about food, art, traveling  and of course scrapping. I remember when he showed me  little sneaks of designs he was working on, (pre-Prima)I showed him mine, we would critique each, of course loving them all. I just knew they would end up in print on a big scale one day!! Fast forward  to November 2015.. Franks dream came true with Prima.
Here we are. Frank is living his dream, and I could not be happier for him!! Artist, Designer, Friend extraordinaire!! I am thankful for his friendship over the years, and now I get to be a part of his dreams. Being asked to design for the Inaugural Frank Garcia Design Team.. I am honored, but most of all blessed. This man has my scrappy heart. And I am soooo proud of him!!!! From humble beginnings to This...Gracias Frank. Te amo muchisimo!!!

Here you go...I would like to introduce you to The Frank Garcia Design team!!!!! Wait until you see what we have in  store for you!!!


The Frank Garcia Design Team
Trina McClune Design Team Coordinator
and 
ME!!!!
Congrats Teamies!!!! This is going to be a rockin time!!!

Tuesday, November 17, 2015

Lindys Stamp Gang...Faux Copper Filigree Leaves tutorial

 I am always discovering new ways to use Lindys products. I was going through my stash of embellishments and found that I was hoarding my metal filigree findings. Then came the thought..Why not try to recreate my own using intricate die-cuts and Lindy's embossing powder!!. It worked out beautifully. And it was oh so simple!! So as to not take away from their beauty, I decided to minimize the shimmer on my layout. I started with a 12x12 piece of Kraft paper and wrinkled it up. I opened it and adhered it to a piece of 12x12 corrugated cardboard. I sprayed the whole paper lightly using Mission Bells Brown Starburst Spray. I used brown distress ink and a sponge  applicator and went over the torn and distressed edges and the creases of the Kraft paper until I got a look sort of a worn leather look. I also sprayed the exposed corrugated cardboard with Incandescent Copper Moon Shadow Mist.Then the fun began layering all of my elements.


Here is a close up of the layout. The frame around the photo is wood. I sprayed it with  Incandescent Copper Moon Shadow Mist. The yellow flowers are spiral cut and were sprayed with Luminous Lemon Flat Fabio Spray. The brown flowers were sprayed with  combination of Mission Bells Brown and Cattail Copper Brown Starburst Sprays.


The fall colored oak leaves were left over from a previous layout I did. CLICK HERE. 


The Dusty Attic chipboard piece was sprayed with  Incandescent Copper Moon Shadow Mist. And the edges of the torn pieces of paper under the photo were edged with the same spray.


I used the different shaped leaves under the floral clusters. The filigree leaves were die cut from Prima's gorgeous Forest Leaves die.


 Here is a closeup of the leaves. 


I only adhered the leaves by the stems. I wanted them to pop off the page to show dimension just like a real copper filigree piece. For my leaves, I used Cleopatra's Copper Embossing Powder. I cant wait to test out the other colors I have. My suggestions are Byzantine Bronze, Caesars Gold, Midnight Pewter, Queen Sheba's Silver, and Silver Moon Turquoise to start out with. There are many other colors to choose from. CLICK HERE to see them all!


 These are the real deal. Filagree Metal Leaves. These were my inspiration for my idea to recreate them. These leaves are brass.


Here is the simple tutorial to follow so that you can recreate them for yourself. I chose to do a copper look.  Just right click on the photo and save to your computer for a quick reference.


Don't forget to join us this month for the Lindys Stamp Gang Color Challenge!! These colors are among my favorite, because they remind me of Autumn in the Apple Orchid farms on Long Island where I grew up.


Thank you for joining me today!! Now grab those sprays and embossing powders and show me what you have done!! 
xoxo
Lisa


Monday, November 2, 2015

Picture Perfect...Lindys Stamp Gang November 2015 Color Challenge

Welcome to the Lindy's Stamp Gang November 2015 Color Challenge. Autumn is my favorite season because of the colors. In Florida we don't have those gorgeous golden warm fall colors during Autumn, so I often create them in my projects. Grab a hot cup of something and cruise through this post.
I layered 2 pieces of patterned paper onto a piece of corrugated cardboard using Mod Podge and a foam brush. I distressed the edges before I mounted them. I brushed the entire background with gel medium. I used a Prima doily mask and Art Basics crackle texture paste, then after it dried, I randomly sprayed  Canna Lily Burnt Orange and Golden Sleigh Bells onto the paper blotting it for a softer feel. I let some of it drip by tilting the paper.


over the Prima flowers. It changed the colors perfectly. 

I used Dusty Attic chipboard to compliment the layered matting for the photo. I primed it with white gesso then  heat embossed it with Kaiser Russet Red.


Here is a closer look at the flowers. Each one was sprayed with a different color for variety.


And the flowers on the other side of the layout. I really love the golden yellow color. And you can see the shimmer of the gold on the leaves.


The die cut leaves were sprayed with  Greased Lightning Green Flat Fabio spray, and because I like a bit of shimmer, I added a light spritz of  Golden Sleigh Bells. This made the leaves shimmer.


I layered the photo mats using corrugated cardboard in between each mat. I also mounted each mat onto corrugated cardboard for dimension. I edged the mats using the wand of the spray bottle to apply the color. The distressed edges soaked up the sprays beautifully.


The Dusty Attic word Picture Perfect was heat embossed with Holly Berry Red Gold and a sprinkle of  Kaiser Russet Red embossing powder. I love that you can mix some of the powders for a great color effect.


Lindys colors are so true to life when it comes to coloring your botanicals. The possibilities are endless. I just love the intensity and shimmer of the colors. Even your Flat Fabios can be transformed into a shimmery color with just a coat of Glitz Spray, but I will leave that for another post!!

Thank you for joining me this week. Now I hope you join us for the Color challenge this month for a chance to win  1 of 5 $50 Gift Certificates to the Lindy's Store! That]s a lot of Lindy]s love!!


The November 2015 Limited Edition Mega Set
The Sprays:

The Embossing Powders: