Friday, July 31, 2015

Dusty Attic July Inspiration/Mood Board Challenge and a layout.

Good Morning my sweet and talented Dusty Attic Lovers!! We are here with another month gone by and the delicious Inspiration/Mood Board Challenge in full swing! You can interpret the colors any way you want!! You can use the words for interpretation. Either way, these board can really get your mojo started, as it does for me.


The Great And Powerful Oz!!!
When I think of Poppies, I think of The Wizard Of Oz. When Dorothy and her entourage  fell asleep in the field of Poppies. I LOVE that scene in the movie. The words in the Inspiration board this month remind me of that scene. I used the  Blazing Poppy Collection from Heartfelt Creations to create my poppies. What I really love, is Dusty Attic Chipboard!! Sometimes just 1 piece can take center stage on a project. And this large piece from the Floral Frame set is it. I primed the frame with gesso. Once it was dried, I sprayed my non stick Craft mat with Lindy's Stamp Gang spray in Caribbean Blue and placed the frame primed side down and swirled it into the spray. I repeated this with the Luscious Lime spray once the blue dried. I added some pearl jewels here and there and started my flower placement.


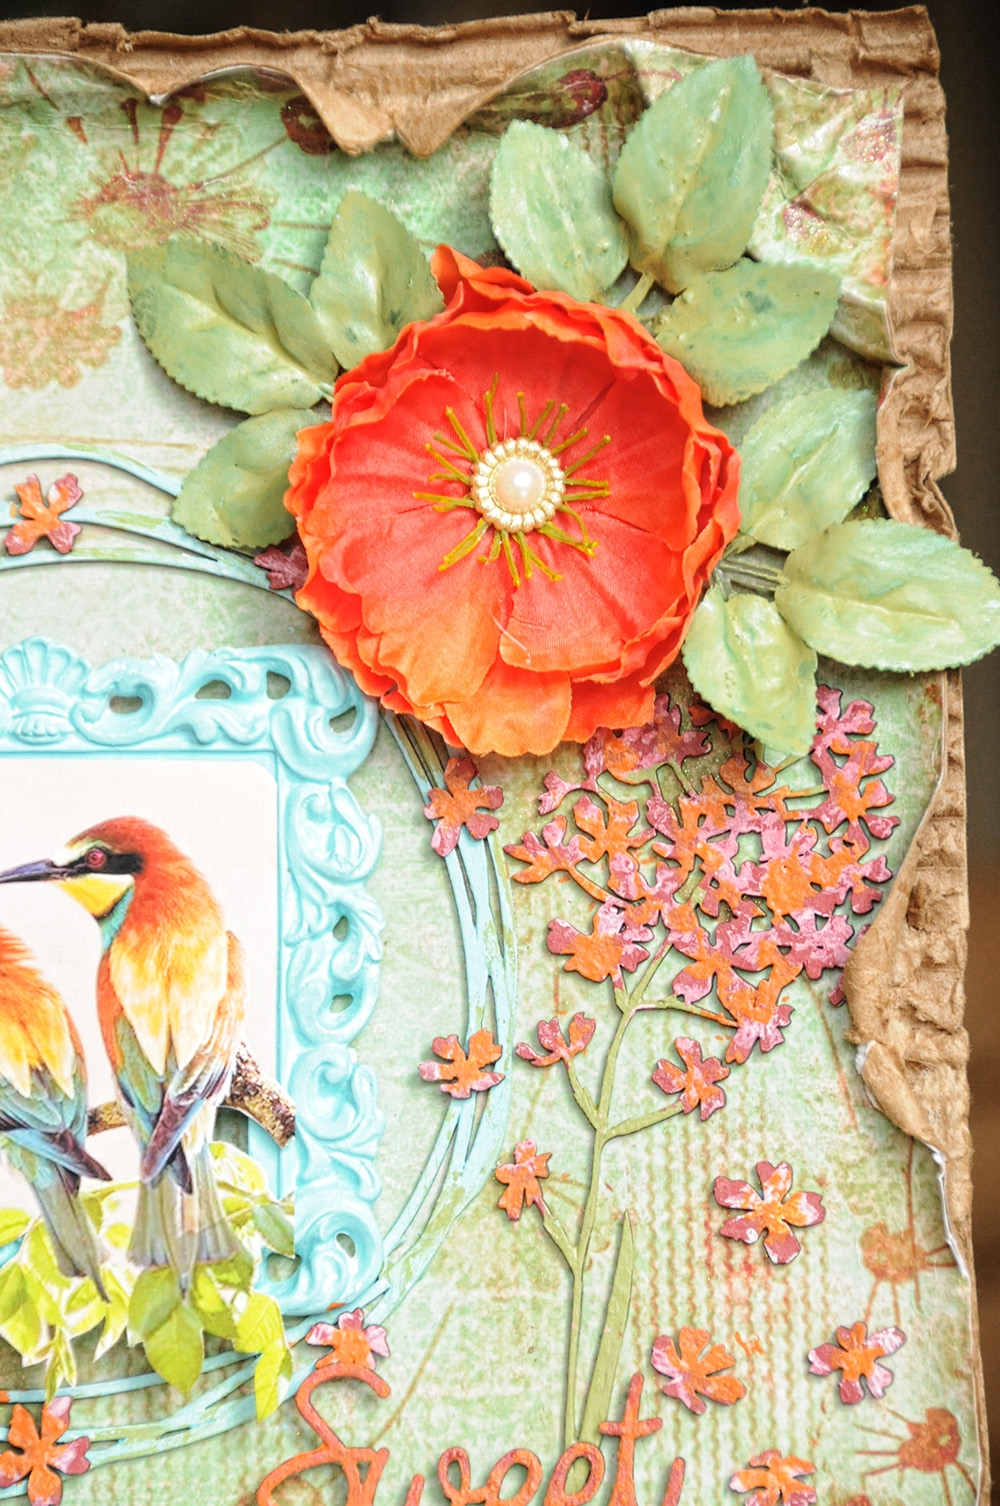
I created the flowers from the Heartfelt Creations Blazing Poppy set. The leaves are from Heartfelt Creations Beautiful You Cling Stamp Set. You can mix and match stamp sets to achieve different styles. Just like you can mix and match Dusty Attic Chipboard to achieve a different design! I colored the flowers  with Lindy's Stamp Gang Sprays.


I trailed a leafy vine with flowers on it at the end of the Dusty attic Floral Frame. The frame  is a gorgeous open ended circular design. It really does just make the whole page!


I found the photo of the poppies  on Pinterest. The colors were just perfect/ Even though the Dusty Attic Inspiration Board color was a bit more on the pinkish side. I let my creative imagination get away from me. I saw Poppy Red!!! But touching up the green leaves with the same red, left the lighter  pinkish color just like in the Inspiration board!! Win Win...


I just wanted you to get another view of the flowers! They were a lot of fun to create!!


Just a closeup of the flowers. I also sprayed the underside knowing that it would show in the layout as well.


I found this quote on the web. I printed it out and just cut out the words, inked the edges and placed them on my layout.


Here is the gorgeous Inspiration Board. Aren't the colors simply yummy!!?? So calming..My red color just pops off the page (get it?? Pop...Poppy??) Sorry...Red isn't so calming, but the balance is there. And it is more of a pinkish red. Not so harsh.
Dusty Attic Products Used:
                                                                      Floral Frame Set


Thank you for stopping by this week!! Don't forget to join us for the Inspiration Board Challenges each month for a chance to win some Dusty Attic goodies!!! You will find the details to join, HERE 
on the side bar...
Lisa
xoxo


Tuesday, July 28, 2015

BoBunny Cards, and a sad Farewell...

Good Morning BoBunny Fans!!! I am here today to inspire you with a couple of cards that I created using Penny Emporium.
But first, I have to tell you that after 2 absolutely wonderful years on the BoBunny Design Team, I have decided to step down from the team. This was a very difficult decision for me to make as I have loved every minute being on such a wonderful talented team. A special Thank you to Jan and Don Lanoy, for providing me with the most beautiful product ever to design with!! I truly loved representing one of the best in the industry. Second I would like to Thank Carley Thiel and Sara Peterson for  their effortless direction, organization, and management of the team. Thank you to Julianna Michaels as well. You all did such a great job!!! I am ever so grateful to have worked with you. Third, but not least, Thank you to my 20013-20015 team mates!!! Without you all, I wouldn't have been challenged to think outside the box. You have all inspired me and I have been so honored to work along side of you these past couple of years. Some of you are great old friends in my scrappy world, and others I have met through BoBunny and have formed a wonderful friendship with. I know this will not be the last time we cross paths...With all of your  gorgeous talents, I am sure we will be together again in some scrappy capacity!!! Some of you are also stepping down, and I wish you well, and some of you are staying with BoBunny, and I will continue to follow you for inspiration! So thank you BoBunny for a wild, creative and fun ride. It has been great!!! xoxo

Here is my first card. I wanted an elegant look to this one so I chose the Penny Emporium "Imagination" paper design. It reminded me of a vintage wallpaper design pattern. I love the colors. I used a Flip Card die from Sizzix. They are so easy to create. Die cut the paper, fold on the lines and flip the card. Easy easy...


Here you can see that I have opened up the card slightly. The trim on the ends are the BoBunny stickers from the 12x12 Sticker Combo sheet. For the decorative florals at the top and bottom of card, I dies cut them using the BoBunny Flourish die. I cut it in half and adhered it to the card.   


Here is the card opened up a little more. I created the rosettes using the same paper plus a piece of Penny Emporium that was used in my next card. It had the same beige color on the flip side and of course matched perfectly. I layered 2 Rosettes and topped it with a Penny Emporium Button and a Double Dot Jewel in Mocha.


This view shows the card opened up to show the flip side which can be used to place a sentiment or a message.


My next card was created using Penny Emporium pattern paper. I love the combo of blue and purple.


To get the decorative corners, I die cut an Ornate Frame piece and cut out the corners leaving a pretty decorative corner piece. I them assembled the Rosette the same way as I did the previous card, and I die cut a Flutter butterfly for the card front. For the ends of the card, I used the Flourish die and adhered them to the opposite ends.


Here is a close up of the rosette and butterfly. These cards are so much fun to make and so many possibilities to decorate!


BoBunny Products:
Patterned PaperImagination, Penny Emporium/Penny Emporium
Dies:Flutter, Flourish, Ornate Frames
Jewels: Mocha
Buttons: Penny Emporium
6x6 paper pad: Penny Emporium


Dusty Attic Chipboard and Dusty In Colour Paint

Hello my Dusty Attic Lovers! After a brief absence, and fully recovered from illness, I am BACK!!! Dusty Attic not only has fabulous chipboard, but the Dusty in Colour water based acrylic paints to color your chipboard are just as fabulous. I have combined both on this layout. I love that I don't have to prime my chipboard before applying the Dusty In Colour paint. One coat is all you need in most cases. Today I have created a layout. I mounted a piece of patterned paper onto a 12x12 piece of corrugated cardboard and distressed the edges. I love the raw edge of the cardboard without any paint because it reminds me of being in the woods, where you might find these gorgeous birds hiding in the trees.


For the resin frame and the String Frame chipboard, I used  Dusty in Colour Oceania. The paint is thick and creamy and only required 1 coat. The resin frame was once yellow. You would never be able to tell because of the fabulous coverage of the paint.  


For the flowers, I sprayed them with Lindys Stamp Gang starburst spray in Tiger Lily Red Orange with a tiny touch of Queen Of Hearts Red Flat Fabio. The flowers were a peach color to start with. The leaves were painted with Dusty In Colour Pesto and after the leaves dried I sprayed them with Lindys Frosty Forest Green starburst spray for a little bit of shimmer.


The fabulous Spring Blooms #2 chipboard was painted with Dusty In Colour Sunburnt Orange and Cranberry. The stems and leaves were painted with Pesto. For the floral parts of the blooms, I just dabbed the colors on the chipboard using my finger. I added a tiny bit of Navajo White Dusty In Colour to dab on the flowers while the other colors were still wet. This created a lighter highlighted color.


I also dabbed  a small bit of the Pesto on the String Chipboard to give it a worn look. Kind of like a patina. I added the single blooms onto the string chipboard.


The title Sweet, is a piece taken from the Word Pack # 14. I painted it the same colors I used in the Spring Blooms.


Thank you for joining me today. I hope that you are inspired to grab the fabulous Dusty In Colour to paint your Dusty Attic chipboard. There are so many colors to choose from.


Dusty Attic Products:


Tuesday, July 14, 2015

BoBunny Boardwalk Treasure Chest with Mini Album

Be warned, this post is a little photo heavy. But I wanted you all to see everything about this Treasure box containing  a mini album. Totally beach inspired!! Living by the seashore my whole life, it wasn't hard to get inspired. The Boardwalk collection by BoBunny is the perfect line to use and create summery beachy projects. Toes in the sand, face in the sun...The joys of summer on the seashore!!


Here is a view of the box top opened and peeking in to see the little surprise inside. A matching mini album.


Here you can see that the mini fits perfectly in the box, and there is still room for more trinkets and treasures to fill in the box.


Here is a close up of the mini album. I used a few starfish to give it that perfect beach and  seashore feeling. You can see that I gave the whole thing a little shine by spraying the Glimmer spray in Gold. Just a little dusting for magic.


Here is a full view of the mini album. I just had to add the rope and tie a few boaters knots into it to make it look authentic. I used a Sizzix die to die cut  each page of the mini and sandwiched the corrugated cardboard with patterned paper. I love the rustic look of each page. And the cardboard makes it heavy duty.


This is the view of the back of the mini. I used the Journaling Cards from the multi pack. I backed it with corrugated cardboard and surrounded it with more rope, just as I did the front of the mini.


The back of the treasure chest, I rubbed on the Foil  Alphabet in Gold. I absolutely adore these Foil rub-ons. They are the easiest ones I have ever used. And so so beautiful like Gold Leaf.


Here is a closeup of part of the box top. I used a couple of little Natural Flowers, and the rest were punched or rolled from a piece of matching card stock. I put them together using the Boardwalk Brads. You can see the cheesecloth peaking through.


Here is a full frontal  view of the treasure chest. I love the layered Boardwalk Chipboard. It has a beautiful gold glitter to some of the pieces.


Here is a closeup of the chipboard. You can see a tiny piece of the cheesecloth I used that I sprayed with Glimmer Spray in Bronze and Gold. I lined the box top with rope.


 Here is the perfect pair together. There is plenty of room inside of the mini to mount those summer  photos you have been waiting to display.


Thank you for taking a peek at my blog today. I hope that you are inspired to  get those summer photos in order, so that you can  display them in your next project.

BoBunny Products Used:
Patterned paper: Drift, Seaside, Carefree, Sandcastle, Beach Bliss/Boardwalk
Blossoms: Denim Daisy, Denim Blue Pansy
6x6 Paper pad: Boardwalk
Layered Chipboard: Boardwalk
Brads: Boardwalk
Glimmer Spray: Gold, Bronze
Foil Transfers: Alphabet Fold Foil Rub On
Kraft: Natural Petals
 Misc Me Boardwalk Pocket Squares

Other Products used: 
corrugated cardboard
paper mache box
rope
brads
Sizzix die
natural Starfish
seashells (collected on Honeymoon Island 45 minutes from my home)
floral punch
Cheesecloth
wide eyelets
Cropodile
ATG Gun
Aleenes quick dry glue

Monday, July 13, 2015

Rebirth Of A Layout Lindys Stamp Gang Style

 Hello Lindy's Lovers!!I have been obsessed lately with looking at my old layouts and wondering what I would do different if I were to do the same layout today. It wasn't hard to figure out what I would do. So I will call this the "Rebirth of a Layout". Just like Cinderella at the ball. I took apart my old layout layer by layer, tore off the flowers and jewels swirls, gathered some cardboard and new white flowers,  pulled out a variety of Lindys sprays and went to town.. What a difference a spray makes.

I cut a piece of 12x12 corrugated cardboard and adhered the very bottom layer to it using ModPodge and let it dry.
I sprayed the edges with  Ceste la vie Cerise Flat Fabio spray. While the spray was still very wet, I peeled it back from the corrugated cardboard taking the top of the cardboard layer with it, I pulled it back a bit, wrinkled the edges and let it dry. I lifted the edges of the card stock a bit, and sprayed the exposed corrugated cardboard part with Dark Chocolate Truffle, and Cattail Copper Brown  Starburst sprays. When it dried I touched it up a bit with the Ceste la vie Cerise Flat Fabio spray.
The next layer of card stock is the beige one. I adhered a piece of cardboard underneath to give it depth and adhered it to the blue layer. I used a piece of giant bubble wrap, sprayed my Ceste la vie Cerise Flat Fabio spray onto a craft mat, dipped the bubble wrap  in the spray and started dabbing it onto the card stock leaving small puddles that I dried with a heat tool. I tore and curled back and wrinkled the punched edges a bit for a worn look. Then I took the top blue card stock layer, placed a piece of cardboard behind it and adhered it to the beige layer. I sprayed that layer with Ceste la vie Cerise Flat Fabio spray and after all of the layers were dried, I gave it a quick spritz of  Dark Chocolate Truffle. Then I adhered cardboard to the back of the photo and placed it in the middle of the top layer.
The next step is to rearrange all of the embellishments back onto the layout, once they were recolored with the sprays. .


This flower was once white. I used  Dark Chocolate Truffle, Mission Bells Brown, and Cattail Copper Brown and dried it with the heat tool. I love the variegated look each color ended up on the flower.


Here is a closeup of the layers. The layout is no longer flat with the addition of cardboard in between each layer. The richness of the browns brings out the beautiful blue.


The larger flowers started out as a flat orange/ brown color. But when sprayed with Dark Chocolate Truffle, Mission Bells Brown, and Cattail Copper Brown, the depth of color comes out in each layer. I topped the flowers with Incandescent Copper Moonshadow Mist spray.


All of the newer white flowers were sprayed with Ceste la vie Cerise Flat Fabio spray. The white flowers that were on the original layout were also touched up with the Ceste la vie Cerise.


Just another closeup of the distressed layers. You can see the fine spray of Dark Chocolate Truffle that gave the layout a final touch of  beautiful distress. I also sprayed some A Bit Of Bubbly Starburst Spray  to give the final layout a golden sparkle.


Here are the before and after photos of the layout side by side. Lindys just added a richness to the whole layout. In real life the change is unbelievable.


Thank you for joining me this week. Until next time, don't forget to check back to the Blog often as the Lindys Designers are always an inspiration with their gorgeous art.

Lindys Stamp Gang products used:

Don't forget to join our Color Challenge this month!!! There will be 5 winners chosen for  $50 Gift Certificates to the store! See rules HERE

 
xo
Lisa