Friday, January 29, 2010


It's Fix-It Friday #42 at i heart faces!!Here is my entry to the fix...I opened the Photo in Photoshop CS4. Used Totally Rad Actions, Oh Snap action, then tweaked the photo in Lucis Art 3 enhance detail at 75 and Mix With Original Photo at 48 then flattened photo. Then I overlayed it with JCarson texture Winter Overlay in normal at 75% opacity. Used TRA"Warm It Up, Chris," Flattened, Sharpened slightly in Portraiture, done.Go check out the original at I heart Faces.

Monday, January 25, 2010

I Heart Faces Textures Contest


Week 4 - “Texture” Photo Challenge!
So this week at I Heart Faces the challenge is Textures..You all know how much I love using textures in my photos. So I took this photo of my friend Christina on her wedding day. I added 2 different textures, brushed in the butterfly wings and used Bleeding Cowboy text for the journaling. I also used a vintage action for the color and softened it up a bit using Portraiture and added a slight diffuse glow. Shana Rae is guest judge!! She owns Florabella and has the best textures out there...One day I hope to own her entire collection!! I love my Photoshop!!!


Wednesday, January 20, 2010

Heartfelt Message...

I just received a beautiful letter from a fellow scrapper. Someone who I only know through forums. But her letter made me a little ...putting it mildly, angry..Not anything she said, but what was said to her that kind of hurt her feelings. I wont post what she wrote, but what she wanted to know was how I felt about other scrappers and photographers asking me if I wouldnt mind telling them how I created something or on my technique when doing something. Because she had approached a scrap artist on a forum and asked if that person would graciously divulge her secret on a specific technique that made that artists pages so unique. The answer she got was, if she divulged her secret that made her unique, then she wouldn't be unique anymore and flat out said No, I wouldn't tell my own mother how I do it...I was astounded. Well I got to thinking, and these are my thoughts...

My creative mind works in mysterious ways especially when I am teaching a class. I have to first formulate my ideas in my head, and then try to convey them to the students I am teaching. In the end my creative mind as a scrapbook artist gets recharged. And although many photographers and scrapbook artists, jealously covet their techniques and creative secrets, I am not one of them...

I often think to myself, "that brilliant creative new idea that I thought I had, has no doubt been already done by some other artist". I just have to stretch my imagination and make it better.

I have heard the buzz in chatrooms and forums to the tune of "ooh, look, she copied so and so and tried to make it her own", or "ooh, look, she did it because so and so did it".I myself am delightfully flattered when I am " scraplifted". Most of us get inspiration from somewhere...Some of us take that inspiration and fly with it.. Few of us ARE the inspiration.

Those are the artists with creative gifts. They don't have to "try", they just "do." I myself use to envy some of those artists and wonder why on earth some of them would not share their creative secrets.

I vowed that I would learn to hone my craft, and Pay it Forward. To Pay it Forward is not a new concept..One good deed deserves another...That is what my parents taught me at a young age.

So my philosophy is this:
Michaelangelo could come down from the heavens and divulge all of his artistic techniques and secrets on how he managed to paint the Sistine Chapel. He would show me every minute detail of his work from technique to lighting to brushstroke. In the end, I will never be Michelangelo. There is only one...But it may make me a better artist with all of the insight that he taught me. And I may see things in a different way.

I will only be just me...
Star Sailor Scrapper
Mother, sister, daughter, wife, friend, scrapbook artist...
And I will graciously share with all of you everything I learn...And I hope that one day, you will Pay it Forward too...

So Thank you to the Krissy's, the Robins, The Irenes, the Beggahunas, the Gabriellep's, the Toni's, the Bonnies, the Sandy's, the Tims, (he is sooo cute) and all the other artists out there who generously devote their time and effort to teach others the fine art of this craft called Scrapbooking...I applaud you...

Lisa

Tuesday, January 19, 2010


I have had some requests on how to make roses. I first saw The Grunge Paper Roses at CHA in Orlando last year, at the Ranger Booth. They were made out of Grunge board paper. Then Bonnie made some for a couple of her projects. Most tutorials require a 6 petal punch. When Tim Holtz started his 12 Tags Of Christmas, I learned so many new techniques. One being the grunge paper Rose he did. I got to thinking, you could use different dies, (he used Sizzix #5 flower layers). I have seen variations using punches. So over at Swirlydoos, I decided to do a tutorial on the different variations using 5, 6, or 7 petal flower punches and dies. You could even use your Cricut or electronic die cutting machines, and if you are a SCAL follower, your flower arsenal would be endless!! They all work well. So stop on over at Swirlydoos real soon where there will be a tutorial posted sometime this week. And don't forget to keep watching for new tutorials on awesome techniques!!

Thursday, January 14, 2010


Ok, I am always trying to save a buck so that I can add to my arsenal of scrap booking goodness. So I have been looking for the Tim Holtz (Ranger) Ink Blending Tool. I have the Alcohol blending felts, but not the foam. But I cant seem to find the packages of the foams. So my dear friend Paulien Vandenbocsh had this wonderful idea to add to her own collection by creating her own. That sparked my creative juices to create the cutest ink blending tools!! With the help of my dear talented husband and my scrappy creative brain, I did it. I went to Home Depot, with a list of what my husband told me to get, came home, handed him the supplies, he went into his work shop and came out with the prototype!!! I was tickled!! I then took it into my scrap room and proceeded to give it it's own personality!! And this is what I came up with...So for about $20.00 (the retail cost of 2 Ranger Ink Blending Tools) I have 20 of them!!! And they will all have different designs!! Sweet!! So go visit Swirlydoos and check out the forums for tips and tricks, because in the near future I will be giving away a few of these cute blending tools!! Here are the before and after photos.

Friday, January 1, 2010

WINTER WONDERLAND


The 
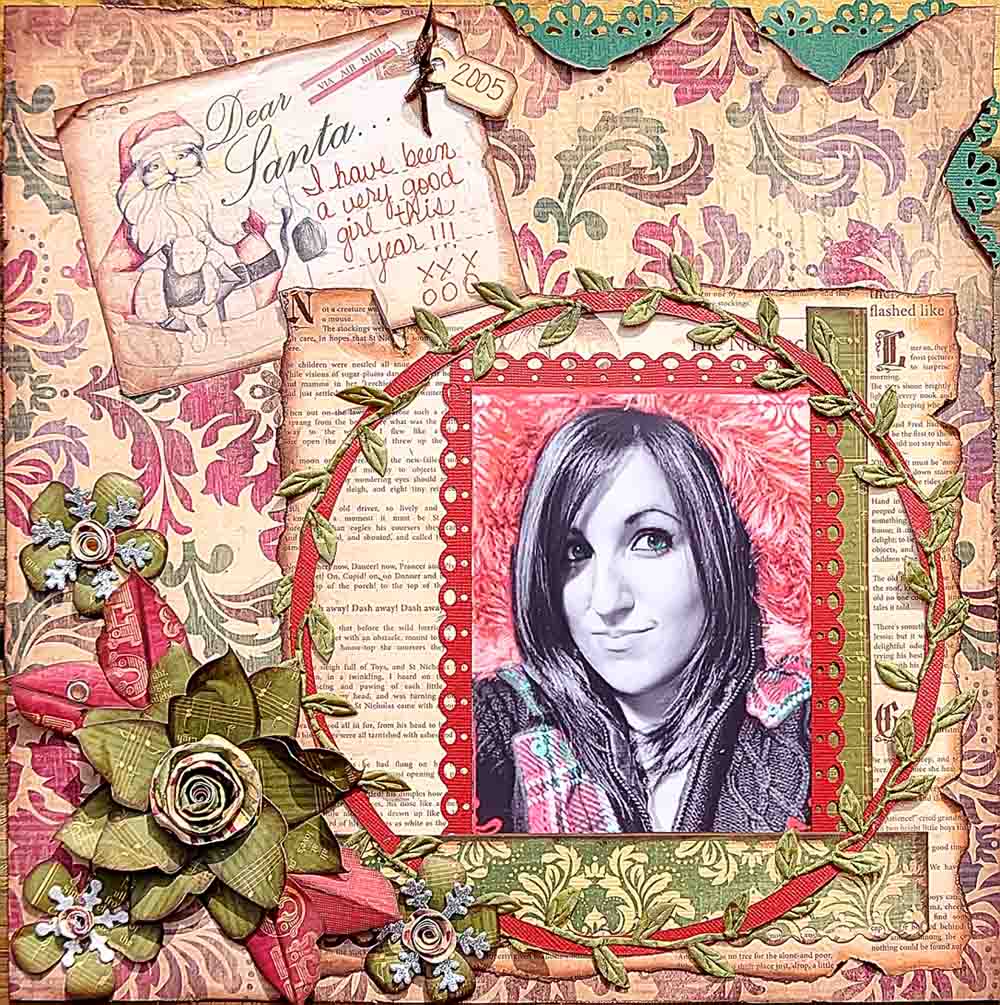
Swirlydoos January kit is out..."Winter Wonderland". Can you say Wonderful???? Beautiful???? So much fun to work with??? It is all that and more. With this past holiday filled with cooking, cleaning, and preparing for me, I only managed to complete 3 LO's for reveal day. I have 2 more almost done on my desk right now. And plenty more supplies to create even more!! But go check out what my design team mates have done with the kit..You are sure to be inspired. And OH YEA, Bonnie Wellink (LaBonita) has joined our design team!!In my humble opinion, Our Design Team is one of the best out there and I am so proud to work along side each and every one of them!! The Christmas rush is behind me. My party was absolutely a huge success as always. So much fun to spend time with friends and family!! But now it's time to scrap again. The Christmas tree can wait a little longer to be taken down...I'm spending the 1st day of the New Year here in my scrap studio, working...no, playing...with all my Winter Wonderland "STUFF"!!!!
So here is to Us my blogging friends!!!! And a new year of creativity!! I am so loving chatting it up with all of you here in Blogville. I am hoping this year will bring everyone a fresh start, more blogging friends, and the BEST year yet!!!!!! Thank you everyone for all of your inspiration, for sharing your tips and tricks, for your visions and dreams...Keep up the great art work, and like Tim says...ENJOY THE JOURNEY!!!!!

Love and Best Wishes for the New Year!!! 2010...We are ready for you!!!!

Sunday, December 20, 2009


I finally got the Christmas Tree done today!!! My 9 foot Martha Stewart Tree...

Saturday, December 19, 2009

Tuesday, December 15, 2009

It was a warm sunny day today in the Sunshine state...But it has started to snow on my blog...Oh how I miss the touch of snowflakes on my tongue...Makes me think of "snow days" from my elementary school days....NO SCHOOL!!!!!! Yay!!!! Good memories!!

Friday, December 11, 2009


My good friend Angelica has a wonderful Etsy Shop called "Angelica's Little Scrap Shop". You know her from her beautiful LO's at SB.com.(go check out her beautiful gallery) She has the most beautiful embellishment kits at her shop and she was soooo kind enough to send me a fantastic kit called "Jingle Bells Christmas Embellishment Kit for Scrapbooking" My oh my..It is filled with gorgeous golden shiny sparking embellies. I wanted to fit every single piece in this LO, but I wanted to save some for another LO, so I still have more left that I haven't even used here. From the gold lame ribbon to the beautiful silk flowers, the glistening branches and the fantastic snowflakes, it is all so fitting for an elegant Holiday LO. Go see what she has in the shop. I love everything!! http://www.etsy.com/shop/angelicafranssen. The photo is my nephew years ago, sleeping and waiting for Jolly Old St.Nick to visit. I have used this photo before, but it is one of my faves....Thank you Angelica for the awesome kit!!!I think I may add some more to this LO with what I have left!! Love it!!

Tuesday, December 1, 2009

SWIRLYDOOS "MY FAVORITE THINGS" kit


It's beginning to look a lot like Christmas!! Here are 6 of my LO's from Swirlydoos December kit "My Favorite Things". I have so much more to get out of the kit. I have one that I havent uploaded anywhere because I am so unhappy with it. I am trying to figure out how to save it. You cant get a bad LO with these papers, I am just so critical of myself. I also did 2 cards that I havent uploaded either. I will work on them tomorrow. I found myself reaching for old Christmas photo's of my kiddies when they were younger. Just feeling sentimental I guess. They have always been close even though they are 5 years apart. There was only one year that they fell apart from each other, and that was because Nick (my son) got married and my daughter found that her big brother was gone...He settled into his new life and before you knew it. they were back to their old selves again... Today, Nick came over to try and install Windows 7 onto my Dell, and Gabbie whisked him away to lunch...they went to Chili's...Ya think they would have bought something back for me!!!! LOL... Not even left overs. It is just nice to see these 2 love each other. Makes my momma heart smile!!

Monday, November 16, 2009


We are up to week 5 in making another page for our Mini Album in Monday Morning Mini Madness over at Swirlydoos. This weeks tutorial is on making a Water Fall page..Come join the fun and get an album done while learning new techniques!!

Monday, November 9, 2009

Can I tell you how much I loved working with this last SWIRLYDOOS kit...Antique Linen for November. The papers are just divine!! I always think Krissy out does herself every month, and out comes another masterpiece kit. This is one of my faves. I used 2 pieces of the paper and the rest of my scraps from the kit. I quilled, Glimmer Misted, punched, wrote, used texture rub ons, and added the Paper bag flower from my tutorial at Swirlydoos. Everything on this LO is from the kit except for the brad, that was from a previous kit. The Photo was edited in Photoshop CS4, it is my DD when she was about 9 months old. I added fairy wings and a little fairy sparkle magic at her fingertips. TFL...

Saturday, November 7, 2009

Another Swirlydoos Design Team LO I did with the gorgeous Antique Linen November main kit. The paper, flowers, lace, stamps. The only thing from my stash is the Journey die cut. I made my own word paper using the cream cardstock from the kits add on card stock, opened up Microsoft word, using the French Script font, started writing sweet words of love, chose a font color the same color brown as in the blue TPC paper and printed it on the card stock. It worked out wonderfully, I also used a little Glimmer Mist in blue to mask a soft flourish then inked the whole LO. I also made my own tiny letter stickers and inked all around before placing them on the lO. I used my Cricut Expression for the first time creating the brown flourishes at the bottom of the LO...The smaller leaves are Sizzix cut with the beautiful leaf green card stock from the add on. Just a side note, I absolutely adore seeing what everyone is creating with Swirlydoos kits...Beautiful work all around!! TFL... The photo is from a wedding I shot a few months ago.

Monday, November 2, 2009

Paper Bag Flower Tutorial

There is a new tutorial over at SWIRLYDOOS...It is for a flower made from paper bags. Though you could use mulberry paper, coffee filters, or just your favorite paper. The paper that Krissy wraps our scrapbook kit in before she places it in the packaging box is a wonderful slightly shiny thinner paper bag. Not rough like a grocery bag. I love it and have even made great ruffles with this paper. Glimmer Mist works so well on coffee filters. The colors are amazing!! So go check out the Paper Bag Flowers, and try your own. Hit me up if you do, I would love to see what you came up with!!

~~~Supplies~~~
1. Any die that will give you a
flower petal, or you can hand cut your own. For the illustrated flowers I used the small petal and flower center from the Sizzix Poinsettia Die.
2. Glue
3. Glimmer Mist
4. Something for the center of the
flower, brads, jewel centers, small flowers, small cardstock
roses, rhinestones, or buttons.
5. Coffee filters,
paper bags, (or any double sided paper. mulberry paper and cardstock may
be used)

Glimmer mist the whole coffee filter or paper bag and die cut or hand cut the petals. For one flower you will need 15 petals.
While the petals are still very slightly damp, twist the petals, then slightly unravel. You should have ripples in the petal. If the paper is still to wet, you will not get the wrinkle ripples, if the paper is bone dry, the paper may rip. Very very slightly damp works best. Then just grabbing the top tip of the petal, twist it so that the petals has a slight overlay towards the tip.
For the bottom layer, glue 8 petals together as shown with the folded tip on the outside of the flower. The next layer will have the remaining 7 petals. I used 2 smaller flowers for the middle. You can use a small flower punch like the Retro or Daisy punch for the middle, but this is just optional to add more dimension. If you will be using an alternative center, the smaller flowers are not necessary Now glue the 7 petal flower on top of the 8 petal flower. You can now twist the tips a little further to your liking. You can further distress it by inking the edges of the petals, by lightly brushing over the whole flower.
To finish your flower, you can use a variety of embellishments for the center. In Illustration 4, I used a small flower and a brad, in 5, I used a small coffee filter rose using Manda's cardstock tutorial over at Swirlydoos. In the last photo I used the pretty pearl metal centers from the Antique Linen Kit.


Note: Leaves can be done with the same petal you use for the flowers. Crease in the middle and ink the crease, Ink the sides and curl under and crunch slightly to get a real leaf look as in this illustration.

Sunday, November 1, 2009

Antique Linen


These pages were created with Swirlydoos November kit Antique Linen. It is one of the most beautiful kits yet!! But I think that about every kit from Swirlydoos. I have been busy with a couple of tutorials, so I only managed to get 4 LO's done for reveal day, but will squeeze out a few more. Tomorrow is Monday Morning Mini Madness!!! Another page creation will be posted in the morning!! Break out those alcohol inks!!! We're gonna get a little crazy!!

Monday, October 19, 2009

Lets Start a Mini...


Head on over to SWIRLYDOOS. I will be doing a weekly series on Mondays on How to make a Mini Album step by step. Head on over to the Tips, Tricks & Techniques page for Part 1 which started today. The Series will be titled "Monday Morning Mini Madness"..Stay tuned for more info. Todays tutorial is on preparing the cover, back and pages. Future sessions will be on embellishing your cover and the different pages with cool techniques and tutorials and end with putting it all together, So come and join us for Monday Mini Madness. If you have always wanted to try a mini, this will take you step by step...

Wednesday, September 30, 2009

AUTUMN SPLENDOR


Here are the first 5 layouts from my design team work for Swirlydoos. I have 2 more in the works on my project desk right now, just no time to finish them up for reveal day today. The kit is just awesome as always!! I didnt think I could find any fall related photo's, but I dug deep into my photo albums and found a few. And Photoshop helped me enhance some of the photos as well.

SWIRLYDOOS AUTUMN SPLENDOR KIT


Swirlydoos is proud to offer you our crisp October collection - Autumn Splendor !!


Fall is definitely in the air here at Swirlydoos! With the breeze turning brisk and the leaves turning colors our minds are set on the beautiful jewel tones that blanket the landscape this time of year. Born of our love for these beautifully, rich colors came our warm and cozy October kit. Our "Autumn Splendor" collection comes complete with an incredible custom sketch by the very talented Beggahuna, which you can use to enter our monthly sketch challenge! This carefully prepared scrapbook collection boasts a variety of brand new products from SEI, My Little Yellow Bicycle, Petaloo, Prima and the list goes on! As a special treat we have teamed up with Unique Pages to create a beautiful custom cut chipboard circle delicately endowed with Fall Maple Leaves and we just know it will add such a special touch to your Fall project! We are proud to offer you a coordinating cardstock add on, a pattern paper add on, our 'Signature' Flower add-on kit, and a 7-Gypsies exclusive add-on kit that will blow your mind! 7-Gypsies is sponsoring our manufacturer contest this month, see details over at SWIRLYDOOS on how to win one of two FABULOUS 7-Gypsies prizes! We sincerely hope you'll enjoy this beautiful collection that we have prepared for you!

Friday, September 25, 2009

We are headed towards the end of another beautiful SWIRLYDOOS month..The last of summer is trailing behind us....Fall is on the way. I end Bejeweled with a LO that oozes Summer sunshine...This is my daughter at 8 years old, so proud that she grew her own Sunflower garden, and so she poses beside her prized flowers...Wish I had gotten more pictures...But I do love this one. So while the October Swirlydoos kit Autumn Splendor waits on my scrapbook table, begging to be opened and created with, I leave you with Gabbies Flowers...The last of Septembers "Bejeweled"...