

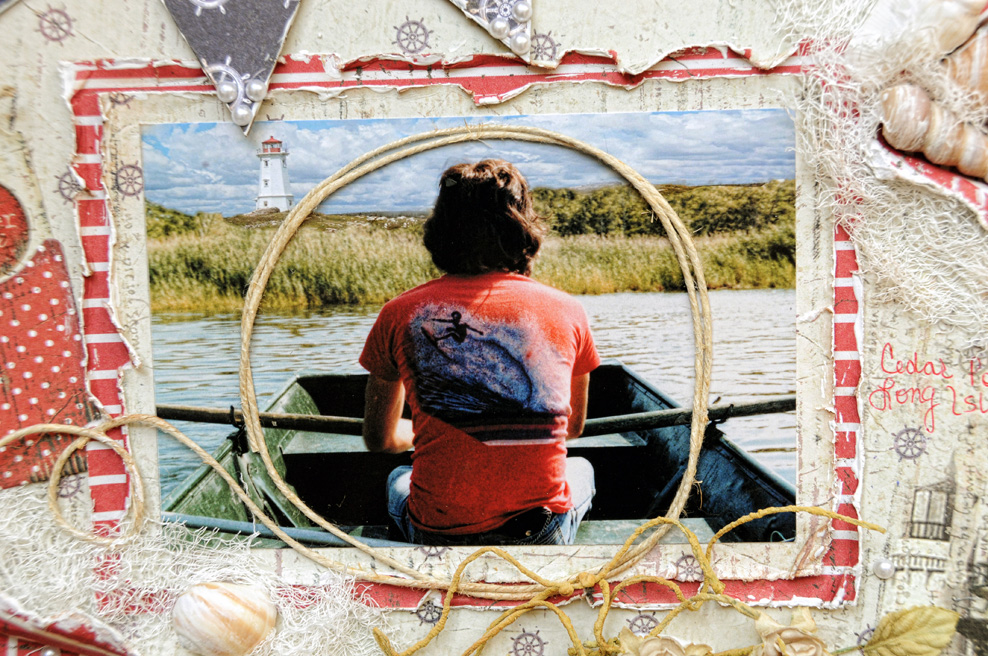
I am super excited about CHA in a couple of weeks. I am now counting the sleeps till it is time to go!! One of the highlights of the show is going to be the wonderful new line from FabScraps. Wait until you see this absolutely gorgeous collection. if you want a summer, beach, sailing, cruising, kind of theme...This line is for you!!Living in Florida, I have the luxury of the beach and sun all year long. And plenty of photo's to scrap in that summery theme!!. But, with this 1st sneak peak layout, I used a photo I took a VERY long time ago. It is of my then boyfriend (who is now my husband) when he was 19 years old. 1980. He took me on a boat ride in one of the inlets of the Long Island Sound in East Hampton Long Island. We have lived on that Island and by the beach our whole lives until we moved to Florida's Gulf Coast. On this particular day, we were clamming!!. What a great date. It was his first camping trip with my family. But more memorable, it was a romantic boat ride. I packed a lunch, and we just sat in that row boat and talked for hours. But something in the photo was missing...A lighthouse. You know, to go with the lighthouse theme of the gorgeous paper!!. So, Photoshop CS5 helped save the photo.I found the pic of the beautiful lighthouse on the internet and merged the 2 together. I will post the pic at the end of this post. I did a couple more as well. You will see them on future layouts using this collection.
And if you are going to CHA, don't forget to stop at FabScraps Booth( booth 1517) and see the whole beautiful collection and what some of the designers have done with it!! You will be inspired!! And I hope to meet some of you there!!

The chipboard pieces that are created for each paper collection is just fabulous!! Wait until you see the peiecs that are made for this new collection. They are awesome!!! I covered the flag chippies with paper, but you could easily paint or stain them.

I have a seashell collection that is so old. It was nice to use some of the shells for this Layout.
I used gauze from an emergency first aid kit. The pinwheels are so sweet.

Here is a closer look at the photo. Funny how even the back of Steve's shirt is water themed.
Just a closer look at the shels and gesso distressing. The random pearls may have fallen out of oyster shells. lol...

A close up of the pocket and tag from the collection. This is a small one, there is also a bigger one. I did some journaling on the back of the tag.

 Here are the step by step instructions on how I constructed this layout:
1. Punch around the C50 006 page using a decorative punch around the page set.
2. With a second C50 006 paper for the background, adhere the punched paper over the background paper.
3. Make 2 tears on either side of the top paper and curl back the edges revealing the background paper underneath.
4. Cut out any excess background paper that is beneath the top paper. This will give you extra paper for the matting.
5. Mat your photo using each pattern from front and back of the paper. Distress the edges and adhere to middle of page on a slight angle.
6. Tuck and adhere some seashells into the corners of the tears. .
7. Take some cheese cloth or gauze and cut it into strips and tuck in and around seashells and the curled back paper.
8. Take some light weight hemp or jute and circle the photo leaving a tail to loop and curl onto the page.
9. Using a piece of coordinating paper from the MC50 001 Die Cut Journal Book, cover the DC50 010Flags chipboard.
10. Using light weight hemp or jute, connect and adhere the flags together leaving a small tail on either side and tie a loose loop on the ends. Place 3 pears on the points and hang over the layout as shown.
11. Create the pocket jounaling card from the MC50 001 Die cut Journal Book. Place a sticker from the ST50 002(flat) sticker sheet onto the tag. Tie a piece of jut onto the tag.
12. Adhere the pocket card to the layout and slip the tag into it.
13. Pant the DC50 017 Ahoy-word chipboard with white Gesso. When it dries, ink the edges with chalk ink in brown. Place over the flags.
14. Place the floral vine on the bottom of the layout.
15. Create 2 small pinwheel flowers using MC DC08 Pinwheel cutouts.
16. Adhere the pinwheels to the layout and top with a pearl.
17. Place small pearls randomly around the layout.
18. Using Gesso, randomly touch up the edges of the papers, shells, gauze, flags etc...
A fabulous layout starting with a fabulous photo and memory!
ReplyDeleteI am loving everything Fabscraps these days! I should be a spokesman heehee~! Such a yummy page to go along with your sweet story! Everything is simply perfect! Have a great time at CHA .. if I don't make my way back over here before then! Muwah!
ReplyDeleteLisa this is one of my all time fav's of yours! It's fabulous! I took my time enjoying it and all the details you added.
ReplyDeleteWONDERFUL!!! Love this layout, its so amazing, and the picture is so beautiful too, well done honey! Love the line its perfect for those sailing beachy pictures. Loving all the little details sweetie! You are a master!
ReplyDeleteHugs! Frank
Wow.. this is stunning.. I love all the nautical themed embellishments you have used, perfect colors.. wonderful design.. really love this one!!
ReplyDeleteAmazing LO!! Love how you used the twine to frame inside the photo!! ~ Blessings
ReplyDeletehttp://gracescraps.blogspot.com/
I love the banner (I'm so into banners right now), and the punch around the page. Gorgeous.
ReplyDeleteoh wowowowowowowowwowwwwww!
ReplyDeleteWow Lisa! FABULOUS LO!!! I love how you added the lighthouse onto the photo! Awesome job with that line!
ReplyDeleteFantastic LO's, Lisa! You make me want to try doing something with banners!
ReplyDelete