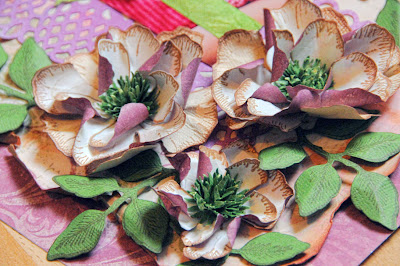
 Here is a closeup of the flowers. I wanted to create wild roses and this is what I came up with.
 Yet another closeup but more of a side view.
 I painted the foam letters with Lumiere paint and it left a wonderful kind of texture on it. The butterflies were die cut and I layered 2 of them and added the pearls for the body.
 Here is how I created the layout.
-
12 x 12 layout
HCD 713 Decorative Lace Border Die
HCD 702 Decorative Butterfly-Bprder DiecutsOther Products
Kaisercraft paper
Mcgill star punch
Glimmer Mist
Seam Binding
Archival Ink
Prima Mask
Chalk Ink
Lumiere paint
Glitz letter stickers
Instructions
Cut the floral piece of paper using a scalloped curvy shape all along the edges. Ink and slightly spray the edges of paper and distress all along the edge, tearing into and curling some of the scallops showing the backside of the paper in parts. Wrinkle the 2 corners slightly and go over the corners with ink distressing further. Adhere the paper to the background paper. Die cut the Lace Border and adhere towards the bottom of page slightly offset. Tie ribbon around bottom of photo and adhere to page as shown slightly offset as well. Create you flowers by die cutting and stamping different sizes, then wet distress by wrinkling and curling the petals slightly inward towards the center, then stack flowers 2 or 3 at a time. Punch 4 star shapes and layer them on top of one another then scrunch them up to form puffy stamen. Adhere each to the middle of flowers. Die cut leaves and stamp. Arrange the leaves and flowers in clusters to your liking around the page. The butterflies were die cut and I layered 2 of them and added the pearls for the body. Place on layout. Paint chip board letters and place the title on either side of the photo as shown. Place the tiny sticker letters above the word WILD as part of the title.

gorgeous Lisa, love the flowers and what a beautiful photo :)
ReplyDeletethis is absolutely beautiful! love those flowers and leaves and this is stupendous and beautiful layout!
ReplyDeleteHi Lisa,
ReplyDeleteI always look forward to Wednesdays to see your beautiful creations! Sooo beautiful and the flowers are gorgeous!
Sigh...I see I now need to buy those stamps. Stop doing this to me. ;)
ReplyDeleteSuch a super sweet LO and love all the detail! The flowers are so pretty and look great the way you've curled them to perfection :)
ReplyDeleteFantastic. I luuurve the flowers. The layout is just suoercalifragelisticexpialedocious. And thanks for the instructions
ReplyDeleteJust beautiful! Your flowers are amazing
ReplyDeleteOh this is so beautiful! I love the colors and the double sided paper you used for the stunning roses! LOVE LOVE LOVE it. Kerry
ReplyDeleteThose flowers are to die for! Just so real looking. Love it!
ReplyDeleteLisa your scrapbook pages are to die for! I love all the flowers, butterflies and paper lace you use......What better way to show these amazing HC products!
ReplyDeleteLisa those flowers are just breathtaking!!!!! They look so real!!!!
ReplyDeleteThis layout is so pretty, those flowers are gorgeous.
ReplyDeleteJust beautiful Lisa, I love your flowers and your gorgeous subject!
ReplyDeleteHugs,
Marsha
Gorgeous project, love all details. Hugs;moni
ReplyDeletewell ~~~ I should have remained an admirer of your heartfelt creations and left it at that.. I realized this when the stamps arrived I knew I could not cut out with precision and found out about the machine that can be bought.to cut out those beautiful blooms....and the stamps are not returnabe unless defective. My fault for not checking it out thoroughly.....
ReplyDelete