Friday, October 28, 2022

Heartfelt Creations Alumni Design Team October Blog Hop


The hop begins at 8AM EDT on Friday, October 28, ,2022 and runs until 11:55PM EDT on Monday, 31, 2022. You have a chance to win 1 of 2 Gift Certificates to the Heartfelt Creations Store. All you have to do is leave comments on the the Alumni Designers Blogs. The more designers blogs you comment on, you increase your chances of winning. The winners will be announced on the Heartfelt Creations blog and Facebook page on Wednesday, November 2ndThe winner has 72 hours to claim the prize by emailing socialmedia@heartfeltcreations.com. Please write “Winner of the October 2022 Alumni Hop” in the subject line. 


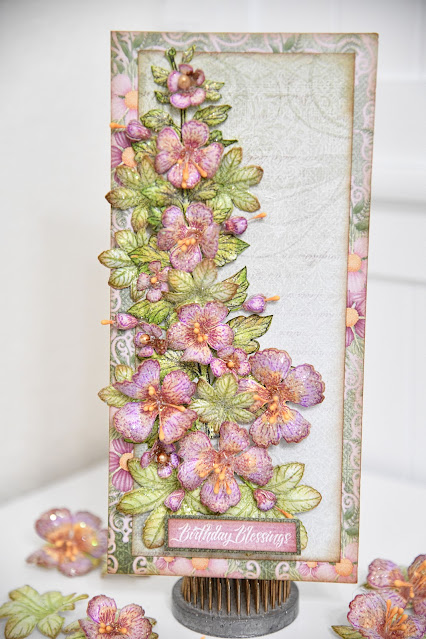
Today I bring to you a card created using 2 different collections. The flowers and leaves are from the new Hollyhocks collection, and the paper I used for my slimline card is the Wild Rose Collection paper. I adore both collections. 

I created the card by cutting a piece of card stock 8 1/2 x 8, and scoring it in half and folding the card. You now have an 8 1/2 x4 inch card base. I cut a piece of Wild Rose paper 8 1/2 by 4 and adhered it to the front of the card. I cut down the next Wild rose paper to 3 1/4 x 8 inches and layered it on top.


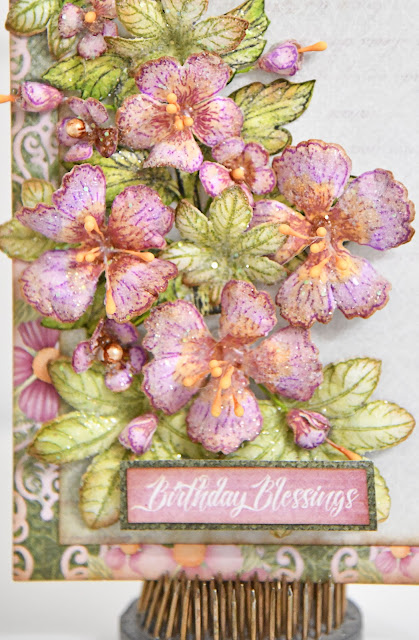
I created all of the flowers and leaves by stamping and coloring them with inks, and I used the Stem with Leaves from the  Hollyhocks Stem and Blooms Cling Stamp Set , inked it and placed it on the front of the card. This was my base for the flowers and leaves. 

I layered the flowers and leaves over the Stem with Leaves. I created all different sizes Hollyhocks,  leaves, and tiny buds. I used stamen for the middle of the flowers. I fussy cut the sentiment and layered it on another piece of scrap paper. I then adhered it to the card. 


I hope you enjoy the hop this month! There is so much inspiration here. Good Luck!! 

BLOG HOP LIST: 


Kathy Clement- Kathy by Design

Vicki Dutcher- All I Do Is Stamp

Gloria Stengel- Scraps of Life

Bozena- BBart Cards

Alissa Wells- Will Run for Stamps

Lisa Gregory- What a Beautiful Mess

Candy Slabaugh- Candy’s Creations

Lynn Stanborough- What the Heart Wants

Heartfelt Creations Blog


Heartfelt Creations Products Used:
Hollyhock Stem & Blooms Cling Stamp Set

Hollyhock Stem and Blooms Die


Sunday, October 16, 2022

49 and Market "The Spice Of Life" 12x12 layout featuring ARToptions Plum Grove

 Hello lovelies. I am coming to you today with another layout created with the brand new ARToptions Plum Grove. This beautiful collection has the glorious colors of a  full blown autumn day.  From the gorgeous falling leaves, to the purple tinged sunsets, it has it all! I had hexagons on my mind all month long. I wanted to use a nesting die set that I have, to create the hexagon design on my layout. I did some machine sewing around the layout, and then decided to machine sew around each individual hexagon. The sewing didn't have to be perfect. In fact, the little imperfections remind me that its OK to be a little messy. Autumn is all about the falling leaves. They leave what I call a beautiful mess in the yard, and on the streets!! I used Plum Grove Colored Foundations 3 for my background. I die cut the hexagons from Plum Grove Blossom paper, machine stitched them, and arranged them on the layout in a pleasing design. I played around with placement until I found one that I liked. I popped them out from the background by placing pieces of cardboard under each one. I wanted the feeling of falling leaves, so I cut apart the Plum Grove Rub Ons, and arranged the smaller leaves and florals around the outside of the hexagon design. I spattered some ink and acrylic paint around the design  as well. 

For the matted photo, I used a larger hexagon die cut from Blossom paper, and nested it with a smaller die. Then I die cut the photo with an even smaller die. I love nesting dies! Once the matted photo was placed, I adorned it using floral clusters. I used 4 different flower packs, with colors I chose form the papers. 1 pack goes a long way when you choose multiple packs for your floral designs. I chose the colors that you would find while leave peeping at the peak of fall! Something I miss in Florida. 


For the title, I layered and stacked some of the Plum Grove Ephemera Bits. I cut down the spice of life word strip to fit inside of the purple strip, then layered it over the ticket strip, placing a thin strip of chipboard under each layer. I scattered some butterflies over the layout. 


With eth scraps of paper I had left, I die cut some tiny berry looking foliage and used it as filler in my floral clusters. I waste NO paper. This is also a closeup of the rub-ons. They actually look like they were part of the paper design. These are the finest quality rub-ons I ever used. They glide on like butter, and you cant even tell they have a birder. It blends right into he paper. If you haven't tried 49 and Market Rub-Ons, I suggest you do. It is quite addicting. And quite beautiful too. Once the layout was finished. I used a little gold mica powder mixed with water to kiss the edges of everything around the layout. It added a bit of rich shimmer. 

 
Thank you for joining me today. I hope that you are inspired by the gorgeous colors of Autumn. Grab some Plum Grove and create something glorious!! xo


49 and Market Products Used:

ARToptions Plum Grove Colored Foundations Pack

ARToptions  Plum Grove 12x12 Collection Pack

ARToptions Plum Grove Laser Cut Elements

ARToptions Plum Grove 6x8 Rub On Transfer Set

ARToptions Plum Grove Plum Grove Ephemera Bits

Garden Petals /Salmon

Royal Spray /Orchard

Royal Spray /Olive

Sugar Stems /Tutti Frutti

Wildflowers /Plum

Other Products Used:

Lindys Stamp Gang Jazzy Jivin Purple Starburst Spray

Lindys Stamp Gang Sea Mint Green Shimmer Spray

Lindys Stamp Gang Glory Of The Seas Shimmer Spray

Lindys Stamp Gang Glitzy Shimmer Only Magicals /Glitzy Gold

Sizzix Tim Holtz Thinlets Garden Greens

Selric Cone Thread/Lilac


Saturday, October 1, 2022

49 and Market ARToptions Plum Grove. 12x12 layout

Hello Lovelies. Now that Autumn has come upon us in my part of the world, I wanted to create a layout using the glorious colors of fall. Although I live in a subtropical climate where the leaves do not turn colors, I can dream!!! We can all dream! For this layout I used the newest, most beautiful ARToptions Plum Grove. The whole collection just feels like a magical, colorful  Autumn day. Although you can change the theme of this collection to suit your creative needs, I wanted that fall feeling. The collection perfectly matched the colors in the photo of my granddaughter Charlotte. 


Some of the newest flowers to come out, are the Nature's Bounty Collection. Here I used the color Mango. The flowers are beautiful. In the package, there is a cluster, singles, and stems in the collection.  Placement is so easy. The other new floral collection is Florets. I used Soft Lilac to tuck in the Mango clusters. They go together beautifully. I also had some Royal Posies in Mango and Orchid that I used as well. 


The flowers and leaves in the Nature's Bounty floral collection are lush and beautiful! I kissed the edges of the flower petals using white acrylic paint using a dry brush. I added some art stones for a textured effect. I also used some gilding flakes and glue glitter for some sparkle. 


I love all of the sentiments in all of the collections. Here, I used sentiments from the Plum Grove Ephemera Bits, and backed them with the leftover paper I used to die cut the 2 big leaves. I created a triple bow using the Single Ply Jute. I did some paint spattering with a thick white acrylic paint. I did some machine sewing around the layout. 


The 2 big oak leaves were die cut from one of the Plum Grove Ephemera Bits papers. The color was perfect. The die has a matching embossing folder so I was able to emboss the leaves. You can still see the beautiful design that was on the paper. I did a lot of ink edging on the layout just to give it a little bit of a vintage rustic feel. I used the Plum Grove 6x8 Rub-Ons around the torn out piece in the middle of the layout. I scattered some of the laser cut butterflies around the page as well. I layered the Plum Grove Laser Cut frames, then mounted my matted photo in the middle. Although I mostly covered it, I hand cut a heart from the leftover paper, distressed and inked the edges, and layered it under the frames. 


I hope you are inspired to create a project using Plum Grove. It is my new favorite collection!! But I am partial to purple, and Autumn!! xo

49 and Market Product List:

ARToptions Plum Grove 12x12 Collection Pack

ARToptions Plum Grove Laser Cut Wildflowers

ARToptions Plum Grove Laser Cut Elements 

ARToptions Plum Grove Ephemera Bits

ARToptions Plum Grove 6x8 Rub-Ons

ARToptions Plum Grove / Blossom Paper
Jute Cording Single Ply
Royal Posies flowers /Mango
Florets Soft flowers/ Lilac


Friday, September 30, 2022

Heartfelt Creations Alumni September Blog Hop

 Welcome to the Heartfelt Creations Alumni Blog Hop. The hop begins at 8AM EDT on Friday, September 30th, ,2022 and runs until 11:55PM EDT on Monday, October 3rd, 2022.

We will choose a comment from one of the designers blogs to win a $25 Heartfelt Creations Gift Card. Heartfelt Creations is also giving away a second $25 gift card for a randomly chosen comment from their blog.
The winners will be announced on the Heartfelt Creations blog and Facebook page on Wednesday, October 5th. So check back to see if you may be 1 of 2 winners!

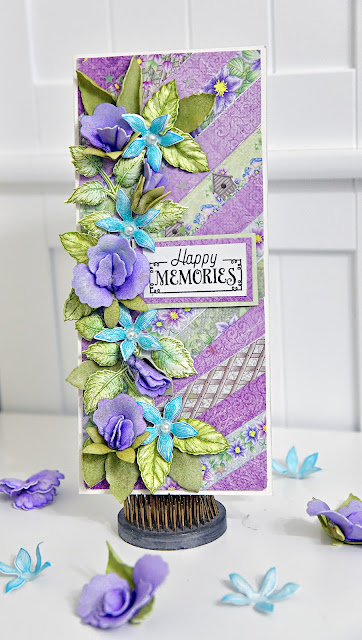
Today I created a slim line card. I cut and scored a 3 1/4 x 8 1/4 piece of heavy white card stock and folded it in half to create the card. For the background I cut strips from  the Climbing Clematis Paper Collection, and adhered them onto a 3.5 x 8.25 piece of card stock in a diagonal fashion. It is a fun way to use up the leftover papers that you may have. I placed that piece of card stock onto the card leaving a 1/4 inch border all around. 

I matted the Happy Memories sentiment on 2 pieces of the Climbing Clematis paper.


I arranged the Sweet Pea flowers and leaves onto the card. I also tucked in some Leafy Accents leaves. The Sweet Pea flowers were created with Art foam paper, and inked with Rangers Archival Ink in Majestic Purple. I added pearls to the centers of the smaller blue flowers that I inked in Majestic Teal and added some blue glitter Nuvo Glitter Drops in Aquatic Mist. I added tiny star sequins around the finished card to give it a little extra sparkle. 


Thanks for hopping with us today!! Just leave some love on the blogs for your chance to win! xo

Products used from the Heartfelt Creations website

Heartfelt Creations Alumni Designers

Kathy - Kathy by Design

Bozena- BBartCards

Alissa- Will Run for Stamps

Gloria- Scraps of Life

Lynn- What the Heart Wants

Lisa- What a Beautiful Mess

Vicki- All I Do Is Stamp

Heartfelt Creations- Heartfelt Creations Blog

Friday, September 16, 2022

49 and Market Vintage Artistry Serenity - 12x12 layout "Choose Happy"

Hello Lovelies. I bring you a layout today created with the gorgeous Vintage Artistry Serenity Collection. I am in love!! With the gorgeous blues, browns  and neutral beige, you can go monochromatic, or add your favorite contrasting colors. The possibilities are endless. I chose to keep with the colors in the collection, and adding a hint of green. I used 2 different papers, tore them and layered them. I did a bit of stenciling with crackle paste down the middle of the layout. I then added some corrugated cardboard under the outer layer, and tucked in some Serenity Washi Tape under another of the inner layers. I spattered some white paint, and that completed the foundation for the layout. The fun part is like icing a cake!! Embellishments!!!! 


I created floral clusters on each corner of the framed photo. I used a few different flower designs from different packages, yet they coordinate beautifully! With the extra paper I had after creating the foundation, I die cut some lacy leaves, and created some tiny rolled roses to add to the floral clusters. For my journal title, I used the Serenity Rub-Ons by cutting apart the words. The leaves are laser cuts as well as leaves from the flower packages. I added some art stones for texture. 

 
The gorgeous frame is part of the Serenity Laser Cuts. I popped it up using corrugated cardboard underneath. This gives it beautiful dimension on the page. The photo is my sweet granddaughter Savannah. Like Charlotte, she loves her picture taken! Lucky me!  Of course I had to tuck in a few butterflies!! I can't get enough of them! 


Here is a closeup of the different layers. Just tearing the bits of Serenity Washi Tape and tucking it under the layer, gave it so much more color and  made the cardboard pop! I inked the torn edges before gluing them down. 

 
Thank you for joining me today. I hope that you are inspired to use Vintage Artistry Serenity for you next project!! And with all of the accessories to coordinate with the papers, there is so much you can create! Let your imagination guide you! 


And if you are a digital Scrapbooker and totally adore Serenity, you can find the digital collection at Katie Pertiet Designs...OR extend you paper collection and become a hybrid scrapper like me, incorporating the paper and digital for fussy cutting. The possibilities are endless. 

Thursday, September 1, 2022

49 and Market ARToptions Holiday Wishes Mini Album

Hello Lovelies! Who doesn't think it is never to early to start on your Holiday projects/gifts!! Certainly not me! I have another one finished! This is a  Foundations Memory Keeper Quad Folio in white, finished with the brand new beautiful ARToptions Holiday Wishes collection.  Breaking with the traditional colors of green and red, it adds teals, light blues, citrus greens with touches of peach, yellow, and pink. It makes for a gorgeous combination. I stained the white album using green ink. I only stained the edges where the paper didn't cover, about one inch all around the edges. I created a frame on the cover using 2 dies from my stash, and papers from the Holiday Wishes 6x8 paper collection. I also die cut corrugated cardboard and adhered the die cuts to it, layered the frames, and it turned out to be a chunky frame that pops right off of the cover. I then used a variety of flowers in a couple of different colors to compliment the colors in the papers. Of course I tucked in the beautiful poinsettia laser cuts in-between the flowers. I tied jute into the laser cut button, and added the laser cut deer. I tucked in some leaves, spattered some white gesso, to match the faux snow in the photo, and called the cover done. 


There is plenty of room in the Memory Keeper quad folio. I used the 4x6 paper collection to cover the pages. There are inserts available to add to the inner pages, but I only used portions of the 4x6 Envelope Folio set on some of the pages. This album has so many possibilities. The beauty is the pages do not lie flat. There is about about a 3/4 inch gap between each page so that you can make your pages chunky and it still closes beautifully. The cover flap is magnetized for easy closure.  I created a waterfall feature with a magnetized flap to hold it closed, and  on all of the pages, and under each flap you can fit a 4x6 photo. I used 1 sheet of 12x12 ARToptions Holiday Wishes paper and cut it into 4x6 pieces to cover the flaps I created using white cardstock. That gave me 6 papers for the flaps. I also created cards and tags to tuck into the Envelope Folio Set pockets, I used white card stock for some of the cards, and just adhered the Holiday Wished paper over it.  Layering the ephemera, laser cut and chipboards is so much fun to create the tags.  I also used the envelope in the set, and when it is lifted, I tucked in a couple of cards that can hold 4x6 photos on the backs and inside. One has a laser cut frame on the front to add a photo. 2 of the pages in the album I left plain, and can be used to adhere photos, or used for journaling. 


The Holiday Wishes Card kit is beautiful. I put together a couple of the cards and envelopes to add to my album. On the back cover of the album, I added the Ephemera Bits snowy house scene to the base, and used it as a pocket to hold a card. I added a cute Washi postage stamp to the envelope. On the inside of the card can hold a 4x6 photo. On every spot that a phot can be added, I used a camera stamp to mark the spots. This album will hold a ton of photos and journaling. 


Here is a close up of the spine that I adorned with chipboard, laser cuts and Ephemera. You can see the cards and flaps I created to hold photos. 


Here is a closeup of the spine and cover. The cover is pretty dimensional, but I love it that way. 


Here is a closeup of the album opened, showing the back, spine and cover. The other flaps to the album are turned in to the inside. There is so much more I can still do to the album, but for mow, I think I like it the way  it is. I am gifting this to someone special. 


Thank you for joining me this week. I hope that you are inspired to get some holiday gifts done using Artoptions Holiday wishes. This collection is really wonderful! xo


49 and Market Products Used:

Tuesday, August 23, 2022

49 and Market ArtOptions Alena

 Hello Lovelies! I am bringing you a layout created with the brand new gorgeous ARToptions Alena. I get water color tropical vibes with this collection.  Keep your eye on 49 and Market, because the collections and accessories  that are coming out are going to blow your mind!  With Alena, the boldness of the reds and Blues go so well together! I just had to highlight the reds with the gorgeous flowers in Tomato with a  touch of Bluejay. 


I used the Curators Essential Key Lined Frames for my photo. There is a throwaway piece in-between the frames, and I chose to keep it and cover it with Alena Fabric Tape. Its like Washi Tape on a role but stronger!! Because it is fabric! I just set in the fabric covered piece in between the frame and the photo. I used 3 different frames as my centerpiece to highlight the photo. I added the sweet little chipboard hearts, and popped up 2 laser cut postage stamps. 


I created a little cluster off to the right side of the layout. I took one of the Curators Essential Key Lined Frame and just worked my embellishments around it. I used jute to string on the chipboard and paper tags. I added laser cuts and flowers to finish the cluster. I used 2 laser cut butterflies and adhered  them on the page by their bodies only, then fluffed up their wings for dimension. 


This is just another closeup of the lower corner of the layout. I machine sewed all around the paper using a coordinating blue thread. I added the laser cut word You. I removed the string from the Alena Tag, and replaced it with jute, to match the chipboard tag. I used some red and blue distress ink watered down, and spattered it on the layout. I also added a few rhinestones here and there for added sparkle. 


I hope you are inspired to use Alena in your future projects. There is so much to this collection and all of the coordinating accessories. Be sure to check them all out. You will want it all!! xo

49 and Market Products used 

49 and Market Products Used: