Friday, October 30, 2020

Heartfelt Creations Alumni October Blog Hop


A randomly chosen comment from a mystery blog will receive a $25 gift certificate to shop at Heartfelt Creations. To claim your prize please email Heartfelt Creations at socialmedia@heartfeltcreations.us with "Winner of the October Alumni Hop" in the subject line.

I have chosen to create a mini album/card. After receiving the Wild Rose paper collection, my mind went into creative overdrive. So many gorgeous designs in one paper pad. I found that all of the little tags labels and designs are perfect embellishments for a mini album. This mini is 5x4 inches. I used chip board for the base, and covered it with a piece of the Wild Rose paper. I die cut a scalloped rectangle from the Eyelet Rectangle and Basics die for the cover. I popped it up with some pop dots. I fussy cut a label, the Happiness Always sentiment, and popped them up with Pop Dots as well. Then the decorating began. 


For the flowers I chose the Arianna Blooms flowers. I die cut them using watercolor paper, painted them with watercolor, green in the middle and purple on the outer petals. I used crystal Clear and Babys Breath Ultrafine Transparent Glitter on the flowers and leaves. The pink shimmer is subtle and beautiful. The leaves are the beautiful Leafy Accents which I stamped, die cut and shaped in the molds. So simple yet so elegant!! I Used watercolors to paint them as well. 


The inside of the mini was lined with coordinating paper from the Wild Rose paper collection. I created a tuck pocket on the inside cover. I fussy cut the tags to insert into the pocket. I fessy cut the label, and popped it up with some chipboard. I added 2 pages for some journaling, but you can easily add more paper/pages using you favorite binding technique. I added 2 strips and die cut a border using the scalloped die to create more tuck spots for tags. 


Thank you for joining us today on the Blog Hop. Make sure to comment on each designers blog creation, and you just may find your self a winner!! xo


Thursday, October 29, 2020

Heartfelt Creations Alumni October 2020 Blog Hop


A randomly chosen comment from a mystery blog will receive a $25 gift certificate to shop at Heartfelt Creations. To claim your prize please email Heartfelt Creations at socialmedia@heartfeltcreations.us with "Winner of the
October Alumni Hop" in the subject line.

I have chosen to create a mini album/card. After receiving the Wild Rose paper collection, my mind went into creative overdrive. So many gorgeous designs in one paper pad. I found that all of the little tags labels and designs are perfect embellishments for a mini album. This mini is 5x4 inches. I used chip board for the base, and covered it with a piece of the Wild Rose paper. I die cut a scalloped rectangle from the Eyelet Rectangle and Basics die for the cover. I popped it up with some pop dots. I fussy cut a label, the Happiness Always sentiment, and popped them up with Pop Dots as well. Then the decorating began. 


For the flowers I chose the Arianna Blooms flowers. I die cut them using watercolor paper, painted them with watercolor, green in the middle and purple on the outer petals. I used crystal Clear and Babys Breath Ultrafine Transparent Glitter on the flowers and leaves. The pink shimmer is subtle and beautiful. The leaves are the beautiful Leafy Accents which I stamped, die cut and shaped in the molds. So simple yet so elegant!! I Used watercolors to paint them as well. 


The inside of the mini was lined with coordinating paper from the Wild Rose paper collection. I created a tuck pocket on the inside cover. I fussy cut the tags to insert into the pocket. I fessy cut the label, and popped it up with some chipboard. I added 2 pages for some journaling, but you can easily add more paper/pages using you favorite binding technique. I added 2 strips and die cut a border using the scalloped die to create more tuck spots for tags. 


Thank you for joining us today on the Blog Hop. Make sure to comment on each designers blog creation, and you just may find your self a winner!! xo


Heartfelt Creations Products Used:

Friday, October 23, 2020

Crealies Guest Designer October 2020

 If you didn't know that purple is my favorite color, you do now. Crealies has the most gorgeous Pigment Powder colors that are so versatile. On my layout, I used them like watercolors. And the spatters?? Oh my, Love them! I created a layout adhering white cardstock to corrugated cardboard. I distressed the edges, then began my coloring with the Pigment Powders diluted in water, and sprayed on using the Crealies spray bottle. Once the background was dry, I spattered some of the more concentrated colors and before the spatters dried, I dabbed them with a damp cloth to take way some of the color, which left what looks like water spots. I love the look. The photo is my sweet granddaughter who shares my love for purple and scrapbooking now.  


I die cut the flowers and leaves using the Mixed Media/Watercolor paper. The weight of the paper is perfect to create dimensional flowers and leaves. I sprayed some water on a glass mat, mixed the Purple and Pink Purple Pigment Powder with a paint brush and painted the flowers. I did the same for the leaves using the Olive Green. When they were almost dry, I used a ball stylus and foam pad to shape the leaves and flowers. Once they were completely dry, I dabbed on some of the Gold Pigment powder mixed in water. I absolutely LOVE the gilded look effect. I added some rhinestones to the middles to finish the flowers. 


The Stitched Tagzz were die cut from the Watercolor/Mixed Media paper. I used the I hope believe dream die to create the sentiment for my title. I used a concentrated Purple to color it, then used a touch of gold. I spattered the tags with the Pink Purple and Purple, and edged them with the Gold. It really brings out the stitching in the die cuts. I used the Light Brown and Gold Pigment Powders to color some ribbon, and strung them through the tags. Thn tucked some of the flowers and leaves around them. 


For the photo, I used one of the Stitched Rectangle dies to cut out the photo. I edged it using the Gold Pigment Powder. I mounted it to the background using chipboard  underneath. 


Here is a closeup of the flowers and leaves. I used all 3 sizes in the set and layered the bigger ones. 


I layered the Tagzz in a couple of different places on the layout. And tucked another flower cluster between the layers. The exposed corrugated cardboard was painted using the Crealies Gesso Paste in White. Once it dried, I painted on some of the Pink-Purple and  Gold Pigment Powder around the entire edge. 


Crealies Products Used:


Tuesday, October 20, 2020

49 and Market Vintage Artistry Sky Collection. "Enjoy The Little Things"

Hello Lovelies. Today I bring to you a layout featuring the Vintage Artistry Sky Collection. The blues in the collection are gorgeous and I wanted to give it a true vintage feel with some distress ink. I edged almost all of the pieces in ink, and used some crackle paste on the window shutters. I absolutely love the Ginger color in the Country blooms flowers for the accent color among the blue. I didn't have to do any distressing on the background paper as it is gorgeous on its own. I did so some white and brown/gold spatters to add to the texture, added some art stones and wishing bubbles. I also used some gold pigment ink to edge a lot of the pieces. 


I used the ephemera in the 6x6 collection and fussy cut all of the pieces. I layered them and created a cluster for the bottom left corner. I created a smaller one for the upper right corner. The little butterflies are the sweetest. I placed an eyelet through the tag and strung some 5 ply jute through the hole. I separated the strands of the jute, and used only 2 strands. I also used a couple of pieces of the beautiful cream lace around the layout to add softness to the vintage look. 


I created a few kites to scatter around the upper part of the layout. I hand cut the shapes, used the 5 ply jute separated, and tied a few smaller pieces in the tails for bows. I used pop dots to pop them off the page and give them life! 


I wanted to portray the feel, of my grandaughter peering out of a window into the beautiful blue sky, and see the things that she loves so much. Butterflies, dragonflies, flowers and kites. These things always put a smile on her face. 


This is a closeup of the kites I created. These are one of my favorite parts of my layout. A little bit of paper and a little bit of jute, created a wonderfully big impact on my layout. 


Tucking some of the leaves and flowers under the shutters gives the layout a little bit more depth. And no matter what angle you look at the layout, it is full of bits and pieces of beauty everywhere. As I hope beauty will remain where ever we all shall go.....

Thank you for joining me today. I hope you are inspired to  create your own layout using any of the Vintage Artistry Collections. 


49 and Market Products Used:

Vintage Artistry Sky 12x12 Collection Pack

Vintage Artistry 6x6 Collection Pack

Serendipitous 12x12 Collection Pack Laser Cuts

Wildflowers Sky

Country Blooms Sky

Sugar Stems Blue Raspberry

Lacey Trims Cream

Jute Cording 5 ply

Country Blooms Ginger

Wishing Bubbles Minty Breeze


Monday, October 5, 2020

49 and Market Vintage Artistry Colors Lilac "Sunshine"

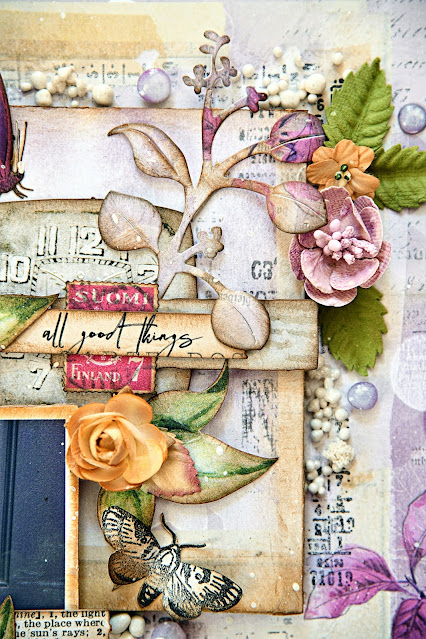
Hello Lovelies. Today I bring you some inspiration from the Vintage Artistry in Lilac. Purple is my favorite color, so this collection is on top of my must have lists! I absolutely adore the laser cuts that come in the kits. I have said before they are perfect for my mini album making, but they are also perfect for the layering in layouts. I just cant get enough of them! I created this 12x12 layout with an abundance of gorgeous layering. I did a little stamping on the background, added a few white splatters and some Art Stones when it was done and called it finished. 


I love that all of the collections are just about interchangeable with a lot of the elements. I used leaves from other collections to tuck under the beautiful flowers. I wanted a different color to accent some of the vintage inking I did, so I chose the gorgeous Ginger. It is a color I normally wouldn't pair with purple, but on this layout it works beautifully. 


There are the most beautiful moth stamps in the Vintage Artistry Always Together Stamp set. I stamped a bunch with black archival ink, and shaded them with  some vintage photo ink and a touch of purple on 1. I scattered  a few around the layout. Using some of the scraps from the 12x12 paper I cut out, I die cut a couple of vines for more layering texture. I adhered some Wishing Bubbles and Art Stones in the background. 

I absolutely love layering and using corrugated cardboard or chipboard for added height. And sometime si add it for texture. By backing all of my pieces with cardboard, it gives the layout some weight to it. It is perfect for placing in a shadow box or displayed on a desk or shelf. 

Here is a close up of the gorgeous flowers with the laser cut leaves. I just used a bit of distress ink to the edges to make them pop. Clustering the different sizes makes a nice little bouquet! One of the laser cuts in the Lilac kit had a dictionary ehemera with the word Sunshine. That is what I chose for my title because that reflects my granddaughters personality. She always light up a room when she walks in. But dont they all?? 💓

Thank you for joining me today. I hope you are inspired to create with your favorite colors! And never be afraid to mix and match what you don't think may work, because it just may! xo


49 and Market Products used:

Vintage Artistry Lilac Mini Collection 12x12 paper

Vintage Artistry Always Together Stamp Set

Country Blooms Ginger

Bold and Beautiful Laser Cuts

Wishing Bubbles Grape Soda

Seaside 12x12 Mini Collection Laser Cuts