Saturday, July 30, 2011

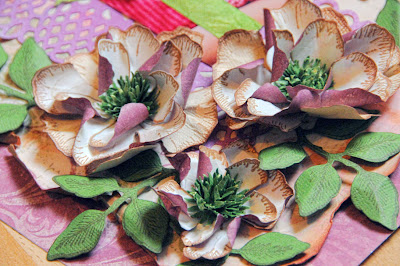
Floriano Flower Tutorial

This is a very simple flower to create.


******************************************

Product List
McGill Floriano Punch
McGill Star Punch
Glimmer Mist
non stick Craft mat
glue
cardstock


Punch out 3 flower layers.


Place on your craft mat and color with Glimmer Mist swishing the flowers in the color for a more intense color. Do both sides of the flower.


Let the flowers dry and curl the petals of 2 of the flowers under, and 1 of them upward towards the middle as shown.


Stack the two flowers with the petals curled back staggering petals, and top that with the flower where the petals are curled upward.


To assemble the middles, punch out 5 stars.


Using a thin handle paintbrush, cup 4 of the sun shapes around the end of the handle and scrunch them tightly. Leave one of the punched suns flat.


Stack the 4 cupped stars in layers, adhere each one to the next and place it onto the flat star. Fluff up your middle.


Glue your middle into the center of your flower.


Wednesday, July 27, 2011

Heartfelt Creations Wednesday July 27th

Welcome to another Heartfelt Creations Wednesday! I just can't seem to get enough of the new Botanicals Collection of stamps and coordinating Spellbinders dies. I see soooo many possible ways to get different flowers. So here is another version using the collection. The butterflies and the Lace border are also Heartfelt Creation Exclusive dies made by Spellbinders. Go visit the blog to see more beautiful creations by the creatively fabulous design team. You will surely be inspired. I know I am. The beautiful sweetheart in the LO is Ashli, Krissy's (owner of Swirlydoos) most adorable daughter. She was so cute posing for me in an impromptu Photo shoot in her backyard.

Here is a closeup of the flowers. I wanted to create wild roses and this is what I came up with.

Yet another closeup but more of a side view.

I painted the foam letters with Lumiere paint and it left a wonderful kind of texture on it. The butterflies were die cut and I layered 2 of them and added the pearls for the body.

Here is how I created the layout.

12 x 12 layout

HCD 713 Decorative Lace Border Die

HCD 702 Decorative Butterfly-Bprder Diecuts

Other Products

Kaisercraft paper

Mcgill star punch

Glimmer Mist

Seam Binding

Archival Ink

Prima Mask

Chalk Ink

Lumiere paint

Glitz letter stickers

Instructions

Cut the floral piece of paper using a scalloped curvy shape all along the edges. Ink and slightly spray the edges of paper and distress all along the edge, tearing into and curling some of the scallops showing the backside of the paper in parts. Wrinkle the 2 corners slightly and go over the corners with ink distressing further. Adhere the paper to the background paper. Die cut the Lace Border and adhere towards the bottom of page slightly offset. Tie ribbon around bottom of photo and adhere to page as shown slightly offset as well. Create you flowers by die cutting and stamping different sizes, then wet distress by wrinkling and curling the petals slightly inward towards the center, then stack flowers 2 or 3 at a time. Punch 4 star shapes and layer them on top of one another then scrunch them up to form puffy stamen. Adhere each to the middle of flowers. Die cut leaves and stamp. Arrange the leaves and flowers in clusters to your liking around the page. The butterflies were die cut and I layered 2 of them and added the pearls for the body. Place on layout. Paint chip board letters and place the title on either side of the photo as shown. Place the tiny sticker letters above the word WILD as part of the title.


Wednesday, July 20, 2011

Heartfelt Creations Wednesday Botanical Gardens Recap!!


Happy Heartfelt creations Wednesday!! Heartfelt creations is at CHA this week . Sorry that I had to miss out on all of the fun this time around. My real job schedule just got in the way. I had plane tickets..Couldn't get the time off.. They need to bring CHA back to Orlando!!
Well this week, I worked on using the newest collection of stamps and dies again, but did my flowers a little different. So many possibilities with the new Botanicals collection. This LO may differ slightly from the one posted on the HC Blog as I added some butterflies and a tail stream...No butterflies on my LO??? What on earth was I thinking!!! Well, the HC Design Team has some amazing work to show you this week. Head on over to the blog and see the beautiful work! If you are a card lover, your going to love what you see!!
Well altered items and LO's rock this week as well!!
I also did this for the Get Picky Inspiration Challenge # 10. I love butterflies!!
If you love butterflies, head over to Swirlydoos and pick up a file or 2...I create one every month to match the kits. You will be sure to find what you need there.

The clusters of flowers are so easy to create using the stamp and die set. I have written instructions on how I created the stamen for the flowers. Check the how at the bottom of this post. I used piece of Prima say it in pearls for the tail stream.

The strip that goes up the page is all punch work. I love my punches!! And playing with my Martha Stewart punches I created Medallions with the corner punch. All you do is cut out a 1.5 x 1.5 piece of card stock and punch the 4 corners...Instant medallion with so many uses! I just adhered it to the pink floral strip that I created with my EK Success large edge punch.


Here is a closeup of the flowers. I really love this set.

Another closeup of the floral strip.

Here are the detailed instructions of how I created this page. And links to the stamps and dies.
Products Used on This Project
Botanical Floral 2 PreCut Set HCPC 3407

HCPC 3406 Botanical Floral 1 PreCut Set
HCPC 3405 Leaf Medley PreCut Set
472123 Foliage Shapeabiliies
472186 Rose Creations Shapeabilities

K and Company paper, Tattered Angels Glimmer Mist, Archival ink ,Martha Stewart Punch Around The Page "Cherish" EK Success Large Edge Punch, Prima E-line Pearls, sewing machine ,Martha Stewart Microbeads, McGill punch "Crystal"

Edge Punch around a 12 x 12 patterned paper. Cut the lighter coordinating paper 10 x 10 and sewed to background paper. Used the large edge punch and punched down a pink strip of coordinating paper, then turned the paper around, lined up the design and punched down that side to create the decorative flower strip. Then took the corner punch and punched the corners of a 1.5 x 1.5 piece of card stock to create the little medallions and adhered one to each of the large flower shapes. Adhere to layout slightly off center. Added a pearl to the middle of each medallion. Using a corner punch, punch around 2 cut circles for the photo frames and adhere the photos to each circle. Adhere the framed photos to each side of the flower strip as shown. Die cut and stamp the flowers and leaves using brown Archival Ink, and spray with Glimmer Mist. Scrunch them slightly while they are still damp. When they are dry, layer 2 different sizes, and leave some of the smaller ones a single layer. The center stamen were made by punching a McGill Crystal shape, dip the tip of each end into the micro-beads and let dry. Attach to center of each flower and top each with a pearl, arrange leaves and flowers as shown.

Saturday, July 16, 2011

CHERRY BLOSSOM TUTORIAL


I found a tutorial for cherry blossoms in a book I have to make paper flowers. Then Rae pointed us towards a store that was selling the punches I needed. (Thanks a bunch Rae!Link!) Tracey may still have a few more sets in her STORE!! And she ships quickly!! So what to my punch wondering eyes did I see?? The whole set for the price of just 1 punch!! So here are my step by step instructions to make these gorgeous little Cherry Blossoms. They are about the size of a nickel. Great for fillers and vines.

Product List
Punch Bunch Small Blossom
Punch Bunch Small Splat
Punch Bunch Small Sunflower
Punch Bunch Mini Sun
McGill Molding Mat
McGill Tool kit
Black marker
Quick Dry Glue
card stock


Punch 2 blossoms, 1 splat, 1 sun and 1 sunflower.


Make cuts between each petal of blossoms as shown. Do not cut to the middle.


Color the tips of the sunflower and then cut each petal in half.


Using a small ball tool, use a circular motion to soften and curve the flower.


Do this to the splat piece as well.


Do this to the sunflower as well. Then pinch bottom to make a tight cup shape.


Adhere both blossom layers together staggering petals.


Adhere the splat piece on top.


Adhere the small sun onto the top of your flower piece.


Glue your cupped sunflower over the sun in the middle of flower.


here are a bunch of the cherry blossoms.


I wrapped pipe cleaners with brown floral tape and created a vine similar to that of a cherry blossom branch. I just Googled images for an idea for the shape. Then I just clustered the flowers onto the branch to create my Cherry blossom Blooming branch. This flower was very easy to do. Hope you enjoyed another flower tutorial.
note: The smaller flowers were made with extra sunflowers and suns that I punched out.I just layered 2 of each. They are tiny but oh so cute!

Wednesday, July 13, 2011

The Botanical Garden Stamp Collection from Heartfelt Creations

I told you there would be twist to the flowers I created with the Spellbinders Foliage Shapeabilities die and the Spellbinders Donna Salazar's Rose Creations Shapeabilities die. Heartfelt Creations has created gorgeous stamps to go along with these dies. I think this is my new favorite collection!! The Botanical Garden Collection features 5 new precut stamp sets that coordinate with existing Spellbinders Rose Creations Shapeabilities and Spellbinder Foliage Shapeabilities dies. The Botanical Garden Collection is a great addition to every floral lover's collection of flowers. And you know how much I love my flowers.
Leave a comment on my blog or the Heartfelt Creations blog by July 19 and one lucky person will win the entire release valued at $75.00. The winner will be announced on the HC blog on July 20.

"Baby Lullaby" features a photo of my daughter when she was just days old, (almost 20 years ago)...*sigh* snuggled up to a plush mouse dressed in pink girliness. The papers used are from K and Company. I just love their coordinating paper collection pads. See bottom of post for instructions on how the layout was created.

Leaves and ferns and even single leaves (not shown) give us such a variety of foliage.

The title was created by punching a stamp shape, die cutting letters, and adhering the letters to the stamp shape. then inking the edges.

Some closeups of the stamped and colored leaves and flowers.

I added a pearl to each flower center. And used Glimmer Mist and Lindy's Starburst Spray in 3-4 different colors for a variegated effect on the flowers

You are going to loooooove this beautiful collection. I know I have a tutorial in the works for some beautiful Flowers and leaf clusters.

Be sure to visit the Heartfelt Creations Blog to see what me and my DT members have created with the new collection. Glorious layouts, cards and altered projects!

Products Used on This Project

HCPC 3406 Botanical Floral 1 PreCut Set
HCPC 3407 Botanical Floral 2 PreCut Set
HCPC 3408 Woodland Fern PreCut Set

HCPC 3405 Leaf Medley PreCut Set Spellbinders Foliage Shapeabilies
Spellbinders Rose Creations Shapeabilities

Other: K and Company paper Core'Dinations card stock Martha Stwart Punch Around The Page Wildflowers EK Success border punch English Ivy Paper Shapers postage stamp punch Recollections pearls Archivers Ink Chalk Ink Chestnut Roan Quickutz Alapha dies Storybook Glimmer Mist Lindy's Stamp Gang Starburst spray

Punch around the pattern paper with Wildflowers All around The Page punch. Ink the edges. Adhere to solid card stock. With coordinating pattern paper, cut a 6 inch strip, edge punch with English Ivy punch on the long sides, ink edges and adhere strip to page vertically across page in middle. Lightly ink edges of photo and adhere to middle of strip. Die cut your letters, ink them around edges,punch the stamp squares and adhere letters to stamp punch background. Ink the edges. Set aside. Die cut the flowers and leaves in various sizes. Color with Glimmer Mist or similar spray. I mixed 5 different colors to achieve a watercolor effect as in the patterned paper in matching colors. Stamp the flowers and leaves. Wet and wrinkle distress them slightly while still damp to give them depth and texture. Layer the flowers 2 or 3 layers per flower. Leave a couple of the smaller flowers in a single layer. Add a pearl to the middle of each flower. Arrange the flowers and leaves in clusters on both sides of the layout. Place your title as shown and place a few random butterflies around the page.

Wednesday, July 6, 2011

Heartfelt Creations Wednesday 7-6-11

Happy Heartfelt Creations Wednesday! I don't think I will ever tire of creating flowers. And as long as companies continue to create more colored sprays, I will continue to buy them to color more flowers!! I am now addicted to Lindy's Stamp Gang Sprays and Mica Powders. The colors are beautiful. I have used Lindy's and Glimmer Mist on this layout. I also used distress ink with the Prima mask. I enjoy going through my vast collection of beautiful Heartfelt Creations stamps to create new looks. And although I am a 12 x 12 scrapbook artist, I have a wonderful artistic idea in my head right now for the stamps I have not used. I will work on it and sometime in the future, introduce you to my brilliant idea..It's in the works right now, so lets see how it goes. Sorry to leave you in the dark...But I need to work on this idea.
Well back to this weeks creation. Please visit the Heartfelt Creations Blog to see what the Design Team has created. There is always something for everyone's taste. Always all beautiful!


I also love my Martha Stewart punches. Clustering the flowers and leaves with these stamps is a no fail design element. They are just go together so beautifully.

I used flocking and a pearl in the middle of the layered flowers.I also rinkled and ink distressed the Glimmer Misted leaves.
I sewed around the page as well as the photo.
I used Rock Candy distress paint on the butterflies. The butterflies can be found over at Swirlydoos in the forums under tutorials. In the butterfly thread of course!
Thank You for visiting on another Wednesday. Next Wednesday is another wonderful release of new stamps. And all I have to say is that I am very very excited about this next reveal. I think you are going to love it as much as I do!!

Products Used on This Project

HCPC 3318 Daisy Patch Flowers PreCut Set
HCD 703 Daisy Patch Die
472117 Nested Leaves Nestabilities
HCPC 3376 Distressed Leaves PreCut Set
HCPC 3390 Bella Rose Leaves PreCut Set
HCD 712 Bella Rose Die

Other: Glimmer Mist: Olive Vine, Dragonfly, Lindy's Starburst Spray: Seamint Green,Lucky Shamrock Green Martha Stewart punch around the page set Double Arches Martha Stewart edge punch Mini Hearts Martha Stewart flocking powder K and Company paper Bazzill card stock Prima Mask Tim Holtz Distress Ink Tea Stain Chipboard wings sewing machine Recollections pearls basic grey buttons Glitz letter stickers

Cut a wavy pattern around patterned paper, ink, wet distress it by spraying the edges slightly with water and bending and wrinkling the edges with your fingers until it is as distressed as you would like. Dry flat. Adhere distressed paper to solid card stock. Edge punch around a 10 x 10 piece of patterned paper. Using a mask and foam applicator, softly apply distress ink using a circular motion to create soft edges. Sew a straight line around the paper, then go over the straight line with a squiggly line. Adhere this piece to middle of prepared page. Mat photo with edge punched card stock and adhere to page. Color die cut wings with Glimmer Mist ink edges and adhere to photo. Stamp. die cut, and color Daisy Patch flowers with Glimmer Mist and Starburst Spray. Curl under petals slightly and layer flowers staggering petals. Add flocking to middles and finish with a pearl. Stamp and die cut the leaves and wrinkle a bit for texture. Arrange the flowers and leaves as shown. Place title under photo and place a few tiny flowers around the title. Add a couple of buttons to side of photo and place the butterflies randomly around the page.

Tuesday, July 5, 2011

Swirlydoos July Reveal and Blog Hop!!

Sometimes you just have to HOP!!! Blog Hop that is!!

Welcome to Swirlydoos July Kit Reveal Blog Hop!!!
If you've arrived here from Swirlydoos blog, then you are on the right track! If you are one of my regular followers then head on over to the Swirlydoos Blog and join in the fun!
This post is a little photo heavy, but be sure to scroll to the end for the Blog Hop Rules and a chance to win a wonderful prize.

The first layout is also July's Anatomy Of A Layout. I created a layout that is a little challenging for those who like a challenge. Fussy Cutting. You can do it! It takes some time, but with patience and a great pair of scissors, it is easy. Try it. And check my tutorial for the step by step on the Faux Scrabble Letters.

I used the Martha Stewart Garden gate punch. One of my faves. The scallops were stamped.

Did some fussy cutting and colored the little silky flowers with Glimmer Mist.

I also Glimmer Misted the cream and beige colored flowers in a rosy color to match the LO.

Used the Faux Scrabble Letters for part of the title.


I created the background paper using card stock from the add on kit and Glimmer Mist, acrylic paint and Prima stencil. I took the pic of Jan, Jen and Kim. My Swirly sisters while on our Photo Shoot excursion in Colorado. Doing the Swirly Hip Check. I am entering this LO in the Petaloo Color Me Crazy Contest.

The Color me Crazy Petaloo flowers were colored with a water pen and Magical Mica's from Lindy's stamp Gang. It was our tech kit this month. I hope you got one as it is fabulous!! So full of flowers and Mica's!! I cut the gates with my Cricut Expression. The butterfly is a Martha Stewart punch.

I also altered the rose tea colored roses to the same peachy color as the larger flowers.


I did some Prima masking on this LO. I used Tim Holtz Distress Ink and the sponge applicator.

One of my favorite butterflies with a ZVA trail...

I made the flowers using Donna Salazars Rose Creations Die. And if you stay tuned next week on Wednesday, I will reveal a wonderful twist to these flowers. I think you're going to love it!!

The leaf vines are a Spellbinders die as well..And yet another twist to be revealed!! The title was cut out with my Cricut Expression.


It just dawned on me that I could have fussy cut some tiny fairies from the G45 paper in the kit and placed them around this LO to appear more magical. Just a mere after thought...Some fairy fillers...hhmm..never to late...

More leaves and ferns from thatsame Spellbinders die..Oh, and I used my fab Vagabond to die cut them. I colored the little tea roses in blue this time.

Love the pretty Prima flower asthe center focus in this cluster.

I cut the title using my Sizzix Sizzlets Alphas and my Vagabond. The beauty of it all is the Vagabond has such a big surface that I was able to cut all of the letters at once!. So nice...And much quicker.

The photo's are of Miss Ashli (Krissy's most adorable daughter). We did a photoshoot in her back yard while I was a guest at her house. Ashli really is a Mini Top Model..

More Prima and Petaloo lovelies. oops, I seem to have a Petaloo flower that fell off. Just the bottom remained.

The leaves are one of my fave Heartfelt Creations stamps and the butterflies can be found in the butterfly thread in the Swirlydoos tutorials section in the forums. There are so many now.

Just a closeup. To enhance the color, I painted the butterflies with Rock Candy Distress paint. I love the crackle finish.


REMEMBER, to qualify for the grand prize you need to:
1) visit all of the blogs, including Swirlydoos, in order to qualify.
2) Be sure to leave a comment and become a follower of each blog (if you haven't already). This way we know that you have joined in the party!
3) Stop by Swirlydoos Facebook page and Like Us!

All entries will be entered into the drawing for our Grand Prize!!! This month's prize will be a $25 gift certificate to the awesome Swirlydoos Store!!!

Now head on over to Angelica's blog to see some more incredible creations with Swirlydoo's Vintage Fae kit. Winner will be announced on the Swirlydoos blog on July 12th. Good luck and thank you for joining us!!