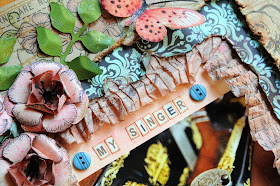
Well as promised I used different stamps for my layout this week, but I had to throw in more from the botanicals collection. I still cant get enough.
I love my collection of antique sewing machines. I have 7 of them, plus my grandma's old factory Singer from the 1930's, and my more modern computerized Husqvarna. My singer featherweights are my fave! My husband has one apart that he is custom painting for me. I cant wait till it is done. Wait till you see this new baby in a couple of months. I am having a REALLY hard time picking out the color. Candy Apple Red sounds gorgeous... He will use automotive paint just like on a car. so head on over to the Heartfelt Creations Blog to see the beautiful work that the rest of the Design Team has done!! Cardmakers will be amazed!! Thank you Joelle for the link to the marble tiles!! Love you!! You will also see a sneak of the next collection..CHRISTMAS!!! Oh the stamps are gorgeous!
Anyway. I though it fitting to pay tribute to my machines. I included the Tim Holtz sewing die, some old patterned paper and a few randomly placed buttons. I didnt sew on this one..I just plain forgot to...
 I didn't want to overdo the dress form die, I wanted to keep it's simplicity to a minimum. I wrapped some ricrac around the spool. I Glimmer Misted some seam binding and tied it around the waist. Then used a cute Blue Moon bead trinket and hung it with a safety pin. I stamped all around the layout, then diecut and Glimmer Misted the same flowers and adhered them over the stamped images for dimension. I added a small dot of Stickles to the center of each flower. Also in the Swirlydoos kit.
 The flowers were created from the Rose Creations Die and the Botanicals collection of stamps in various sizes. I did not stamp the leaves this time, but left them a beautiful green using Glimmer Mist.
 I did some layering using papers from Swirlydoos August Main Kit and Technique kit. I cut strips of old dress pattern tissue paper, stamped it using a background word stamp, then gathered and adhered it under one of the layers. I printed up the title using Microsoft word. See post below in the morning for complete instructions on creating this LO.
 Products Used on This Project
HCPC 3409 Tropical Floral Swirls PreCut Set
HCPC 3407 Botanical Floral 2 PreCut Set
HCPC 3406 Botanical Floral 1 PreCut Set
472186 Rose Creations Shapeabilities
HCPC 3405 Leaf Medley PreCut Set
472123 Foliage Shapeabiliies
HCPC 3323 Large Elegant Word Background
Other Products: Tim Holtz paper Glimmer Mist Tim Holtz Sizzix Ssewing Die Basic Grey Buttons Stickles old pattern tissue paper Kaisercraft paper Prima paper Colorbox chalk ink Bluemoon trinkets McGill punch starburst
Cut out a square within the background paper and diistress and ink the edges. Layer another piece of patterned paper underneath and cut out another square smaller than the last and distress and ink that piece as well. Cut strips of old pattern tissue paper, stamp with Word background stamp, ruffle and adhere to the inner background paper. Back the open area with a piece of solid cardstock. Place photo to the side of the middle solid area and place the title to the side. Stamp the flower stamps around the outer border and color the flowers and leaves with Glimmer Mist. Stamp, die cut and color the flowers in different sizes. Layer a few to form the roses and leave others to layer over your stamped and colored images done around the border. Dot the middles with Stickles for a little sparkle. Die cut, stamp and color the leaves as well. Bend the leaves slightly for dimension. Arrange the flowers and leaves around the page. The Dress form was diecut from chipboard and patterned paper. A ribbon was tied around the waist and a small trinket was pinned to the knot. The small die cut spool was wrapped with ricrac.A few buttons and a butterfly were placed around the page as shown.


