Hello Friends!! Welcome to the Heartfelt Creations Alumni May 2021 Blog Hop, where you can have a chance to win a $25,00 Gift Certificate from the Heartfelt Creations Store. The hop begins at 8AM EDT on Friday, May 28th, 2021 and runs until 11:55PM EDT on Monday, May 31st, 2021. The rules are simple. Leave each designer some love {comments}on their blog. The winner will be announced on the Heartfelt Creations blog and Facebook page on Wednesday, June 2nd. Once the winner has been announced on the Heartfelt Creations BLOG and Facebook page, he/she has 72 hours to claim the prize by emailing socialmedia@heartfeltcreations.com. Please write “Winner of the May 2021 Alumni Hop” in the subject line.
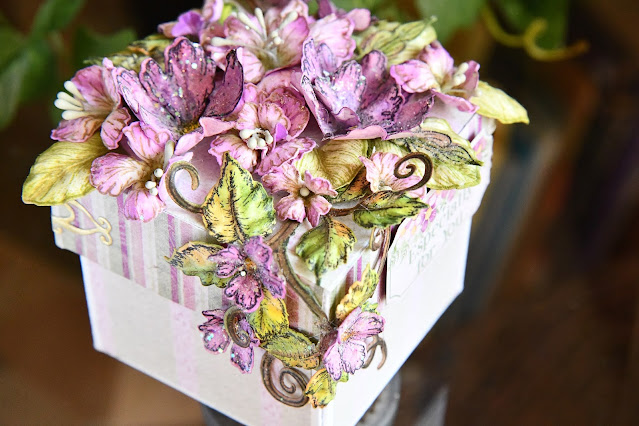
I decided to do something a little different, besides a card or a layout. I have been having so much fun creating explosion boxes! What a perfect way to use Heartfelt Creations products to create them! They are so easy to do. Once the base is done, Just start adding paper and your flowers and leaves!! I chose a variety of floral dies and leaves to adorn my box.
I created the explosion box base using the We R Memory Keepers Explosion Board using the small size. For the corners, I used their templates to cut out the hearts in the corners.
Amazing that this small gift explosion box only used an 8x8 piece of cardstock for the base, and an 5.5x5.5 inch for the top. I used heavy duty cardstock for stability, as it will hold a small ring box.
This is the view when the base is open. I love the Wild Rose paper. There are so many other things you could do to adorn the inside. I imagine photos framed on the square pieces.
And don't discount the smallest piece to the Elaborate Oval Die. I die cut it using the Lux Gold paper and created the corner filigree's for the top of my box. They look like real metal. I just wrapped them around the corners.


The way you used the gold die cuts on this box is pure genius, Lisa! The whole project is just exquisite! And I love your narrative blogging style. Great project! Thanks so much for hopping with us this month, my friend! xo
ReplyDeleteLoved the treatment of the box corners - a tip I will remember and is very useful. What a surprise when you remove that gorgeous lid. Think this idea would be lovely for Valentine day too. (Keeping this in mind.) Those lid cascading flowers are a work of art and arranged so artfully!
ReplyDeleteSuper fun project box! Love the draping flowers on the top too
ReplyDeleteGorgeous exploding box Lisa. Love the colors.
ReplyDeleteI just love a good box and this one is wonderful! Beautiful flowers too!
ReplyDeleteWhat an exquisite project Lisa! I just love your attention to detail. I will definitely be trying this in the future. Thanks for the inspiration!
ReplyDeleteLove the design. Your coloring is super nice.
ReplyDeleteWOW! Talk about a dramatic floral display!! Love all the work you've done on this project!!
ReplyDeleteSo beautiful!
ReplyDeleteWow!! This is just stunning!! The wild rose flowers are so pretty!! Love the colors.
ReplyDeleteLove this project, I've never tried one but looking at this one I'm going to give it a try and I love the wild roses!
ReplyDeleteIt's so much fun to see something different. Your box is so beautiful. I really love the hearts.
ReplyDeleteWow!!!! This is FANTASTÌC!! I love exploding box projects. Thank you for Sharing all the details!
ReplyDeleteyour work is always an inspiration for me to keep trying. This would make such a special gift for someone. The flowers are beautiful.
ReplyDeleteThe chunky glitter is a great touch. LOVE this
ReplyDeleteSuch a beautiful labor of love! Thank you for sharing.
ReplyDeleteOh I love the design
ReplyDeleteof the box and your
choice of paper and
embellishments are
gorgeous!
Carla from Arizona
This is so very cute!! Lovely project!!
ReplyDeleteOh my gosh - this is stunning! Love that you pre-make the flowers as that helps with the time needed to create something this detailed.
ReplyDeleteBeautiful. I like the flowers and how this opens up.
ReplyDeleteWhat a clever and truly beautiful way to present a small gift! Love the overall design of the box, but your flower arrangement at the top is beyond doubt a sight to behold! Love the metallic accents!
ReplyDeleteWow this is such a beautiful gift box, who ever receives this will be truly blessed x
ReplyDeleteThank you for showing a project that is "other than" a card. I love cards, but 3D projects are my favorite! Yours is so beautiful and dainty!
ReplyDeleteYour explosion box is gorgeous. Love the flower cluster on top. Thanks for sharing with us.
ReplyDeleteThis box is simply gorgeous! you are wonderfully talented! thanks for sharing. How did you make the box?
ReplyDeleteMarina, I used the We R Memory Keepers Explosion Score board. So so simple!! I used the small size for this box. If you look a couple of posts back on my blog, I did a large box.
Delete