Friday, May 28, 2021

Heartfelt Creations Alumni May 2021 Blog Hop "Explosion Gift Box"


Hello Friends!! Welcome to the Heartfelt Creations Alumni May 2021  Blog Hop, where you can have a chance to win a $25,00 Gift Certificate from the Heartfelt Creations Store. The hop begins at 8AM EDT on Friday, May 28th, 2021 and runs until 11:55PM EDT on Monday, May 31st, 2021. The rules are simple. Leave each designer some love {comments}on their blog.  The winner will be announced on the Heartfelt Creations blog and Facebook page on Wednesday, June 2nd. Once the winner has been announced on the Heartfelt Creations BLOG and Facebook page, he/she has 72 hours to claim the prize by emailing socialmedia@heartfeltcreations.com. Please write “Winner of the May 2021 Alumni Hop” in the subject line.

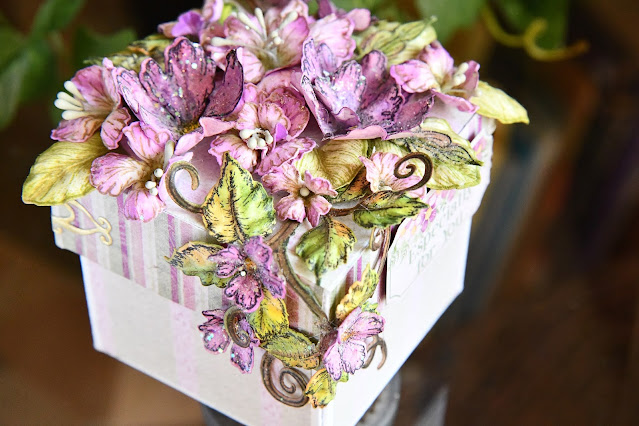
I decided to do something a little different, besides a card or a layout. I have been having so much fun creating explosion boxes! What a perfect way to use Heartfelt Creations products to create them! They are so easy to do. Once the base is done, Just start adding paper and your flowers and leaves!! I chose a variety of floral dies and leaves to adorn my box.


I have listed below all of the stamps and dies I used to create the flowers and leaves. I just sit in front of my TV while binging on Netflix or Hulu and create all of my leaves and flowers by the batches, so when it is time to adorn something, they are already done. It is so easy to do this. I find it very addicting as well!! I started with placing the leafy vines on my box top. Then added the flowers and leaves in clusters. I have them cascading down 2 of the corners of the box top. 


I created the explosion box base using the We R Memory Keepers Explosion Board using the small size. For the corners, I used their templates to cut out the hearts in the corners. 


Amazing that this small gift explosion box only used an 8x8 piece of cardstock for the base, and an 5.5x5.5 inch for the top.  I used heavy duty cardstock for stability, as it will hold a small ring box. 


This is the view when the base is open. I love the Wild Rose paper. There are so many other things you could do to adorn the inside. I imagine photos framed on the square pieces. 


And don't discount the smallest piece to the Elaborate Oval Die. I die cut it using the Lux Gold paper and created the corner filigree's for the top of my box. They look like real metal. I just wrapped them around the corners. 


Kathy- https://wp.me/p34lmI-5Q9

Carole- https://theprettypaperpatisserie.blogspot.com/2021/05/28th-may-heartfelt-creations-alumni.html

Monica- http://scraps2treasure.blogspot.com/2021/05/alumni-hop.html

Candy- http://candyscreationsblog.blogspot.com/2021/05/heartfelt-creations-may-alumni-design.html

Vicki- https://allidoisstamp.blogspot.com/2021/05/heartfelt-creations-may-alumni-hop.html

Amarilys- https://amadrian8.blogspot.com/2021/05/fridayheartfelt-creations-may-alumni-hop.html

Lisa- https://what-a-beautiful-mess.blogspot.com/2021/05/heartfelt-creations-alumni-may-2021.html

Magda- https://scrapdesign-handmade.blogspot.com/2021/05/heartfelt-creations-alumni-blog-hop.html

Oksana-  https://everydaycrafting.blogspot.com/2021/05/heartfelt-creations-may-blog-hop.html

Emily- https://emmielouwho.blogspot.com/2021/05/heartfelt-creations-may-blog-hop.html

Alissa- http://willrunforstamps.blogspot.com/2021/05/cherry-blossom-retreat-heartfelt.html


Heartfelt Creations products used:

Wild Rose paper collection

Small 3D Wild Rose Shaping Mold

Small Wild Rose Cling Stamp Set

Small Wild Rose Die

Sweet Magnolia Blooms Cling stamp set

3D Magnolia shaping die

Small Sweet Peony Cling stamp set

Small Sweet Peony die

Leafy Accents Die

Leafy Accent cling stamp set

3D Leafy Accents Shaping mold

Rock and Roll Prills 12 pack

Lux Gold Cardstock

Rajni Chawlas Crystal Clear

Ranger Archival Ink Pad Fern Green

Ranger Archival Ink Pad Majestic Violet

Ranger Archival Ink Pad Cactus Flower

Ranger Archival Ink Pad Coffee

Elaborate Ovals Die


Thursday, May 20, 2021

49 and Market "Picture Perfect"

Hello beautiful people!! I am here today to inspire you with a new layout featuring Some of the newer 49 and Market gorgeous product. I started with a paper from the Vintage Artistry in Color Collectors Edition Volume 1. It features some of my favorite colors. Coral Sage and Sky.  Paper 5 is one of the new designs in the collection. The blues and greens in the paper are mesmerizing. Lots of texture in the paper, and no specific design, so I was free to add a lot of my own textures. I chose to do some stenciling with texture paste, color washing, art stones, and stamping. Topping it all off with spatters was the icing on the cake! I chose to use last months (April) sketch to kick start my creative juices. Its a great idea to save the sketches, because they really jump start your creativity when you are stuck on a design. The beautiful sketches make it so easy!


I absolutely adore the yellow Royal Posies and Royal Spray flowers in Sunshine. They are gorgeous! I also used the leaves in the collections. Dipping into the Vintage Artistry Essentials Ephemera Bits and the Sky Collage Stacks, topping them off with the Vintage Artistry Essentials Square File Frame Set,  completes my photo mats. I used the Picture Perfect die cut piece for my title. 

The Rub-Ons are a dream to work with, and the Roughly Sewn Rub-Ons are awesome!! The stitches look so real!! You can see the closeup of the stamping I did. Just a little goes a long way. A tiny flower here and there are great to lead the eye visually to a sweet spot. 


Here is the other photo cluster on the opposite side. You can also see the closeups of the Roughly Sewn Rub-Ons connecting the 2 photos. I love all of the design stitches in the pack. There is a great variety, and I didn't have to drag out my sewing machine!!! Win-Win!! I also used the Essentials Rub-Ons. The doily designs are amazing! 


 I hope you enjoyed and is inspired by my layout. I would love to say I took the paper from drab to fab, but that is such an unfair statement, as 49 and Market doesn't make anything drab!! Its all fabulous! 


49 and Market Products Used:

Vintage Artistry In Color Collectors Edition Volume I

Royal Posies Sunshine paper flowers

Royal Spray Sunshine paper flowers

Roughly Sewn Rub-Ons in black

Vintage Artistry Essentials Square File Frame Set

Vintage Artistry Sky Collage Stack  (retired)

Vintage Artistry Essentials Ephemera Bits

Springtime Harmony Stamp

Jute Cording Single ply

Vintage Artistry Essentials Rub-On Transfers


Thursday, May 13, 2021

Crealies Guest Designer 12x12 layout. "They Color My World"

Hello Friends! Today I have for you a 12x12 layout created with the wonderful products from Crealies. I wanted to use their mixed media product, especially the Pigment Colorzz. I have had this idea in my head for a while. I finally put it to paper! I started with a patterned paper that had a beautiful vintage design, but a muted light color. I used the Stencil Paste , and applied it to the Circles with Rough Edges stencil using the Large Paste Spreader. I adore the Spreader as it is made of metal, and gives a perfect edge when used. For smaller areas, you could use the smaller Spreader. Once it was dried, I mixed my 7 colors in a paint mixing tray, and all you have to do is spray a little water in each of the reservoirs in the  paint mixing tray, and give the Pigment Colorzz a few taps into each puddle of water. Let it sit for a minute and stir each color. Using the Spray Bottle (pen), spray your prepared layout with a light mist of water. Starting with the first color, using a paint brush, wiggle  the color onto the wet layout and watch the colors start to bleed into the paper, tipping the layout up and down vertically to let the color drip toward the edge. The Piment Colorzz I used from left to right were, Purple, Pink, Orange, Yellow, Spring Green, Red, and Turquoise. Let the entire layout dry. Then I used Pearl Powder Gold mixed with water and spattered the entire layout. I also painted the edges with the gold. 


I die cut 3 Big Labelzz Tagzz using the watercolor paper and die cut some circles into the tags using the Elements Circles die, then mounted it onto some heavy chipboard. I used some of the Pigment Colorzz I had in my paint tray, and color washed the tags. I edges them in the Gold and gave them some spatters as well. I printed out the photos, die cut their faces using the same Elements Circle die. Then I inlaid the black and white photos into the tag. I used one of the smaller Rectangles die for the color  photos. Because the rectangles were to long, I repositioned the die after the photos were cut, and die cut them again. This ended up to be the size I wanted, a little shorter. I placed some corrugated cardboard under the photos and  adhered them onto the tag. I wrote their names on each tag, then mounted them onto the layout. I painted a piece of the water color paper with the Olive Green, then die cut the leaves with the mirror image using the entire sheet of paper. I tucked in some of the die cut leaves into the photos. 


I placed some purple 49 and Market flowers under the tags, and with the Pigment Colorzz, I painted some of the tiny flowers using different colors. I added the gold to the leaves and flowers, and tucked in some of the die cut Leaves around the cluster.  


I die cut the title using the Alphies Dies set in Capitals using black card stock and adhered them to the layout. I used some glitter pens to highlight the letters. This layout is done. 


Thank you for joining me today. I hope you are inspired to do some mixed media using Crealies wonderful products!! 

Mixed Media Products Used:


Wednesday, May 5, 2021

49 and Market...Dream Chaser

 Hello Beauties!! I am up on the blog today with a new layout featuring Vintage Artistry Essentials. I absolutely love this collection because it is neutral, you can add any color accent you want. I chose to stay with blues and greens to give it a forest vibe. I also followed the May Sketch. I look to sketches sometimes to kick start an idea. With me, it always takes on a life of its own. But I am always in love with the result. For the background, I used the Essential Rub-On Transfers. The tiny little beads look so realistic! I just randomly rubbed on some designs here and there. So many to choose from!! And they are all beautiful!


This is the sketch. Join the challenge for a chance to win a wonderful prize pack from 49 and Market! 


I decided I wanted to showcase my title as well. So I created a small cluster complete with flowers, bow created from the jute, a  slide frame from the Ephemera Bits collection, and the banner for the title. I love the little acetate butterflies from the Essentials Foliage collection. I scattered 3 on the layout. 


I chose to use 2  of the same  photos, and placed them behind the square file frames. I processed one photo in an antique brown and left the other color. I layered them on top of the laser cut wreath from the 12x12 Essentials collection. I clipped on a Shaped Clip arrow to the square file frame. I added some sticks from my yard to the laser cut fence. It just adds some extra dimension. 


All of the new flower collections are beautiful! I chose the Royal Posies and Royal Spray in Ocean Jade. They are so pretty! I clustered some laser cut leaves, the acetate foliage and the fern leaves from the Royal Posies Collection in each of the corners of my photo cluster. I added some glitter to the flowers for some extra sparkle. 


Just a closer look at the Title cluster. I simply adore the brown laser cut leaves. I need MORE!! They are simply beautiful! And so realistic. 


Love the little acetate butterflies in the Foliage collection set. They are so delicate looking. I flicked on some Lindys Stamp Gang Antique Bronze. It added a little shimmer to the layout. I also added some glitter to match the greenish blue in the layout.