Monday, January 30, 2012

Zva Creative January DT Blog Hop!

Zva Creative and our talented Design Team welcome you to join us for our first Design Team Blog Hop of the New Year! We are happy to have you join us today and wish you the best for 2012!

The Blog Hop begins at Zva Creative's NEW blog! Be sure head on over to check it out! Leave a comment there for a chance to win an extra prize package just for visiting the blog and telling us that you stopped by! You will also find a complete list of all the participating blogs there (in case there is a glitch along the way).
As you know, Zva offers many beautiful color groupings for pearls, flowers and crystals. We want to make sure that they shine bright for you, so each designer was asked to share a creation using a specific color or color combination on their blog hop project. If you like what you see you can find a list of stores and online retailers that sell Zva HERE.
The colors chosen for me were whites and creams. Since I didnt have any cream colored flowers, I added the next color up the color wheel. Browns. The browns are warm and beautiful . I used my Martha Stewart Wild Flowers punch around the page set on a white piece of card stock. I then painted the whole piece with gesso. I used a Layers Of Color stencil on all 4 corners using Glimmer Mist and sprayed a little of blue randomly around the page. I did the same on a smaller piece of white cardstock, but this time sprayed the blue on while the gesso was still wet, and brushed the color across the page. I then matted both pieces on a blue piece of card stock. The gesso on the textured Bazzill card stock looks and feels like canvas. I love the effect.


I chose the large Zva flower FL 04CA 107 and paired it with the smaller white Zva flower FL 04CA 128 and brown flower FL 04CA 126. The smaller elegant rose buds [FLBK-03CB-145] and the sweet roses [FLBK-03CB-133] were used on the ends of the flower cluster. I mixed in leaves[FL-04CA-114] and tucked them under the floral spray. I did touch the sweet roses with a bit of soft brown ink.

This is the Thriving Pearl/Crystal [PEB-03CB-114] in champagne. So elegant!!

Just another closeup of the flower cluster.

This piece, Fantasia, [PEB-03CB-114] comes 2 to a pack. I used the lighter one of the 2 once again in champagne.


If you would like to play along with our design team, just follow along the blog path. I am linking to one of the Zva designers and that designer is linking to the next and so on. Be prepared to be inspired along the way!
Hidden on FIVE of the designer's blogs is a Zva Creative prize package! Winners will be randomly chosen after the hop is over, so it's important to leave a comment on as many blogs as you can along the way.
The Blog Hop starts today, January 30th and runs through midnight US Eastern Standard Time on Tuesday, January 31st.
The 5 winners will be announced on Wednesday, February 1st on each of the five winning blogs. The full list will be found on Zva's blog as well. We will do our best to notify each winner, but it's best if you can pop in to all of the blogs once again on Wednesday... plus, you never know what kind of inspirational creation that you may find there.
All you need to do is leave a comment on this Blog Hop post... you do not need to leave a comment on each and every designer's blog post to qualify. However, the more times you comment along the blog hop path, the more chances you will have to win.
We also thought it would be more fun to add even more chances to win our blog hop prize! To increase your chances of winning:
* Comment to let us know that you posted on your Facebook page about our hop (link to any of the blog hop posts)
* Comment to let us know that you "tweeted" about our hop (link to any of the blog hop posts)
* Comment to let us know that you asked your local store to carry Zva creative products. If they already do, that's fantastic, maybe you can suggest other products that they don't carry.
*Hop over to Zva's NEW blog and leave a comment there to tell us that you made it there!
The blog hop begins here at Zva Creative's NEW blog. Your next stop is the fabulously creative Nicole Martel. Enjoy!
Thank you for joining us!
P.S. Mark your calendar to join us again on February 27th for our next Zva blog hop!

Saturday, January 28, 2012

Zva Creative featuring The Color Room palette #95

With CHA in full swing, I am feeling so sad that I was unable to attend this time around. So, to feed my creative soul, I decided to work on some Zva assignments for February and add a touch of the Color Room. With Valentines Day coming up, I wanted to do something pink and red. Palette #95 was perfect!! The photo is my son and daughter in law on their wedding day. The brick stamp is from Layers Of Color and the outer edge lacy stamp is from my Prima/IOD Build a Stamp set.

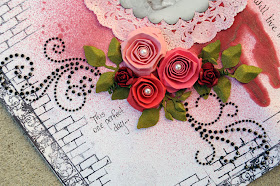
The Spiral Roses are from the quick tutorial I just did. I used card stock instead of coffee filters. I added a Zva Basic Lines Pearl PEW-03CB-143 in the middle of the flowers. They added a sweet touch. The smaller red roses FLBK-03CB-125 are also Zva. The tiny leaf clusters are a from a 3 piece Sizzix Sizzlet set die.

I just love these easy Spiral Roses for fill ins, but they look nice as the main attraction. The larger leaves are a Spellbinders die. The "Lovely" Zva black swirls [CR-04CB-112] are perfect for this LO. I used a 0.5 point Kuretake/Basically Bare Zig pen for the journaling. I painted a Wilton Doily with Glimmer Glaze in Pink Lady and the background is done in Glimmer Mist Vintage Pink and Red Velvet. Not happy with my drips, but I blame is on the paper. Recollections brand. To thin. I should have used my tried and true Bazzill. It never fails me!

Just another closeup of my floral cluster. And the first part of my journaling. I sprayed all of my leaves with Glimmer Mist in Olive Vine.

Be sure to come back on January 30 when the Zva Blog Hop starts off the new year with more creative Bang!! And prizes to be had!! So what do you think? Would you like to see more? If so you can join Zva Creative’s design team for their monthly blog hop on Monday. It will kick off right on the brand new Zva Blog starting at 9:00 am EST US. There will be plenty of inspiration to take in as our team shares artwork created with Zva Creative’s beautiful crystals, pearls and floral embellishments. You won’t be disappointed!

Monday, January 23, 2012

Coffee Filter Spiral Roses

These are the easiest flowers to make with lots of tutorials on web. I had scraps and did the blue flowers in this LO to use as a fill in, then got lots of requests on how to make them. Here is the tutorial. You can use cardstock, paper or coffee filters.


Product List:
Scissors
Coffee filters
adhesive of your choice
Glimmer Mist or any color sprays
non stick craft mat


Cut a circle shape from the coffee filter.


Cut a spiral shape into the circle as shown. Leave a portion intact in the middle to use as the base. Lay the cut out spirals on a craft mat and spray with color.


Bend and crease back the edges on the outer portion of the circle. This will make it easier for the next step.


Starting with the outer edge of your cut spiral, using the handle of a thin paint brush or skewer, start rolling the spiral with the creased back edges to the outside.


When your spiral is rolled to the end, let the middle piece flap up as shown.


Place the adhesive into and around the base of the rose.


Fold your flap over and onto the base of the rose pressing gently to secure the flap.


This is your finished rose.


These were sprayed with different colored Glimmer Mist.


Just a few more colors.

Friday, January 20, 2012

Put it in a Rocket Ship


Life is to short to waste time...and love...
These words come from one of my very good mentors in the photography world. Bambi Cantrell. Pass this on if you know someone who is in this situation. It's never to late...

"All of us at one time or another have had some sort of disagreement with a family member. Maybe they said or did something that upset us, and we didn’t talk to them for a while. When does it cross over from being just a normal disagreement to one of a more serious nature? I guess it would depend on a number of factors most of which are attitude based.

It is easy to fall into a pattern of behavior where we ignore the problem, and the family member, because it is just too painful to address. But is ignoring the person, the answer? Hardly. In fact, all we are doing is keeping ourselves from happiness, and in the process making others just as unhappy. Case in point: One of my relatives was for whatever reason was estranged from her father and stepmother. For the life of me, I can’t remember why. I guess they found a reason to be upset at one another, and fell into a pattern of ignoring each other, allowing stupid issues to rob them of a beautiful close bond of love. Tragically, this beautiful person died in an accident before that stupid argument was resolved… how sad, how tragic, ..how permanent. (Sorry to back up the hearse, but this is reality) Her father has spent the better part of 25 years, grieving his dear daughter, and doing the “would have, should have, could have” game. Are any of you out there in similar circumstances? If so, what is so important, so earth shaking, that you can’t reach out to those loved ones, and put the issues to bed once and for all?. Will it take a death to make you finally see how really silly those issues were? Would you even remember what it was that caused the rift? What could possibly be so important that it causes you to finish this sentence…I don’t talk to my father because…I don’t talk to my daughter because… My mother is dead to me because..” Will it take loosing those loved ones in death to make us finally wake up and realize that while one has breath in one’s body, there is nothing more important than family? In the case of my dear beloved, her children continued to suffer long after her death. Her dad so grieved because of his failure couldn’t face his grandchildren, and in the process, lost not only his daughter but a wonderful relationship with his grandchildren. Those grandchildren lost out not only a mother, but grandparents to keep the memory of their mother alive..I guess the point of this very heavy blog post is, if you have something like this taking place in your family suck it up and seek out those lost ones, love them, and do not allow the fear of rejection to keep you apart. Don’t allow another day to pass with words unspoken.. tomorrow isn’t just another day. Why not make January 1, 2011 the day to put the past in a rocket ship and shoot it to the moon."

I know someone in this situation as I write this. I know she will read this. My hope is that she turns the tables around before it's to late...

Tuesday, January 17, 2012

Celebration Of The Heart***Swirlydoos***

Swirlydoos January kit Mystical Winter has so many possibilities when it comes to designing. I have done a winter and spring LO using the papers in the kit. I have gone from soft and romantic to cold....bbbbbrrrrrr..... Either way, the kit is beautiful and versatile. This LO showcases the Blue Daze flowers that I just did the tutorial on, in my last post. I used cardstock from the add on kit. Card stock is a must for me when creating the LO's. I use it for the flowers, diecuts and backgrounds. The Dusty Attic piece is from a special order that Krissy opens up for the subscribers. If you order, you can get it shipped free with your kits. This piece is from their last collection. We love our special orders at Swirlydoos. The photo is my dear grandmother. I took this picture this week on my visit to the nursing home to see her. She will be 97 in a couple of months. My little sweetheart.


Here is a closeup of the large and smaller flower. The leaves are Spellbinders and sprayed with Olive Vine Glimmer Mist and lightly sprayed with Lindy's Stamp gang Buccaneer Bay Blue Moonshadow Mist then inked with Chestnut Roan (my fave) and distressed.

The Dusty Attic piece was painted with Smooch in Mocha that we got in a former kit. I love the way it pools on the chipboard creating a coppery feel to it. I could of added some blue/green paint to it to give it a verdigris look. hhmmm. Not to late. I'll try on another piece.

I did some punching and lacing. I just purchased a gorgeous wrapping paper rack to store my lace and ribbon rolls, and now I can see everything at a glance. Just pull and cut. I love it!!

I have one more LO in the works from this current kit. I am completing my Zva CHA projects that will be going to California in a couple of days for the show, and I am expecting Swirlydoos February kit around the corner!! It's going to be a creative year !!

Monday, January 16, 2012

Blue Daze Flower Tutorial


Product List:
*Sunflower Die that has large and smaller sizes. I used Spellbinders for this tutorial.
*Flower Soft
*glue or any liquid adhesive
*chalk ink
*Pearls or crystals


Die cut or punch out 2 large flowers and 2 small flowers. Ink all of the edges.


Curl back each petal of the larger flowers and both smaller flowers but make the curls tighter in one of the smaller flowers. This one will be your center. I used the handle of a small paintbrush to get a tight curl.


Because my larger flowers had a large gap in the middle, I glued them onto a small cut out circle. Layer the 2 larger flowers and stagger the petals.


Next place one of the smaller flowers onto the layer.


The flower with the tight curls place in the middle with your curls going toward the center of the flower.


Place your pearl of crystal in the center of the flowers and place a ring of adhesive around it.


Take some oinch fulls of flower soft and cover the adhesive generously. Gently pat down the flower soft into the adhesive so it gets a good grip onto the adhesive.


Turn the flower over and tap out the excess flower soft. You can always add some more if you see a gap or a space you missed.


The smaller flowers are made the same way except you only use the smaller die cuts. This is a sneak of a LO I completed using the fabulous Swirlydoos January kit Mystical Winter. Once I slap a photo and some butterflies on it, I will upload it into the Swirlydoos gallery. I hope you enjoyed this tutorial. Off to print up some butterflies to complete this LO.


Thursday, January 12, 2012

Swirlydoos January Blog Hop Block Party!!

Welcome to Swirlydoos' January Blog Hop Block Party!!

Happy New Year and welcome to Swirlydoos January Kit Reveal Blog Hop BLOCK PARTY!!! If you came here from Tiffany Morgan's blog, then you are on the right track. If not, go back to Swirlydoos' blog and start from there. We have some amazing projects for you to see today and as a bonus we have 4 manufacturer blogs that are joining in the fun!! There are 5 prize packs up for grabs so make sure to follow along and have fun!!?

The inspiration for this LO came from the current sketch # 190 from Creative Scrappers. And I totally adored my Zva Design Team mate, Karen Shady's take on the sketch. She is Guest Designing for them this week. I loved her banner and had to do one!!

I used my Martha Stewart Deep edge Wild Flowers punch around the page set. It wrinkled and distressed very well.
Here is a closeup of the banner. I free hand cut the triangles, matted them and used a scallop scissor to cut the mat, I added some pearls and rhinestones and attached some letters. I glued the banner pieces onto a twisted piece of ribbon.

For the floral cluster I created some handmade flowers. For the blue roses, I hand cut circle spirals and folded back the edges and rolled them to create the roses. Very Easy. Click here for the tutorial.

The peach colored flowers are just as easy and I will be posting a tutorial at Swirlydoos on Friday. I also created a have a file for the vines in 3 colors to match the kit as a bonus with the January 2 butterfly files I created for the kit. There are 2 different files. Click here for the downloads.

Just a closer view of the flowers.


This next LO started out as my SwirlyHues project, but took a turn when I decided not to put any brown in it. Then I wanted to make it a wintry LO, but I live in Florida and lack wintry photo's. So I just rolled with it. The white decorative background was cut out with my Cricut Expression and I used the Ornamental Iron 2 cartridge. I cut it at 11.5 inches. I cut out the window pane to fit my picture in.


The strip journaling was printed on 4x6 cardstock and then I just cut it into strips and inked the edges.


The blue vines were cut using a Sizzix Sizzlets die and the blue velvet paper in the kit. I adhered pearls and rhinestones along the design of my Cricut cut.

I left the creamy white flowers in their natural color.

This LO is my take on the beautiful sketch by Beggahuna. I did manage to find a picture of Gabbie taken in 2010 at Swirlydoos Camp in Bailey Colorado. It snowed!! She was happy to wear her Parker. She was so happy to experience snow for the first time as she was to young to remember snow on a trip to NY when she was 3.


Just a closeup of the flowers and vine swirls. It is a Cheery Lynne Die.

Thank you for visiting my blog. I have created a couple more projects with the kit that I will reveal during this month.


You have until midnight, eastern time, on January 15th to complete the hop. In order to qualify to win here is what you need to do: 1: Visit all of the blogs and leave a comment on each. This way we know you were there. Become a follower if you're not already. Take your time. There are beautiful things to see along the way. 2: Before you leave each blog, look for the “special” words and write it down. Once you have visited all the blogs and collected all the special words, they will create a sentence. 3: Finally, go back here to the Swirlydoos blog and leave a comment letting us know how much fun you had AND tell us the sentence that was created with all of the special words you collected.

My special word is : But

The party continues over at Rae Moses's blog. Have fun!

Tuesday, January 10, 2012

January SwirlyHues

Welcome to another fabulous month of SwirlyHues!
Lisa Valentine is our host for January. She picked the colors for our storyboard and picked the sketch by Begahunna for inspiration. See the Rules below.

This is my layout for this months challenge. I chose a few techniques that can be found in the forums at Swirlydoos.
Masking is one of the easiest and most beautiful way to jazz up a plain piece of card stock. I chose to use a piece of white 12x12 Bazzill cardstock from the add on cardstock kit and use stencling/masking. The stencil I chose from my collection is from a wonderful company I recently discovered called Layers of Color. They offer the most beautiful stamps, and stencils as well as embellishments and dies to match their stamps. I chose to use the Vintage Medallion Art Stencil for my background. Layers Of Color is taking a new direction and is having a fantastic sale right now!! But there is excitement in the air for the future and the wonderful designs!! A wonderful transition is happening right now.
I used Distress ink with a foam applicator to go all around the page. I love the look. You could use gesso or clear embossing for a different look. So many possibilities.


Some of the techniques I used on my page are the decorative punched Circle, How to Hand Dye Vintage Seam Binding to make Crinkle Ribbon Tutorial, and stenciling with distress ink. The butterflies are a down load from the Butterflies thread in the forums.

I used Glimmer Mist to add color to the white flowers from the add on flower kit. I also painted the berries spray so that it matched everything else. My blue color inspiration came from the blue cardstock and the crystal flourishes in the kit.


Here is the inspiration sketch that Begahunna created for us from a former kit. We love her sketches so much and they are so versatile. I use them over and over again and always get different results!
So give SwirlyHues a whirl this month and check out what the design team has done. You will surely be inspired.

The Rules:


1) Must stick to the hues provided. You may add black or white, but it can NOT be more than 5% of your total page and can NOT be a main element.
2)
You must interpret the sketch provided.

3) Now for the Swirly-fying element – you MUST use one of our tutorials on your page. Here is a LINK to our tutorials. It is really to our forum. Just scroll down. Our tutorials are separated by category. You can choose anything your beautiful, creative heart desires.
4) Create a post on your blog for your SwirlyHues entry.

5) Upload your gorgeous creation to the SwirlyHues album in our gallery no later than midnight eastern time on February 10th. Click HERE to get there. You will need to register to upload photos. It's free! Use the following format to name your item: SH Jan 2012 (insert your project name here). Your photos can be no larger than 600x600. In the description please tell us what tutorial you used and a link to your blog post. If you don't have a blog, just let us know that.

6) 2 winners will be chosen; 1st and 2nd place. Each winner will receive one of our highly coveted blog badges (see the right-side bar). Winners will be posted to the Swirlydoos blog on the 13th of the month (unless otherwise noted), as well as our Facebook page. Check back here to see your name and then contact LisaV at Lisa@Swirlydoos.com She will make sure you get your blog badge and then we'll add you to our blog for the month! Superstahhhhhh *strike a pose*

7) The next challenge will be uploaded to our blog on February 10th!