
Monday, February 28, 2011
Swirlydoos Reveal Date Change
I know ya'll were waiting on a new Flower Tutorial...Well in order to accommodate more time, Swirlydoos Design Team Reveal has been moved to the 5th of each month...So my pretties, just a few more days, and I will have that up for you!! And look for more videos as well!! Krissy is working on a new format for Swirlydoos Tutorials. You will be able to save them as a PDF or just download and print out the step by step instructions. Go check it out HERE..
Saturday, February 26, 2011
I ♥ Faces Fix It Friday
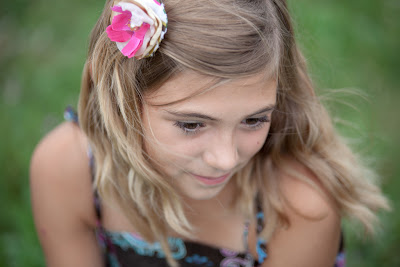
Yup, it's that time again. I love Fix it Friday at IHEARTFACES It gives me the chance to play using my Photoshop Skilz....and the photo this week is just darling!!! I adore cruising the participants versions. You have professionals, amateurs and those who just like to play, like me!! I did 2 versions...
This one is the original...
 This one I applied an oil painting technique using Corel Paint Shop Pro and Photoshop CS5. Just playing around with different textures and strokes. Then tweeking color and adding a slight vignette in Photoshop.
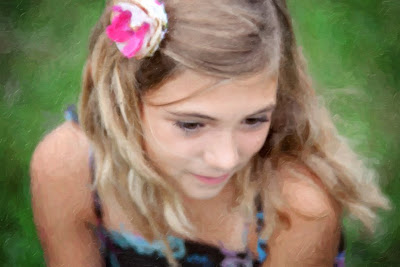 This one was done all in Photoshop using Florabella Actions and textures fron the Luxe II set and the new Texture III set. I am so addicted to Florabella Textures and Actions. They are my favorite next to Kubota and MCP..Oh yea, and Totally Rad..I am an action junkie. I mix and match all the time!! I like this edit the best. I must remember the formula...
Wednesday, February 23, 2011
HAPPY HEARTFELT CREATIONS WEDNESDAY!!
I cannot believe that it is Wednesday already..But that only means you can see all of this weeks Designer Creations on the Heartfelt Creations Blog!! And what a week this is!! The cards and projects are absolutely beautiful!! I love how we all give step by step instructions on the creations...You can follow them easily.
I have used my February Swirlydoos kit to create this LO. I did a photo shoot a couple of weeks ago and this is one of the pictures cropped. Little Anthony holding to daddy's hand. He was precious. The flowers were all stamped, cut apart, layered and curled for dimension. Love love the Coordinations Paper from Graphic 45. I did some sanding to give it a distressed looked. If you check out the Heartfelt Creations blog, I give details on how I did this LO. For the title, I made my Faux Scrabble letters. This time I printed up the files on 5 x 7 paper for smaller tiles. I then glued the whole sheet to chipboard and then cut out the rows of letters, then cut them apart. You can follow the tutorial here.


12 x 12 card stock was punched with Martha Stewart Punch Around The Page Set Double Arches , and the used a sander to bring out the raised areas of the paper. I weaved ribbon through the bottom 6 x 6 Prima Flora Fairy paper then it was adhered and offset slightly to the right. The picture was then adhered to the mat. The decorative corners were then adhered to both right side corners. The sunflower stamps were stamped onto blue card stock using black ink. There are 2 stamped images for each of the larger flowers. And 1 layer for the buds. The stamped images were die cut, then cut between the petals, then sprayed slightly with Glimmer Mist and wrinkled slightly. When the stamped flowers are dry, curl the ends in different directions for dimension. The middles are punches layered for stamen. The buds are a single stamped image folded in half and curled to mimic buds. the punched stamen were tucked in the flower. The leaves were cut out, and painted with Glimmer Mist. They were arranged on the side of the page. The butterflies were printed cut out and covered with Rock Candy Stickles and placed around the page. . The faux scrabble tiles were printed on card stock, backed with chipboard, covered with Glossy Accents, cut out and arranged at the bottom of the page.
Saturday, February 19, 2011
Ruffle Flower Tutorial
As Promised...

 Punch out about 15-16 coffee filter scalloped circles.
 Color your punched pieces with your Spray Mists. I used 2 different colors on these pieces and topped it with Gold for added glimmer.
 Take your scallop circle and fold it on half, then fold in half again (quarter) then fold again (eighth).
 Fold all pieces before assembling.
 Punch out your 1 inch circle (or free hand cut it, you wont see it anyway) Spray the same color as your scallop circle pieces. Add a ring of glue around the circle as shown.
 Take one of your folded pieces and place it over the glue. Make sure the folded edge is on the right and the open edge is on the left.
 Start placing your folded pieces overlapping them ever so slightly making sure the folded edge is on your right. This way the open edge will fluff up a little in the same direction.
 You should have enough pieces to create a full circle of petals. 15 or 16 petals should be enough depending on how close you overlap them.

Place your middle onto the flower. I used a button on this one. I just removed the shank so that it lay flat.
 You may notice that the purple flower is slightly different than the others. That is because I folded the scalloped circle in quarters, eliminating that last fold. It makes a wider petal, and you need fewer. You will only need half the amount. enjoy making your ruffle flowers!!
This flower will revealed on Swirlydoos on January 31 on reveal day...Super Simple...

***Product list***
Coffee Filters
Glimmer Mist
Adhesive, glue, and a tape runner would be good as well
Scalloped circle punch or die (Love my Spellbinders Scallop Circle set)
Beautiful buttons or Prima middles or similar
Coffee Filters
Glimmer Mist
Adhesive, glue, and a tape runner would be good as well
Scalloped circle punch or die (Love my Spellbinders Scallop Circle set)
Beautiful buttons or Prima middles or similar
 Punch out about 15-16 coffee filter scalloped circles.
 Color your punched pieces with your Spray Mists. I used 2 different colors on these pieces and topped it with Gold for added glimmer.
 Take your scallop circle and fold it on half, then fold in half again (quarter) then fold again (eighth).
 Fold all pieces before assembling.
 Punch out your 1 inch circle (or free hand cut it, you wont see it anyway) Spray the same color as your scallop circle pieces. Add a ring of glue around the circle as shown.
 Take one of your folded pieces and place it over the glue. Make sure the folded edge is on the right and the open edge is on the left.
 Start placing your folded pieces overlapping them ever so slightly making sure the folded edge is on your right. This way the open edge will fluff up a little in the same direction.
 You should have enough pieces to create a full circle of petals. 15 or 16 petals should be enough depending on how close you overlap them.
Place your middle onto the flower. I used a button on this one. I just removed the shank so that it lay flat.
 You may notice that the purple flower is slightly different than the others. That is because I folded the scalloped circle in quarters, eliminating that last fold. It makes a wider petal, and you need fewer. You will only need half the amount. enjoy making your ruffle flowers!!This flower will revealed on Swirlydoos on January 31 on reveal day...Super Simple...
Forever "Lets Get Shabby Winner"!!!!!
Let's get Shabby Challenge #20, is all about Weddings...
I remember the day I snapped this picture of my friend Crystal..It was the moment right before she was to recite her vows...She had this precious, happy, smile on her face. It was the look of love...At this moment, she knew it would be Forever...


 This is a LO I did with the gorgeous "Antebellum Beauty" kit from Swirlydoos. I really love the blues in the papers, and blue and brown is one of my favorite color combo's. Using one of my Crafters Workshop Templates, I cut out the scalloped design of the brown paper. I then used my Swirly sister Robins technique for the wet paper distressing, wrinkled and crumpled slightly then inked it while it was still a little damp. That helps the ink bleed a little. I like the effect. The ribbon was a bit to wide to thread through the paper so I sewed, gathered and tied to create the scallops, then just glued to the paper using Alene's quick dry glue and placed a Prima pearl between each gather. I used parts of my punched Martha Stewart scallop punch to peak out from behind my ripped paper. I made the distressed blue rose in the corner then I made the green ribbon flowers and placed some Prima flowers on top of them. I will be putting up the tutorial for the ribbon flowers. I placed tiny rose buds in a few places. I found them at a wonderful UK online store Wild Orchid Crafts. I ordered a bunch of flowers...So beautiful!!!! The buds are just so sweet!!
Wednesday, February 16, 2011
Happy Heartfelt Creations Wednesday
It's Heartfelt Creations Wednesday!! And Yes it is Happy, that is the title of my layout this week. The design Team does an incredible job with cards..I am not a card maker..I try..Maybe I will try again. All it is is a miniature LO right??? Well, if you visit the Heartfelt Creations Blog, the designers give you step by step instructions on how they created their beautifully creative cards..Step by step!!...Maybe I should follow them and unhinge the secret of card making!! lol..Seriously, the DT does incredible work every week. You must check it out. They are also making a special announcement you may not want to miss...
You will also see my step by step instructions with creating this LO. It was a labor of love as I tried to create everything on the LO from the paper to the flowers with only stamping. Gotta love Glimmer Mist!! Some of my scrap friends tell me, "OH, I have 6 bottles and I am running low, I may need to replenish my stock"...I say..I have almost 60 bottles!! That's not enough colors!! I need more"!!!!! Honestly, Glimmer Mist is the BOMB...I spray it on, paint with it, wet distress with it,color my seam binding to make any color ribbon I want..I just love it!! And on this LO, to enhance the paper, flowers and stamping, I only used 6 colors..Well enough of my rambling.. I bring you Happy...
Cause that's how my daughter rolls...
 The butterfly was cut from a Custom Heartfelt Creations Die that Spellbinders does for them.
I added Stickles and dimensional paint to it and cut around the body a bit more for definition. There is also a coordinating Butterfly stamp set that goes with the die.
 My favorite leaf stamp to date!! And the flowers are from the the Innoscents stamp collection. They were stamped and die cut with Spellbinders Blossoms 2 set. What I love about Heartfelt Creations stamp sets is many have a Spellbinders die that will cut out the stamped images. So easy rather than trying to fussy cut them with a pair of scissors.
 Just a closeup of the flower that was stamped on cream card stock and colored with Glimmer Mist in Sunkissed Peach and Peach Delight. I used my McGill Starburst punch for the middle, then added a Prima E-line pearl. The leaves were misted in 2 different greens. the lighter green to color the card stock, a darker green to touch on shadow parts and what ever color I use in my flowers, I use a paintbrush to stroke on a few highlights onto the leaves. That brings the flowers and leaves together harmoniously...Dont you think?? A video tutorial is in the works for the March Swirlydoos Kit debut...
 The corner was also cut from the die set mentioned before. I cut all of my Spllbinders dies on my Cuttlebug.
 The punched trim under the photo was punched with my Martha Stewart large punch, then dipped in Utee extra thick embossing powder that I melted in my Melting Pot. It looks like a piece of acrylic. To see how I created this LO step by step with details on techniques, visit the blog. You may pick up some fresh new ideas from what you find in this weeks blog post. Oh and as a side note?? All of the paper I used on this LO came from my Swirlydoos kits...
Sunday, February 13, 2011
Swirlydoos February Round Robin challenge.
Well, this past Friday was Round 2 in Swirlydoos February Round Robin Challenge. It was my turn, and I got to follow the fabulous Denise Jensen. This is one of our favorite challenges at Swirlydoos. Denise and I didn't make it in time for sign ups, so I put up a big fuss to add a 5th Team..Yea, I whined till I got my way...(it pays to be the Design Team Coordinator)Well, we ended up with 4 of us on that 5th Team..So now we are known as The Taboo Team...The other 4 teams wanted a name as well...hhhmmmm...I think I started something..once again!! Team Taboo Rocks!!!! Cant wait to see what what Jen and Pat do to follow us!! Well, here is my version of Denise's Beautiful LO. I used Swirlydoos February Kit "Things Remembered" for this wonderful challenge.
 This flower is the Ruffle flower that I did a tutorial on.. I used Sunkissed Peach Glimmer Mist to color it. You can print out a file of the leaves here. I printed, cut, and inked the edges after cutting them apart from the stem. I did a little dry embossing and folding and curling them to give them dimension. I topped it with a button after taking the shank off.
 This flower looks like the hibiscus in my garden at our 2nd home. I will be doing a tutorial next month with the release of Swirlydoos march Kit. The smaller purple flowers are The Fairy Cosmo Flowers I did a while back.
 The decorative circle is a double punched circle using my tutorial, with the exception that I punched the inside as well. I used Martha Stewart's French Scroll Punch around the Page set. There will be a tutorial on making it look like hammered copper.
 I colored the little buds on the Prima Vine with Sunkissed Peach Glimmer Mist and made the little flower buds using my Alterations Tattered flowers die. .
 I die cut the Alterations Bird cage using chipboard and paper and adhered it with glue then used a brayer to flatten it. I added the jewels that were in the kit, and colored the clear ones with Alcohol ink in Salmon. I made the flower vine using one of the flowers in the kit and wrapping a wire stem with brown floral tape,and wove it through the cage and added the May Arts Leaf trim. I really enjoyed working with his wonderful kit!!
Thursday, February 10, 2011
Swirlydoos February Kit Timeless Memories...
This one is going to be a loooong post!! I really enjoyed playing with the February Swirlydoos kit "Timeless Memories". So many beautiful papers, so many beautiful elements, and although I have 56 bottles of Glimmer Mist, I welcomed one more new color from the kit to my collection!! Sunkissed Peach...The peachy colors in the kit, the blues and greens...So lovely!! The beauty with each kit that comes out is our designers keep you creating with new tutorials. This month Lisa Valentine showed us how to create glass flowers. I love my melting pot!!! I used the technique on the flowers and leaves on my Recipe box. A $1.00 find at Michaels. Transformed into a beautiful treasure to hold favorite recipes. It is a gift for my daughter who is in Culinary School. I just need to add Timmy feet to it. My blog post is s little late because I worked overtime this week . The hospital is busting at the seams again. Nurses are getting sick...How I stay healthy for the most part is a small miracle...I thank God that I do. Well, more on this beautiful kit. You must check it out...There may be some left. But not for long...
 This Lo contains the flowers for my next tutorial. I call them Swirly Hibiscus. They are the same color as the ruffled hibiscus at our second home. I really need to go get cuttings and plant some in the home we are living at. They are double ruffle and gorgeous!! So I tried to duplicate them with paper.
 I cut the Prima bling apart.
 I enhanced the butterfly all over with Rock Candy Stickles and outlined it lightly with Icicle Stickles.
 I bunched one of the flowrs under the paper in the corner. I die cut the letters, Glimmer Misted them and covered with Glossy Accents for dimension.
 My bottom corner flower cluster. I used 3 different colors of Mist on the flowers. I will share that with you when I do the tutorial.
 This LO was fun to do. The flowers were made like my peeled poppies tutorial, but I didnt peel the paper. I used regular Bazzill card stock from the add on card stock kit. The frame is a Digital Element from Scrap Girls that I printed out and painted with Glimmer Mist. I traced the Dusty Attic piece with on the green cardstock from the add on Card Stock kit and inked it lightly for dimension. .
 Close up of flowers.


 I used my favorite Heartfelt Creations leaf stamp and painted with Glimmer mist as well
 We got the Prima mask in a past kit, so I used it along with Glimmer Mist to enhance the Kraft Paper in the card stock add on kit. I was not a fan of Kraft Paper but learned to love it by using Mists. stamps and stencils. Love the big Skeleton Leave in the kit. there were 2. This LO was my take on the sketch.
 Folded back a corner and placed the inked, punched corner piece and tucked a couple of flowers in there.
 I used the swirly vines that I provided Swirlydoos with a while back. there are so many colors you can down load, print and cut. I enhanced them with Stickles.
 A nice big package of Petaloo flowers in the add on flower kit went a long way. I still have a ton left.
 I did some button sewing on the frame. It just leaves a nice warm touch to your LO's.
 This Lo is of my sweet Willow. Such a love bug he is. He was laying on my cedar chest in a sun spot here. The new Prima printed paper reminded me of my Prima Build a Frame Stamp sets. so I busted them out along with my new Word stamp from Heartfelt creations and created the Prima Look a Like paper. i was so inspired to do this from the moment I saw the new Prima line. I Glimmer Misted the Cream card stock from the add on Card stock kit with the kits Sunkissed Peach Glimmer Mist. What a great color! I used a Crafters Workshop stencil (from a past kit) for some design. I really enjoyed creating the paper, and will be making more.
 I punch the scallops from a scrap of paper used in another LO, weaved some of my hand dyed Vintage Seam Binding through it and used a small piece of my Mays Art vine trim with some of the tiny Petaloo flowers. I just cut them in half and folded them.
 I inked the DA key, and colored my leaves.
 I created the title using my tutorial for Faux Scrabble Letters.
 I did some flowers using my Tim Holtz Alterations Tattered Flowers die, My personal favorite die. Used the coral card stock from the card stock add on kit, enhanced with Sunkissed Peach Glimmer Mist and inked the edges in soft black.
 I cut a circle into the paper, and hand tore some smaller sections and rolled them back to create the frame. I then took long strips of a different paper, used the same technique and tucked it around the outside of the inner circle. 2 layers seemed to work well.
 close up of the curled edges.
 I used Lumiere paint for the Dusty Attic piece.
 I wove some of my hand dyed Vintage Seam Binding in a torn corner of the LO. I dyed it with the Sunkissed Peach Glimmer Mist.
 My flower cluster is made with kit and add on flower kit flowers.
 Close up of butterfly. I don't think the Glossy Accents on his body was dry yet...
 I really love the combo of blue and brown. The blue card stock is such a beautiful blue. I really enjoyed the color combo in this great kit!!
 More hand made flowers using the Tim Holtz Tattered Flowers die
 I hand dyed the vintage Seam Binding Ribbon with Glimmer Mist. I tied the ribbons onto the matted photo's of myself. The small leaves were punched with my fave Martha Stewart leaf punch. They work well with the smaller flowers.
 I love the way the seam binding shimmers. it has a great weave and texture.
 The Dusty Attic piece was left in the raw with only a small amount of inking.
 And last is the Recipe Box I create using the kit and add on flower kit. I found these great $1.00 recipe boxes at Michaels. I bought 4 of them and plan on altering all 4. This one is for my daughter. The only thing I will add are Timmy feet! I need to get to Hobby Lobby this week and pick up a couple of packs. The recipe box was inspired by one that my Scrapping friend Tammy did ..Go check out her gorgeous piece here!!
 This is the front.
 I printed out the poem and adhered it to the inside of the box lid.
 The top corner...
 The front closure...
 The top. I dipped the leaves and some flower in my melted Ultra Thick Distressing powder. This was Lisa Valentines Tutorial for Glass flowers, you must try it!! They are beautiful. Whether your own or store bought, they are fun to make.
 This is the box open. I love the ribbon that matches the paper.
 Another top view...
 And yet another.
Sorry for the long post, but I get so many requests to show every bit of my LO's and projects. I hope you enjoyed this ultra long post, cause I need to go to bed now...I'm fried...Nite Nite!!!
 This Lo contains the flowers for my next tutorial. I call them Swirly Hibiscus. They are the same color as the ruffled hibiscus at our second home. I really need to go get cuttings and plant some in the home we are living at. They are double ruffle and gorgeous!! So I tried to duplicate them with paper.
 I cut the Prima bling apart.
 I enhanced the butterfly all over with Rock Candy Stickles and outlined it lightly with Icicle Stickles.
 I bunched one of the flowrs under the paper in the corner. I die cut the letters, Glimmer Misted them and covered with Glossy Accents for dimension.
 My bottom corner flower cluster. I used 3 different colors of Mist on the flowers. I will share that with you when I do the tutorial.
 This LO was fun to do. The flowers were made like my peeled poppies tutorial, but I didnt peel the paper. I used regular Bazzill card stock from the add on card stock kit. The frame is a Digital Element from Scrap Girls that I printed out and painted with Glimmer Mist. I traced the Dusty Attic piece with on the green cardstock from the add on Card Stock kit and inked it lightly for dimension. .
 Close up of flowers.

 I used my favorite Heartfelt Creations leaf stamp and painted with Glimmer mist as well
 We got the Prima mask in a past kit, so I used it along with Glimmer Mist to enhance the Kraft Paper in the card stock add on kit. I was not a fan of Kraft Paper but learned to love it by using Mists. stamps and stencils. Love the big Skeleton Leave in the kit. there were 2. This LO was my take on the sketch.
 Folded back a corner and placed the inked, punched corner piece and tucked a couple of flowers in there.
 I used the swirly vines that I provided Swirlydoos with a while back. there are so many colors you can down load, print and cut. I enhanced them with Stickles.
 A nice big package of Petaloo flowers in the add on flower kit went a long way. I still have a ton left.
 I did some button sewing on the frame. It just leaves a nice warm touch to your LO's.
 This Lo is of my sweet Willow. Such a love bug he is. He was laying on my cedar chest in a sun spot here. The new Prima printed paper reminded me of my Prima Build a Frame Stamp sets. so I busted them out along with my new Word stamp from Heartfelt creations and created the Prima Look a Like paper. i was so inspired to do this from the moment I saw the new Prima line. I Glimmer Misted the Cream card stock from the add on Card stock kit with the kits Sunkissed Peach Glimmer Mist. What a great color! I used a Crafters Workshop stencil (from a past kit) for some design. I really enjoyed creating the paper, and will be making more.
 I punch the scallops from a scrap of paper used in another LO, weaved some of my hand dyed Vintage Seam Binding through it and used a small piece of my Mays Art vine trim with some of the tiny Petaloo flowers. I just cut them in half and folded them.
 I inked the DA key, and colored my leaves.
 I created the title using my tutorial for Faux Scrabble Letters.
  I did some flowers using my Tim Holtz Alterations Tattered Flowers die, My personal favorite die. Used the coral card stock from the card stock add on kit, enhanced with Sunkissed Peach Glimmer Mist and inked the edges in soft black.
 I cut a circle into the paper, and hand tore some smaller sections and rolled them back to create the frame. I then took long strips of a different paper, used the same technique and tucked it around the outside of the inner circle. 2 layers seemed to work well.
 close up of the curled edges.
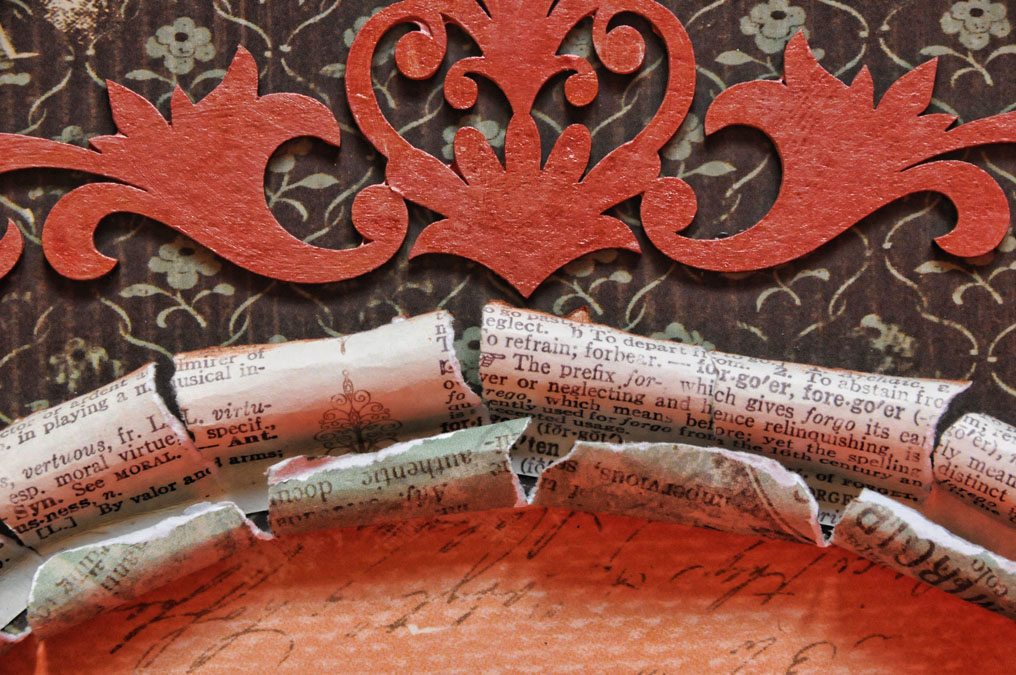 I used Lumiere paint for the Dusty Attic piece.
 I wove some of my hand dyed Vintage Seam Binding in a torn corner of the LO. I dyed it with the Sunkissed Peach Glimmer Mist.
 My flower cluster is made with kit and add on flower kit flowers.
 Close up of butterfly. I don't think the Glossy Accents on his body was dry yet...
 I really love the combo of blue and brown. The blue card stock is such a beautiful blue. I really enjoyed the color combo in this great kit!!
 More hand made flowers using the Tim Holtz Tattered Flowers die
 I hand dyed the vintage Seam Binding Ribbon with Glimmer Mist. I tied the ribbons onto the matted photo's of myself. The small leaves were punched with my fave Martha Stewart leaf punch. They work well with the smaller flowers.
 I love the way the seam binding shimmers. it has a great weave and texture.
 The Dusty Attic piece was left in the raw with only a small amount of inking.
 And last is the Recipe Box I create using the kit and add on flower kit. I found these great $1.00 recipe boxes at Michaels. I bought 4 of them and plan on altering all 4. This one is for my daughter. The only thing I will add are Timmy feet! I need to get to Hobby Lobby this week and pick up a couple of packs. The recipe box was inspired by one that my Scrapping friend Tammy did ..Go check out her gorgeous piece here!!
 This is the front.
 I printed out the poem and adhered it to the inside of the box lid.
 The top corner...
 The front closure...
 The top. I dipped the leaves and some flower in my melted Ultra Thick Distressing powder. This was Lisa Valentines Tutorial for Glass flowers, you must try it!! They are beautiful. Whether your own or store bought, they are fun to make.
 This is the box open. I love the ribbon that matches the paper.
 Another top view...
 And yet another.
Sorry for the long post, but I get so many requests to show every bit of my LO's and projects. I hope you enjoyed this ultra long post, cause I need to go to bed now...I'm fried...Nite Nite!!!
Subscribe to:
Posts (Atom)